concerningHow to use the portable Colorimeter and how to operate the ColorimeterIntroduction, this article is mainly usedNS800 The Spectrophotometer is used as an example to illustrate.
1. Introduction to the use of portable Colorimeter
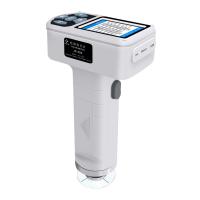
(1) Introduction to relevant interfaces

API introduction:
Power switch: push the switch to "1" to turn on the power supply and start the instrument; Push the switch to "0" to cut off the power and turn it offInstrument.
DC power interface: used to connect to an external power supply. The specification of the external power adapter is 5V== 2A.
USB/RS-232 interface: This interface is a common interface, and the instrument automatically determines the connection. The USB port is used to connect with the PCletterRS-232 The interface is used to connect the printer.
(2) Battery use and installation methods
Instructions for battery use:
1) The lithium battery specification is Li-ion 3.7V == 0.5A, and the capacity is 3200mAh;
2) Please use the original lithium battery, do not use other batteries, otherwise the instrument may be damaged;
3) If the instrument is not used for a long time, the lithium battery must be removed from the Colorimeter;
4) When charging the battery, the instrument needs to be connected to an external power supply or USB port to the PC side, and push the switch to "1"
When the power is turned on, the lithium battery will be charged. If you do not charge the lithium battery, take out the lithium battery and connect it to an external power supply, this instrument can still be
Normal operation;
5) When charging the battery, there is a dynamic battery icon in the upper right corner of the measurement page for charging prompts.
(3) Battery installation method
1) Check whether the power switch is cut off (switch to the "0" position), and then remove the battery cover;
2) Put the lithium battery into the battery compartment and gently push it in, paying attention to the front and back of the battery and the direction of the contacts;
3) Buckle the battery cover as shown in Figure 2.

(3) Precautions for the use of Colorimeter
● This instrument is a precision measuring instrument, and drastic changes in the external environment of the instrument should be avoided during measurement, such as during measurement
Flickering of ambient light, rapid changes in temperature, etc. should be avoided.
● When measuring, keep the instrument stable, the measuring port should be close to the measured object, and avoid shaking and shifting; This instrument is not guarded
Water, not to be used in high humidity environments or water mist.
● Keep the instrument clean and tidy, and avoid water, dust and other liquids, powders or solid foreign objects from entering the measurement caliber and inside the instrument.
Collision and collision with the instrument should be avoided.
● After the instrument is used, the color Tester and calibration cylinder should be put into the instrument box and stored properly.
● If the instrument is not used for a long time, the battery should be removed.
● The instrument should be stored in a dry and cool environment.
● The user shall not make any unauthorized changes to this instrument. Any unauthorized changes may affect the Colorimeter
Accurate, even irreversible damage to the instrument.
2. Colorimeter operation tutorial
(1) Power on
1. Prepare before starting
Check if there is battery power or external power supply.
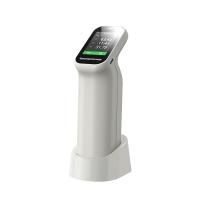
2. Power on
Push the power switch to the "1" position, turn on the power, the display will light up and display the logo interface, wait a few seconds,The instrument will automatically enter the standard measurement step, which will be displayed by default L*a*b*C*h*Measurement interface, as shown in Fig 3 Shown:

3. Black and white correction
Click on the "Main Menu" area on the display to enter the main menu, as shown in Figure 4:

Select "Black & White Correction" in the main menu to enter the black and white correction interface, as shown in Figure 5.

Click "Whiteboard Correction", and the display interface will remind you to place the whiteboard and align the instrument measuring port with the whiteboard in the whiteboard boxKeep the whiteboard aligned with the measuring aperture, click "Confirm" or press the "Measure" button to correct the whiteboard; Note that the whiteboard number and the instrument correspond one-to-one.Click "Blackboard Correction", the display interface will remind you to put the black cylinder, align the measuring port of the instrument with the black cylinder, and click "Confirm"Or press the "Measure" key to make a blackboard correction.At this point, the black and white correction is complete.
(2) Measurement
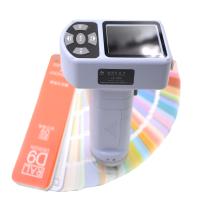
1. Measurement positioning
The instrument can be positioned by visual inspection of the cross at the measuring port, and by observing the alignment of the cross with the position of the sample to be measureddegree, while moving the measuring aperture to adjust the position, alignment can be realized.
2. Standard sample measurement
The standard measurement can only be measured when the Colorimeter enters the "Standard Measurement" interface, as shown in Figure 6, at which point the Colorimeter is alignedsample, press the "Measure" button, and the Colorimeter obtains the color data of the standard sample.

3. Specimen measurement
After the standard measurement, click "Specimen Measurement", and the instrument enters the specimen measurement interface, as shown in Figure 7, and the Colorimeter will be measuredAlign the sample and press the "Measure" button, and the Colorimeter obtains the color data of the sample sample.
In the specimen measurement interface, the data L*a*b*C*h* on the left is the measured value of the current specimen, and the data in the row on the right is the sum of the current specimenThe difference in the standard data.

4. Measure and view the reflectance curve

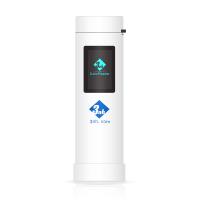
5. Communication with PC
On the main menu of the Colorimeter, click "Start Communication" to enter the interface as shown in Figure 9, and use USB data as prompted in the interfaceWire connection Colorimeter with PC computer, press the "Confirm" button, then enter "Communication", as shown in the figure 10 , at this point, it can be accessed aboveThe computer software controls the measurement of the color meter.

(3) Printing
The Colorimeter is connected to a dedicated micro printer, which can automatically print the number of measurements during "standard measurement" or "specimen measurement".Occupy.