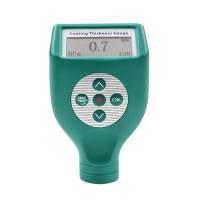
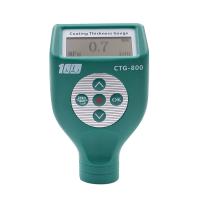
The Defelsko PosiTector 200 Series Ultrasonic Coating Thickness Gauges are designed for coating thickness measurement on non-metallic substrates, including wood, plastic, ceramics, glass, concrete, floor paint, asphalt, etc., with three different probes for different applications. The new defelsko PosiTector console supports touch screen operation for higher protection.
On-Gage Help
This manual outlines the basic functions of a Thickness Gauge. Many menus, items include a gauge help function with additional information (indicated by an icon). Press the Defelsko PosiTector 6000 Coating Thickness Gauge Chinese Version Instructions for Use [2023 New Edition] with picture 4 + key or touch the icon to display help.
Note: Update your meter to make sure you have the new meter help information.
This quick guide lists the basic functions of the meter. Many menu items include a feature, including a help screen with additional information (represented by an icon indicating an icon). Press the + key or indicate an icon icon to display help information.
Note: timely update your meter to ensure you have menu help information for your new meter.
Introduction
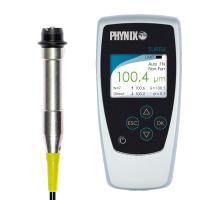
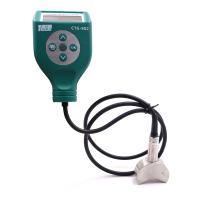
The PosiTector 200 is a handheld coating Thickness Gauge that uses non-destructive ultrasonic principles to measure coating thickness on various substrates. It consists of a body (standard or premium) and a probe
Quick start
Press the button to power up the Thickness Gauge. To save battery life, the gauge will automatically go to sleep after 5 minutes of inactivity. In sleep mode, the gauge powers up significantly faster - handy when moving between parts or positions. After 4 hours of inactivity, the gauge will be completely powered off. Or select Power Off from the main menu. All settings will remain.
Remove the protective rubber cover from the probe.
Press the center navigation button to start the meter.
Zero the probe.
Verify accuracy and make adjustments if necessary.
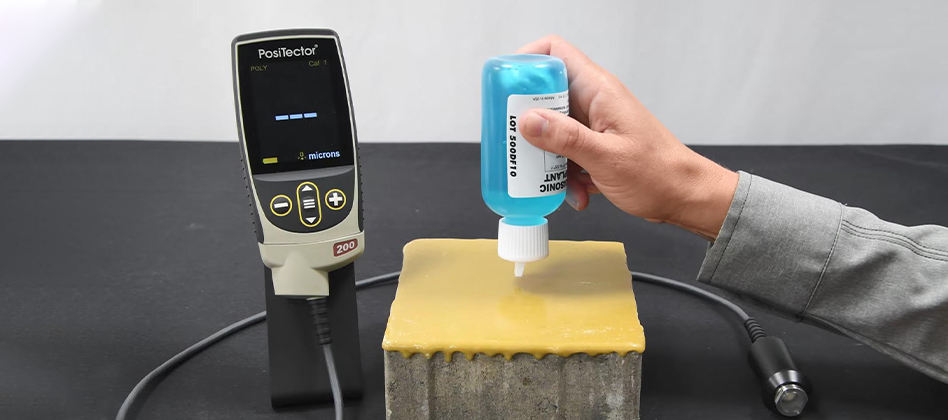
Apply the coupling agent to the surface of the part
Measure parts.
menu operation
To access the menu, launch the Thickness Gauge and press the center navigation button. A keyboard or touchscreen can be used to navigate menu menu icons. Touch screen functionality can be disabled in the settings menu if desired.
By touching the menu options, up or down keys to use and but- to highlight the desired option and press the menu icon to select it.
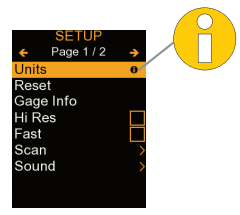
On menus longer than one page, the current page number is displayed below the menu name. Use navigating between pages when selecting the up button first menu item or the down button last menu item. If using touch, use Defelsko PosiTector 6000 Coating Thickness Gauge Chinese Instructions for Use [2023 New Edition] with Figure 14 or Defelsko PosiTector 6000 Coating Thickness Gauge Chinese Edition Instructions for Use [2023 New Edition] with Figure 15 or swipe up or down to navigate between pages.
Press the Defelsko PosiTector 6000 Coating Thickness Gauge Chinese Version Instructions [2023 New Version] with picture 16 button or swipe right to return to the previous screen. Select Exit to close the menu.
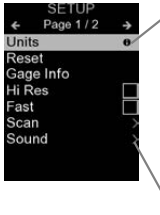 When menu options are highlighted, the icon indicates that help is available on the meter. Press the + key or touch the icon to indicate the icon to display help.
Indicates the existence of submenus for menu options. Select this option to display its submenus.
Probe
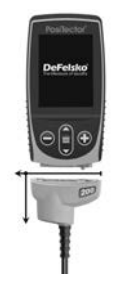
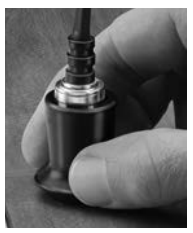
When powered on, the PosiTector automatically determines which probe is connected and performs a self-test. To disconnect the probe from the body, slide the plastic probe connector horizontally (in the direction of the arrow) off the body. Reverse these steps to connect different probes. There is no need to turn off the gauge power when switching probes. The PosiTector 200 probe can be used to measure a variety of coating thickness applications.
B probe - 13~ 1000μm (0.5~ 40mils)
Polymer coatings for wood, plastic, composite materials, etc.
C probe - 50~ 3800μm (2~ 150mils)
Suitable for thicker coatings such as concrete and glass fiber.
D probe - 50~ 7600μm (2~ 300mils)
Suitable for thick, soft (attenuated) coatings such as polyurea.
Note: Range restrictions apply only to polymer coatings.
In addition, PosiTector probes can accept a variety of probe types, including magnetic, eddy current and, ultrasonic coating thickness, surface profile, environmental, hardness, salt contamination, gloss and ultrasonic wall thickness probes.
Coupling agent
A coupler is required to propagate ultrasonic waves into the coating. Water is a good coupler for smooth coatings. Rough coatings are performed using the provided glycol gel. Although it is unlikely that the coupler will damage the finish or leave a stain on the surface, we recommend using a coupler on the sample to test the surface. If the test indicates that staining has occurred, a small amount of water can be used instead of the coupler. If you suspect that the coupler may damage the coating, please consult the safety data table available on our website and on your coating supplier. Other liquids such as liquid soaps can also be used.
PosiTector 200 - Operation Theory
The PosiTector 200 probe emits high-frequency acoustic pulses that enter the coating through the coupling agent and reflect from any surface of different densities. The coating thickness reading is obtained by measuring the time it takes for the ultrasonic signal to propagate from the probe to the coating/substrate interface and back. The travel time is divided by two and multiplied by the speed of sound of the coating to obtain the thickness of the coating.
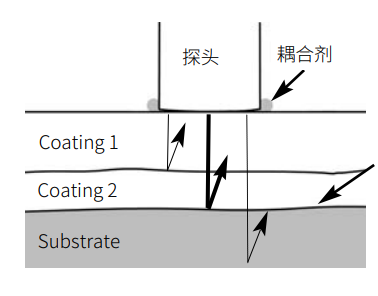
PosiTector 200 interprets the largest "echo" in the selected range as a coating/coating or coating/substrate echo unless the maximum thickness mode is activated.
How test
1. Remove the protective rubber cover from the probe.
2. Press the center navigation button to activate the Defelsko PosiTector 6000 Coating Thickness Gauge menu button gauge.
3. Apply the coupling agent to the surface of the part.
4. Place the probe FLAT on the surface and press down.
5. Raise the probe when you hear a double BEEP sound, or place the probe in the same position on the surface for continuous measurement.
6. When fully complete, wipe the probe on the coupler and place the gauge back in the protective bag. There is no need to disconnect the probe from the locator during storage.
Verify accuracy at the beginning and end of each shift, or check if the meter has dropped to give an incorrect reading.
Calibration, Validation and Adjustment
Three steps to ensure good precision...
Calibration - Usually done by the manufacturer or a qualified laboratory. All probes include a calibration certificate.
Verification of Accuracy - Performed by the user against known reference standards, such as the accompanying plastic gasket, test block or optional coating thickness standard.
Adjust - Adjust to a known thickness if necessary.
calibration
Calibration is a controlled and recorded process that measures a traceable calibration standard and verifies that the results are within the accuracy specified by the gauge. Calibration is usually performed in a controlled environment by the manufacturer of the Thickness Gauge or a certified calibration laboratory using a recording process.
verify
Verification is an accuracy check by the user using a known reference standard. Successful verification requires the Thickness Gauge to read within the combined accuracy of the measurement and reference standard.
adjust
Adjustment or calibration adjustment is the act of matching the thickness reading of a gauge to the thickness reading of a known reference sample to improve the accuracy of a particular coating gauge.
Note: The PosiTector 200 accurately measures most polymer coatings without adjustment.
Cal settings menu
The probe must be periodically zeroed using the Zero menu option to compensate for temperature and probe wear effects. Before use, allow the probe to reach ambient temperature. Wipe the coupler on the probe. If the measurement will be performed at extreme high or low temperatures, zeroing the probe in an operating environment is recommended. If the measurement will be performed on rough surfaces, it is recommended to periodically zero the probe to compensate for wear.
The measurement range of each probe can vary depending on the specific application or the expected thickness range of the coating system.
For most applications, the default range value does not need to be adjusted. But certain conditions, such as surface roughness, may cause the gauge to display very low or non-repeatable readings. In this case, the low range may be increased to cause the gauge to only display readings higher than the user-set Lo value.
The operation to adjust the setting range value is as follows:
Choose low resolution or high resolution.
Use the button to decrease/increase the display value.
Note: PosiTector 200 will ignore any readings outside the selected range. Incorrect or dashed readings may appear if the coating thickness is outside this range.
Here are some typical range settings:

The PosiTector 200 accurately measures most polymer coatings without adjustment. To determine if adjustment is required, select a coating sample of known thickness with the composition as close as possible to the intended application. For good results, the thickness of the sample should be equal to or slightly greater than the maximum expected thickness of the coating to be measured.
Measure the coating sample. If the average of a series of measurements on the sample is not close to the known thickness.
Select the Thickness menu option.
Use the Defelsko PosiTector 6000 Coating Thickness Gauge Chinese Version Instructions [2023 New Version] with Figure 16 or reduce/increase the displayed measured thickness value to match the known thickness of the sample.
For advanced models with multiple layers selected, use the button to select the next layer and adjust as needed.
To save the adjustment, use the button to highlight OK and press the button.
(PosiTector 200 D probe only)
During inspection, the Thickness Gauge is loaded with pre-programmed calibration adjustments, optimized for measurements of polyurea coatings.
When selected, an icon appears and the current calibration adjustment is "locked" to prevent the user from making further adjustments
Restore the Thickness Gauge to factory calibration and range settings.
The icon will appear on the display.
Settings menu
Convert the display from microns to mils and vice versa.
Reset (menu reset) restores factory settings and returns Gage to known conditions.
The following will happen:
- Delete all batches, stored measurements, images, batch names and screenshots.
- All calibration and range adjustments are cleared and returned to Gage's factory settings.
- Menu settings return to the following location:
Perform a more thorough hard reset by powering off the meter, waiting a few seconds, then pressing and holding the and buttons simultaneously until a reset symbol appears. This will return the instrument to the known "out-of-the-box" state. It performs the same function as a menu reset, adding:
- Bluetooth pairing information cleared.
- Menu settings return to the following location:
Note: Date, time and WiFi settings are not affected by any reset.
(Premium version only)
The advanced version of the PosiTector 200 is capable of digitally displaying up to 3 individual layer thicknesses in a multi-layer system.
Select the Layers menu option to:
- Select up to 3 individual film thickness values.
- Edit coating name and batch drawing color.
Note:
Before setting up gauges for multi-layer measurements, it is recommended to first take the measurements in single-layer mode and interpret the results using the graphics options.
When the batch is open, press the button to view the chart.
(Premium version only)
Defelsko PosiTector 200 Coating Thickness Gauge Display
When selected, the gauge displays a graphical representation of the ultrasonic pulse as it passes through the coating system. When the probe is depressed and the ultrasonic pulse passes through the coating system, the pulse encounters density changes between the coating layers and at the interface between the coating and the substrate.
These interfaces are depicted with "peaks". The greater the density change, the higher the peaks. The flatter the density change, the greater the width of the peaks. For example, two coatings and "mixing" made of substantially the same material will result in low and wide peaks. Two materials with very different densities and a clear interface will result in high and narrow peaks. The PosiTector 200 is capable of measuring the thickness associated with the highest or deepest peaks, depending on whether the maximum thickness mode is enabled. The reported peaks will be represented on the graph with small red triangles.
Use the navigation (move left) and (move right) buttons to highlight icons on the graphical display.
Zoom - Visually zoom in to display the waveform of the peak for greater visibility. Repeatedly pressing the Defelsko PosiTector 6000 Coating Thickness Gauge Chinese Version Instructions for Use [2023 New Version] with picture 16 or the button will reduce/increase the zoom.
Threshold (replace "zoom" when maximum thickness mode is enabled) - Press Defelsko PosiTector 6000 Coating Thickness Gauge Chinese Version Instructions [2023 New Version] with picture 16 or button to adjust the threshold using the horizontal cursor. Peak values below the cursor will be ignored.
Setting Range - Press Defelsko PosiTector 6000 Coating Thickness Gauge Chinese Version Instructions [2023 New Version] with picture 16 or button to adjust the Lo or Hi measurement range of the gauge.
Cursor - The cursor allows further analysis of the displayed waveform. Using the Defelsko PosiTector 6000 Coating Thickness Gauge Chinese Version Instructions for Use [2023 New Version] With Figure 16 or the button moves the green ray line to the left or right on the waveform. The thickness value is displayed in the upper right corner of the cursor. This, the function is especially useful in multi-layer applications with more than 3 different layers.
Screenshot - Press the Defelsko PosiTector 200 Coating Thickness Gauge menu button to capture and save the currently displayed image. The last 100 screenshots are stored in memory and can be accessed when connected to a computer.
Shortcut: Press and hold the Defelsko PosiTector 6000 Coating Thickness Gauge Chinese Version Instructions for Use [2023 New Version] with picture 16 or button at the same time to capture any screen.
Defelsko PosiTector 200 Coating Thickness Gauge Menu Buttons
Menu - Press the Defelsko PosiTector 200 Coating Thickness Gauge Menu button to access Gage's main menu.
By default, the PosiTector 200 reports coating thickness results related to the maximum ultrasonic echo (the highest peak in graphic mode) within the set range. This maximum echo usually represents the total coating thickness above the coating-substrate interface. When multiple layers are selected (premium models only), the maximum echo is reported as a single layer thickness.
In some applications, coatings with significant density differences in surface roughness and/or near the surface may result in larger ultrasonic echoes than the coating-substrate interface, resulting in lower-than-expected readings. While the Lo range can be adjusted to ignore these loud, unwanted echoes, this sometimes requires adjusting the range too close to the expected coating thickness for reliable measurements.
When the maximum thickness mode is selected, the PosiTector 200 reports the echo or peak associated with the deepest interface in the coating system, rather than the maximum sound. This usually reports the total coating thickness above the substrate interface more efficiently, and there is no need to adjust the Lo range. Since there will inevitably be some small echoes from inside the substrate, only echoes above the preset loudness threshold will be reported. On advanced models, this threshold can be adjusted from within graphics mode. When multiple layers are selected (advanced models only), the layer thickness associated with the deepest ultrasonic echo is reported.
Note: Maximum Thickness Mode is not recommended for thin metal substrates, or substrates such as composites and fiberglass, with thicknesses less than 2.54 mm (100 mils).
Adjust the volume of the built-in speakers (off, low, medium, high).
Disable auto-rotation by locking the display in the current orientation.
Disable auto-rotation by locking the display in the current orientation.
Allows to disable touchscreen functions. All meter functions can also be controlled using the navigation buttons.
When stored in memory, all measurements come with a date and timestamp (24-hour format). Therefore, it is very important to set the correct date and time. Use the and button, select a value, and use the Defelsko PosiTector 6000 Coating Thickness Gauge Chinese Version Instructions for Use [2023 New Version] With Figure 16 or button to adjust. The current date and time settings can also be viewed at the top of the main menu.
Select the type of battery used in the instrument from "Alkaline", "Lithium" or "NiMH" (rechargeable NiMH). The battery status indicator symbol has been calibrated for the selected battery type. If the battery type used in the instrument does not match the selected battery type, no damage occurs. Memory Management The PosiTector 200 has internal memory storage for recording measurement data. Stored measurements can be viewed on screen or accessed through a computer, tablet and smartphone. Measurements are dated and timestamped. Standard models store up to 1,000 readings in one batch. Premium models can store up to 250,000 readings in 1,000 batches. "New Batch" closes any currently open batches and creates a new batch name with the lowest available number. An icon appears. New batch names are created with a date stamp.
Defelsko PosiTector 200 Coating Thickness Gauge Key Instructions
Screenshot
Press both Defelsko PosiTector 6000 Coating Thickness Gauge Chinese Version Instructions for Use [2023 New Version] with picture 16 and button at the same time to save the currently displayed image. The last 100 screenshots are stored in memory and can be accessed when connected to a computer.
Access stored measurement data
DeFelsko offers the following free solutions for viewing, analyzing and reporting data:
PosiSoft USB Drive - Connect Gage to PC/Mac using the included USB-C cable. View and print readings, and charts using a universal PC/Mac web browser or file browser. No software or internet connection required.
PosiSoft Desktop - Powerful desktop software (PC/Mac) for downloading, viewing, printing and storing measurement data. Includes a customizable templated PDF report generator. No internet connection required.
PosiTector APP- (Premium models only) is an application compatible with iOS and Android smart devices. Allows users to create, save and share professional PDF reports. Add images and notes using the smart device's camera and keyboard.
PosiSoft.net - Compatible with PosiSoft desktop and PosiTector applications, PosiSoft.net a secure way to use the cloud to store and share measurement data.
Connect menu
(Premium version only)
Allows connection to a local wireless network or mobile hotspot. Ideal for using a network's Internet connection to synchronize stored measurements with PosiSoft.net and PosiSoft Desktop.
When the USB drive is enabled, PosiTector uses the USB mass storage device class to provide users with a simple interface to retrieve stored data in a manner similar to USB flash drives and digital cameras. USB drives can also be used to import stored measurements into the PosiSoft desktop software.
Note: When connecting, the power supply passes through the USB-C cable. If the battery is not used, the fuselage will not automatically power off.
(Premium version only)
Stream individual readings to a USB-connected computer via serial protocol. Ideal for use with serial, compatible SPC data collection software.
(Premium version only)
When enabled and connected to a computer, PosiTector will be recognized as a keyboard. The readings are sent to the computer as they are read, simulating keystrokes, and then entering.
The above WiFi and USB menus contain the Sync.net Now option. Once selected, the gauges will immediately synchronize the stored measurement data via their respective communication methods (internet connection required). Alternatively, select Auto Sync.net from the USB connection menu to automatically sync when connected to a PC. Other measurements added to memory when connected are only synced when the USB cable is disconnected and reconnected or when the Sync.netNow option is selected. WiFi-connected gauges will automatically attempt to sync when powered on.
Note: Using USB requires PosiSoft Desktop to synchronize measurements with PosiSoft.net.
(Premium version only)
Allows communication with smart devices running the PosiTector App via Auto Pairing Bluetooth (BLE) wireless technology.
Select batches to mark them to sync to the PosiTector app. Synchronizing batches is useful when connecting a new device to a meter with pre-existing batches, as only batches created when Bluetooth is enabled are automatically selected.
The selected batch will be synchronized when the next read is made in the batch marked as synchronized, or when the Synchronized batch option is selected at the bottom of the Selected Batches list.
Note: If Bluetooth is disabled or disconnected, as selected in the Sync Batch menu, the data in the batch will be saved in the queue until communication with the PosiTector application is re-established.
Transfer selected batches to the PosiTector app. Sending batches is useful when switching between devices, as only readings and batches that have not been synced with any smart devices are automatically synced. When the Thickness Gauge is connected to a smart device running the PosiTector app, the Send Batch option is visible in the menu.
(Premium version only)
Once enabled and connected to a computer, the PosiTector will be recognized as a wireless keyboard. The readings are sent to the computer as they are read, simulating keystrokes, and then entering.
Note: The keyboard is in the Bluetooth settings menu.
(Premium version only)
Allows Bluetooth devices such as barcode scanners and keyboards to be paired with PosiTector to annotate batches and readings.
Note: The input device is in the Bluetooth settings menu.
(Premium version only) Bluetooth icon
Allows a single reading to be sent to a computer, printer or compatible device when shooting with Bluetooth Classic wireless technology.
Determine if a software update is available for your Thickness Gauge.
Note: The instrument will perform a hard reset after the update.