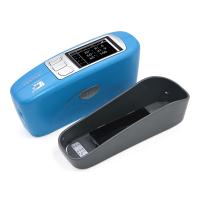
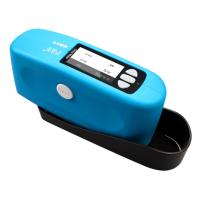
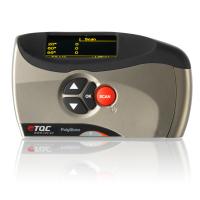
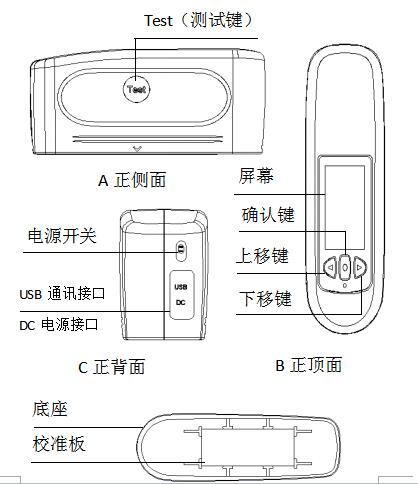
First, the product diagram
II. Overview
Instructions for the use of multi-angle gloss meter
(1) The "gloss meter" mentioned in this manual refers to the mirror gloss meter or mirror gloss meter, also known as "gloss meter" and "gloss meter";
(2) The "standard board" required in this manual refers to the working standard device matched with the gloss meter and used for instrument calibration;
(3) The use of this instrument should avoid strong electromagnetic interference, and should not be used in an environment with humidity greater than 85% and condensation.
Warranty & Technical Support
If your instrument is damaged during the warranty period, please contact your local sales department or contact us for a free repair.
At any time we can provide spare parts to dealers or customers, such as standard plates, etc.
In order to avoid affecting the accuracy of the instrument and increasing the difficulty of maintenance, please do not disassemble the instrument without permission; If the instrument is damaged due to disassembly or incorrect use, the user is responsible for it.
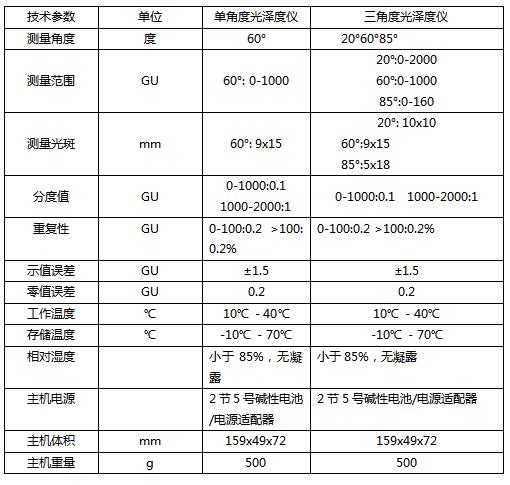
This gloss meter meets the standards
(1)、ISO2813,ISO7668
(2)、ASTM D523,ASTM D2457
(3)、GB/T 9754,GB/T 13891,GB/T 7706,GB/T 8807
The performance indicators of this gloss meter meet the requirements of the first-class working machine in the national JJG 696-2002 measurement and inspection regulations.
This gloss meter is widely used in: paint coatings, decoration materials, building materials, plastic materials, bamboo and wood products, ceramic products, leather products, film paper, printing inks, car maintenance, molding molds, metal products and many other fields of materials and products surface gloss measurement.
Description of the gloss meter function
(1) Multi-angle one-key measurement: one operation can complete three-angle measurement at the same time; Measuring the angle of light to man conforms to the three measurement angles of incidence of light specified in ISO 2813. The three incident angles of the mirror gloss meter are 20°, 60° and 85° respectively;
(2) Optional angle mode: the measurement angle or angle combination can be selected according to the user's needs;
(3) The gloss data of the standard sample can be manually entered;
(4) Humanized design, good human-computer interaction interface;
(5) 50,000 (10,000 for a single angle) test records can be stored at three angles, and the storage structure is: 100 standard samples, and 500 (100 for a single angle) group of test data can be stored under each standard sample;
(6) Data browsing and viewing function;
(7) This machine has the function of automatic shutdown, low battery prompt, and full of storage data space;
(8) USB communication interface, which can communicate with PC;
(9) PC gloss software, which can expand more functions.
Attachment description
(1) Power adapter: standard +5V, 2A external power supply;
(2) Standard board: provide calibration standards for the instrument;
(3) Data cable: the communication cable between the instrument and the PC.
3. Operating instructions
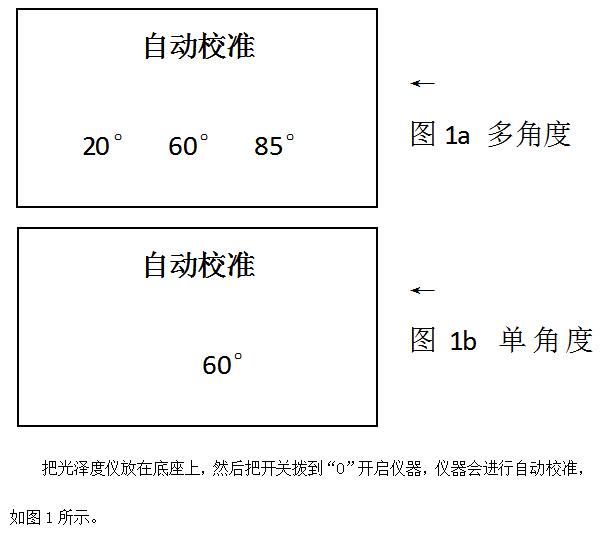
1 Boot and measurement page and mode introduction
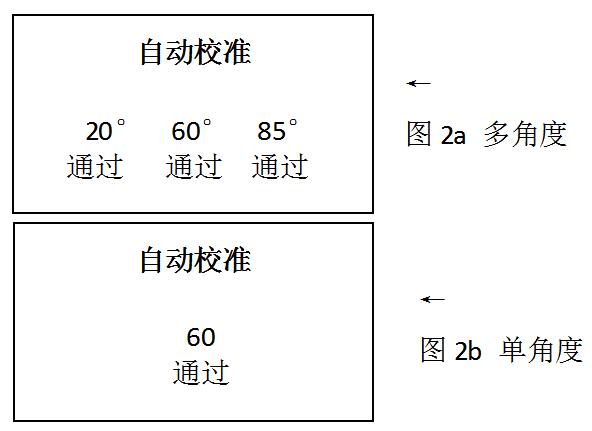
If the page shown in Figure 2 appears when the instrument is automatically calibrated, the calibration is passed.
Fig. 1a, Fig. 2a is the start-up calibration process of multi-angle gloss meter, Fig. 1b, Fig. 2b is the start-up calibration process of single-angle gloss meter, in the follow-up explanation, take multi-angle as an example to describe, the settings of single-angle are consistent with multi-angle, and only 60 degrees of data are displayed on the display data.
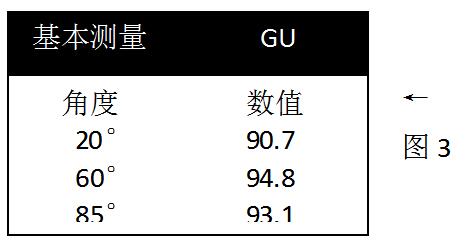
After the calibration is passed, the instrument automatically jumps to the measurement page, as shown in Figure 3. On the Figure 3 page, you can do the following:
(1) Press the "Measure" button to measure;
(2) Press the "Menu" key to enter the "Main Menu" page, as shown in Figure 4.
Illustrate:
1. The measurement mode on the measurement page is the measurement mode when the computer was turned off before. If the gloss meter goes through the "factory reset reset" operation, the instrument will be automatically included in the "Basic Mode" page when the instrument is turned on and the measurement will be started, as shown in Figure 3;
2. As shown in Figure 3, "GU" represents the current measured value as the gloss unit, and if "REF" is displayed at this position, it means that the current value is the reflectance unit (please refer to 3.5 units for unit setting).

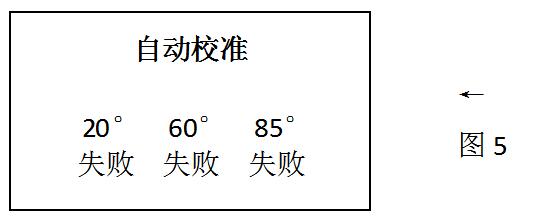
If the page shown in Figure 5 appears, it means that the boot calibration has not passed, you can enter the "Main Menu" for manual calibration (refer to the description in 3.3), when performing manual calibration, please make sure that:
(1) The base calibration plate is clean;
(2) The instrument is correctly placed on the calibration plate.
2 A brief introduction to the "Main Menu" page
(1) When setting in the "Main Menu", press the "Measure" button once to return to the previous menu;
(2) After the cursor moves to "Sampling Record", press the "Confirm" button to be included in the "Sampling Record" page, where users can view the statistical measurement records under a certain standard;
(3) The cursor moves to the "Standard Sample and Tolerance" page, and you can enter the "Standard Sample and Tolerance" page, where the user can select the standard sample and set the tolerance under the standard change;
(4) After moving the cursor to "Settings", press the "Confirm" button to enter the "Settings" page, where users can set the parameters of the system;
(5) After the cursor moves to "Mode Selection", press the "Confirm" key to enter the "Mode Selection" page, where users can select one of the four measurement modes: "Basic Mode", "Sampling Mode", "Statistical Mode" and "Continuous Mode";
(6) After the cursor moves to "Standard Input", press the "Confirm" key to enter the "Standard Input" page, where users can enter the standard value;
(7) After moving the cursor to "Language Selection", press the "Confirm" button to enter the "Language Selection" page, where users can choose to display in Chinese and English;
(8) After moving the cursor to the "System Version Number", press the "Confirm" button to refer to the version number of the instrument.
3 Settings
Under the "Main Menu" page, select "Settings" by pressing the "Up" and "Down" keys, and press the "Confirm" key to enter the "Settings" page, in the "Settings" page, you can perform the following operations: date and time setting, sampling angle setting, calibration, mode setting, unit selection, backlight time setting, automatic shutdown time setting, emptying test data, and factory reset settings. This is shown in Figure 6.
You can select by the "up" and "down" keys, press the "confirm" key to enter the page, and press the "measure" key to return to the previous page.
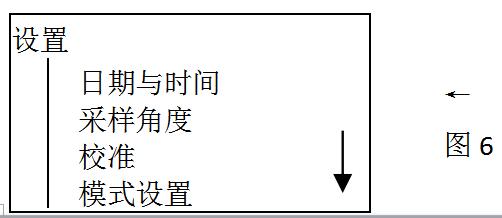
The following are the settings for each function in the "Settings" section.
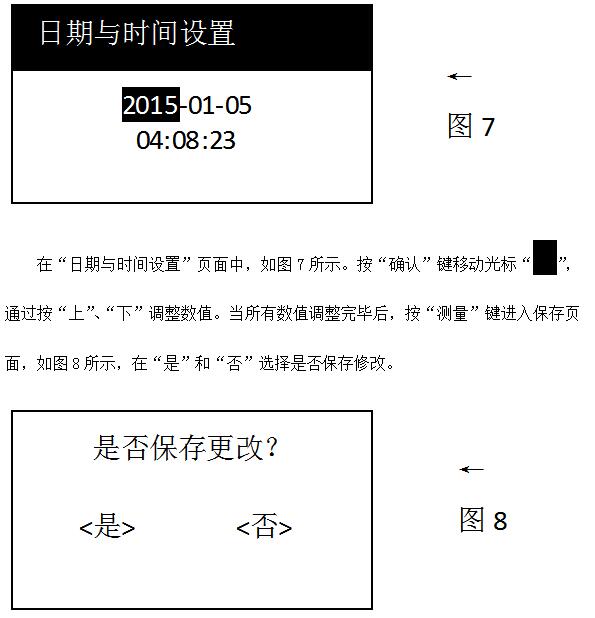
3.1 Date and Time

In the Angle Selection page, 6 angle combinations are available, as shown in Figure 9. Select one of them according to your needs, select by pressing the "Up" and "Down" keys, press the "Confirm" key to determine the selected sampling angle, and after selecting the angle, "*" will appear after it. Press the "Test" button to enter the save page, as shown in Figure 8, and select whether to save the modification in Yes and No.
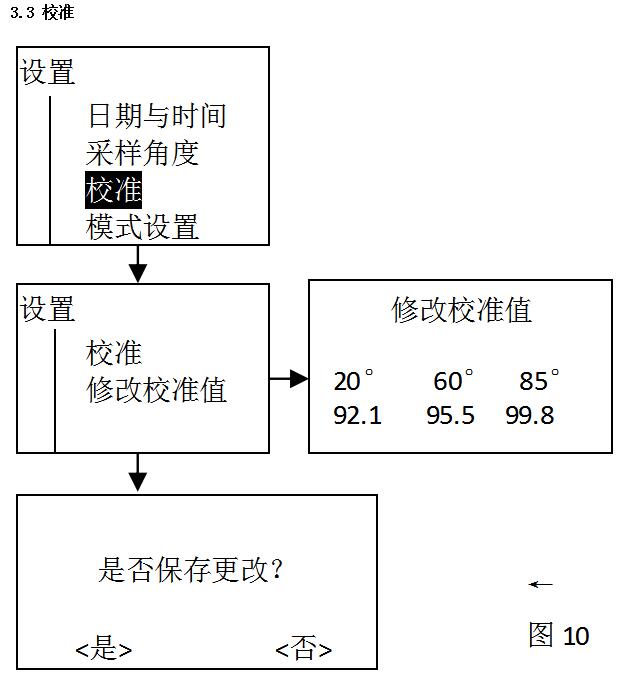
In the calibration page, as shown in Figure 10, press the "Up:"Down" button to select "Standard", press the "Confirm" button to calibrate, and make sure that the "Standard Board" is in a hurry and the value is accurate. If the value of the "Standard Board" is inconsistent with the "Standard Value" in the instrument, select "Modify Standard Value" to modify it, as shown in Figure 10, and refer to "3.1 Date and Time" to set the method of modifying the number and the method of saving the data.
3.4 Mode Settings
As shown in Figure 11, the system operation flow diagram for "Mode Settings".
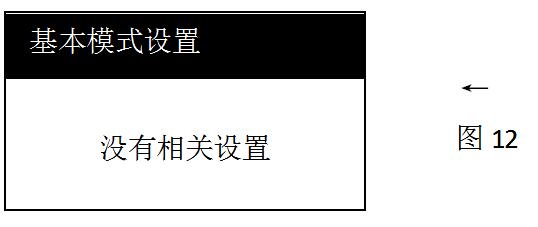
There are no mode settings for the "Basic Mode Settings" and "Sample Mode Settings", and when one of them is selected, the page shown in Figure 12 is displayed.
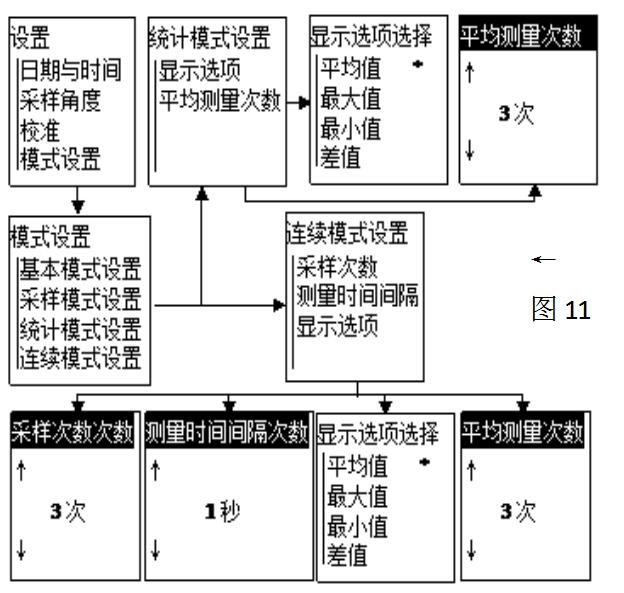
In the "Display Options" page of "Statistical Mode Settings", there are 5 alternatives, namely: average, maximum, minimum, difference, and standard value, select one for each lesson (the final measurement interface of statistical mode will display the value, result, and the selected option in the 5 items), after selection, save and exit.
On the Average Measurement Count page of Statistical Mode Settings, press the Up and Down keys to modify the average number of measurements, and after the modification is complete, press the Test button to enter the save page, and select whether to save the modification in Yes and No.
On the Sampling Count page of Continuous Mode Settings, press the Up and Down keys to modify the number of samples, press the Test button to enter the save page, and select whether to save the modification in Yes and No.
On the Measurement Interval page of Continuous Mode Settings, press the Up and Down keys to modify the time interval as shown in Figure 13, press the Test button to enter the save page, and select whether to save the modification in Yes and No.
Also in the "Display Options" page of "Continuous Mode Settings", there are 5 alternatives, namely: average, maximum, minimum, difference, and standard value, and you can select one at a time (the final measurement interface of continuous mode will display the value, result, and the selected option in 5 items), after selection, save and exit.

On the Unit Selection page, as shown in Figure 14, press the Up and Down keys to select one of the units, press the OK button to confirm the selection, press the Test key to enter the save page, and select whether to save the modification in Yes and No.

On the "Unit Selection" page, as shown in Figure 15, press the "Up" and "Down" keys to adjust the backlight time, ranging from 5 seconds to 60 seconds, press the "Test" button to enter the save page, and select whether to save the modification in "Yes" and "No". At a set time, if any action is taken, the backlight will turn off automatically.
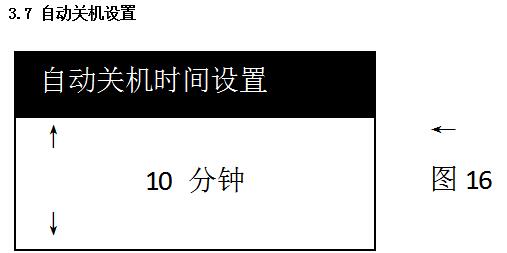
On the "Auto Shutdown Time Setting" page, as shown in Figure 15, press the "Up" and "Down" keys to adjust the backlight time, ranging from 1 minute to 60 minutes, press the "Test" button to enter the save page, and select whether to save the modification in "Yes" and "No". At a set time, it will automatically shut down if any action is taken.
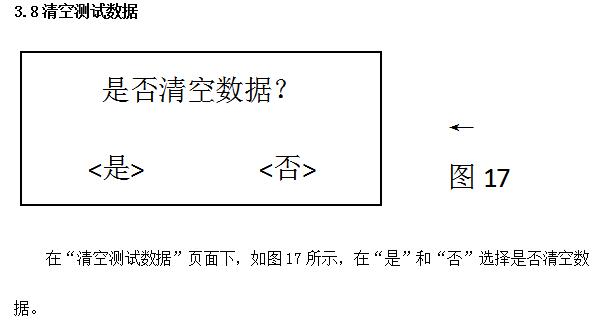
On the Clear Test Data page, as shown in Figure 17, select Yes and No to clear the data.
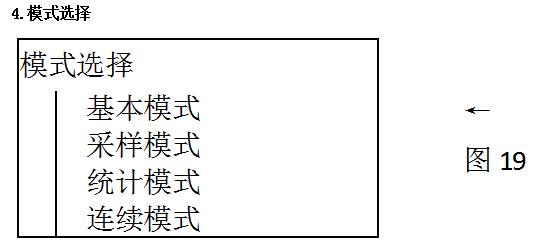
There are four measurement modes under the "Mode Selection" page: "Basic Mode", "Sampling Mode", "Statistical Mode", and "Continuous Mode". The following are the functions of each mode.
"Basic Mode": a simple and practical measurement mode without saving and statistical functions;
Sampling Mode: The measurement mode in which the standard sample is taken. Before measuring in "Statistical Mode" and "Continuous Mode", you need to enter the "Sampling Mode" for sampling. Then, after the standard sample and tolerance are determined, the "statistical mode" and "continuous mode" measurements can be made;
Statistical Mode: In this mode, you need to select standards and set tolerances before measuring. It has the function of statistics and saving measurement data. When measuring, the measured value of the measured item and the statistical value of the difference, maximum value, range, etc. of the measured value are displayed;
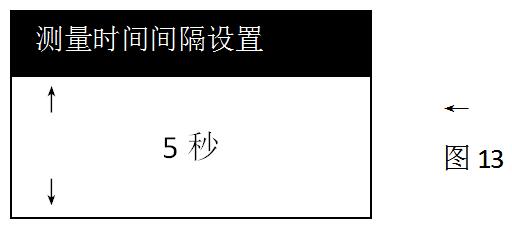
"Continuous Mode": In this mode, you need to select standards and set tolerances before measuring. The difference between it and the Statistical Mode is that the measurements cannot be saved. The number of measurements can be set to automatically repeat the measurement of the measured product. It is also possible to set the time interval for measurement, which is measured in seconds(s). The default time interval of the machine is 5s, as shown in Figure 13.
5 Basic Mode Measurement Page
In the "Main Menu", press the "Up" and "Down" keys to select "Mode Selection", and press the "Confirm" key to enter the "Mode Selection" page; Then press the "Up" and "Down" keys to select the basic mode, press the "Confirm" button to select the "Basic Mode", press the "Test" button to enter the save page, and select whether to save the modifications in the "Yes" and "No" fields. Return the cursor to the "Main Menu" and press the "Test" button to enter the test page in basic mode.

The basic measurement mode is the commonly used measurement mode, and it is also the default measurement mode after the machine is restored to factory settings; This measurement mode does not require any parameter setting and the measurement data cannot be saved, as shown in Figure 20.
6 Sampling mode measurement interface
6.1 Operation process of sampling and measurement
In the "Main Menu", press the "Up" and "Down" keys to select "Mode Selection", and press the "Confirm" key to enter the "Mode Selection" page; Then press the "Up" and "Down" keys to select "Sampling Mode", press the "Confirm" button to select "Sampling Mode", and press the "Test" button to enter the save page. When the cursor returns to the "Main Menu", press the "Test" key to enter the test page in sampling mode, as shown in Figure 21, in the "Sampling Mode" page, press the "Test" key to sample the standard sample, sample once, and the serial number "T001" will automatically increase by 1.
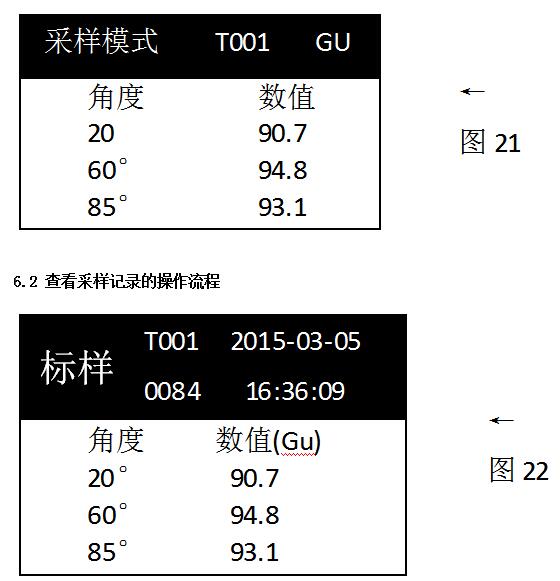
On the Main Menu page, press the Up and Down keys to select Sample Records, and press the OK key to enter the Sample Records page, as shown in Figure 22.
Illustrate:
"T001": standard serial number;
"0084": there are 84 sets of test data under the standard sample "T001";
"2015-03-05 16:36:09": the date and time of the collection of the standard.
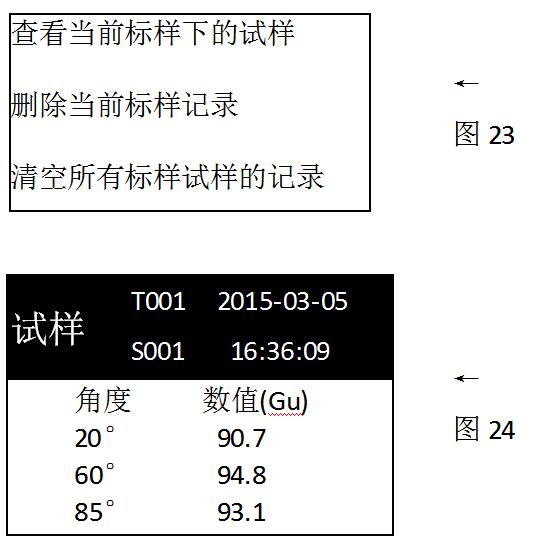
On the "Sampling Record" page (Figure 22), press the "Confirm" button to enter the function selection page, as shown in Figure 23.
Illustrate:
"View the sample under the current standard": the cursor is in this item, and press the "Confirm" button to view the standard record page as the current standard (T001), as shown in Figure 24;
"Delete Current Standard Record": If you press the "Confirm" button, the data of the current standard (T001) and its specimens (84 groups of specimens) will be deleted;
Clear the record of all standard specimens: Deletes all standard and specimen data stored in the machine.
7 Statistical Mode Measurement Interface
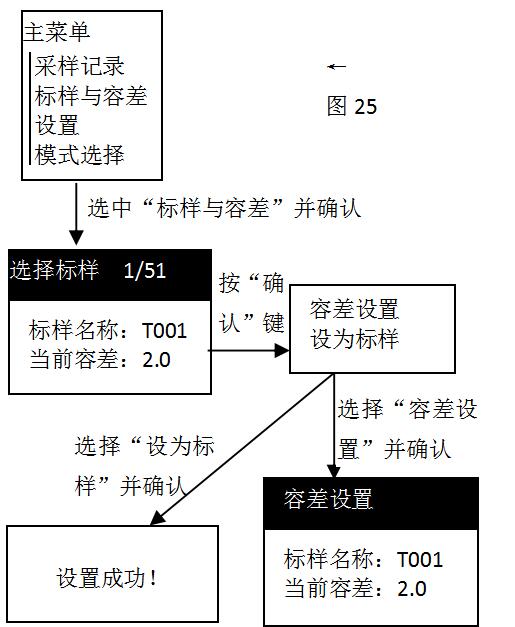
On the "Standard Selection" page in Figure 25, press the "Up" and "Down" keys to select the standard sample and confirm itPass the "Up" and "Down" keys to select and confirm to enter the tolerance setting.
On the "Tolerance Settings" page in Figure 25, press the "Up" and "Down" keys to adjust the tolerance value, press the "Test" key to enter the save page, and select whether to save the modification in "Yes" and "No". And press the "Test" key to return to the main menu layer by layer.
Before the statistical mode and continuous mode measurement, please select the standard sample and set the tolerance, and set the relevant parameters according to the specific situation. This is shown in Figure 25.
Illustrate:
Select Standard: Select the standard to be the standard for subsequent "Statistical Mode" measurements and "Continuous Mode" measurements;
Set Tolerance: Sets the tolerance for the restandard.
In the operation of selecting standards and setting tolerances, you can set the tolerances of each standard first, and then select the required standards. You can also select the standard and then set the tolerance for the standard.
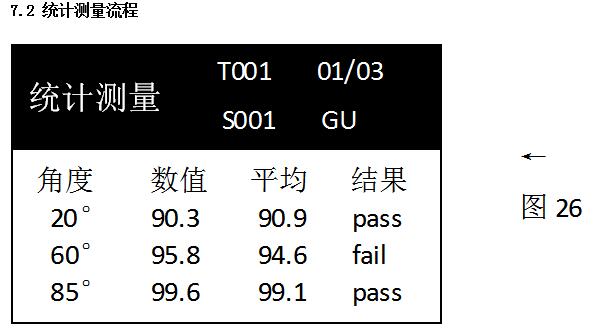
The page measured by the Statistical Mode is shown in Figure 26. Please select the standard and set the tolerance of the standard before measuring, please refer to "7.1 Select Standard and Set Tolerance", then select "Statistical Mode" in "Mode Selection", press "Confirm" to select "Statistical Mode", press "Test" key to save and return to the main menu, then press "Test" key to enter the "Statistical Mode" measurement page, and press "Test" key to measure.
Illustrate:
"T001" is the name of the standard sample, and "S001" is the name of the sample;
In "01/03", "03" is the average number of measurements, and "01" is the current number of measurements;
If it passes, it will be displayed as "pass", and if it does not pass, it will be displayed as "fail";
After the measurement is completed, you can view the current measurement result in the "Sampling Record", please refer to "6.2 Operation Process for Viewing Sampling Records".
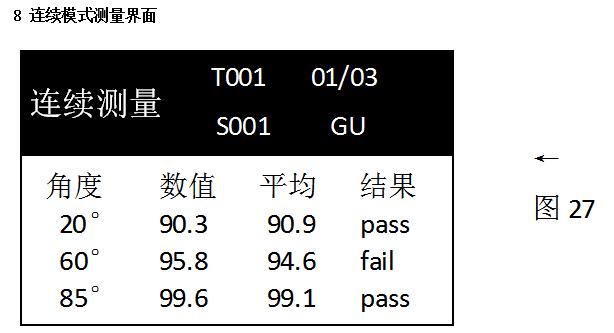
The page for the "Continuous Mode" measurement is shown in Figure 27. Before measuring, please select the standard sample and set the tolerance of the standard, please refer to the operation of "7.1 Selecting the Standard and Setting the Tolerance", then select the "Continuous Mode" in the "Mode Selection", press the "Confirm" button to select the "Continuous Mode", press the "Test" key to save and return to the main menu, and then press the "Test" button to enter the "Statistical Mode" measurement page, and press the "Test" button The instrument will automatically measure.
Illustrate:
"T001" is the name of the standard sample, and "S001" is the name of the sample;
In "01/03", "03" is the number of consecutive measurements, and "01" is the current number of measurements;
If it passes, it will be displayed as "pass", and if it does not pass, it will be displayed as "fail";
After the measurement is completed, you can view the current measurement result in the "Sampling Record", please refer to "6.2 Operation Process for Viewing Sampling Records".
9 version number
In the "Main Menu", select the "System Version Number" by pressing the "Up" and "Down" keys to view the version of the instrument.
4. Handling of common problems