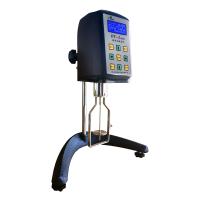
Instrument installation
After the instrument is powered on, it will display the words of the original manufacturer 'Sheen', then 'Ref.455N', and finally the software version number, such as 'Ver.20'.
The measuring range of the instrument is also shown on the display, this range can be changed, if necessary, by pressing and holding both buttons simultaneously.
Available switching ranges are:
0 - 15 Poise.
0 - 65 Poise.
0 - 340 Poise.
Notice
The measuring range of the instrument can only be changed and effectively used after calibration and using the corresponding rotor.
To remove the rotor for cleaning, press and hold the rotor and push it up and turn it clockwise 90 degrees to remove it.
Instrument Calibration
The instrument has been calibrated before leaving the factory. If recalibration is required, it must be done according to the procedures in the in-house laboratory.
warn
Changing the calibration value will affect the operation of the instrument. Do not enter the calibration state when calibration is not required, as a calibration error will cause the result to be displayed as zero or inaccurate.
Four-point calibration is required for the calibration of this viscometer. These points are around 0, 12, 50 and 100% of the scale.
To enter calibration mode, a calibration key (not supplied) can be inserted into the print port on the rear of the instrument.
The four-point values for calibration of each range are approximately:-
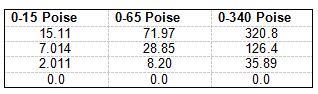
Due to the difference in the batch year of the viscosity oil used for calibration, the value displayed on the instrument may be different.
At the beginning of the calibration, make sure that the value of the viscosity oil needs to match the point displayed on the instrument.
If the value of viscosity oil deviates from the displayed value, press the left and right buttons to adjust the displayed value.
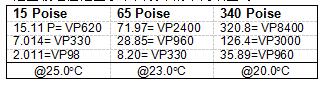
These calibration values are based on common oil types in the table below:
calibration technique
This work is carried out under strict temperature control. Calibration accuracy depends on the temperature of the calibration oil.
Each time at least 250mL of viscosity oil is required to complete the calibration.
1. Carefully pour sufficient viscosity oil into each jar, according to BS1262:1989, use 250ml clean jars. The liquid level is about 15mm from the tank mouth. Label each jar and lid the size of the oil it contains.
The oil is to be stored at calibrated temperature for at least three hours, or the jar is placed in a Water Bath.
2. Turn off the power and insert the calibration key into the back of the instrument, the instrument will enter the calibration mode.
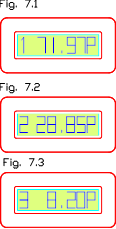
3. The first calibration point is displayed on the screen (see Fig.7.1). The number on the left represents the number of the oil (1=first bottle, 2=second bottle etc.).
4. If the value does not match the oil used, use the two buttons on the panel to adjust the value.
Note: The value of the viscosity oil used needs to be close to the value stored in the instrument. If the viscosity of the selected oil deviates too much from the stored value, the linearity of the result may be affected.
5. Open the first bottle of viscosity oil and place it on the sample holder of the instrument.
 6. Check the oil temperature with a calibrated thermometer or temperature probe, and make sure that the temperature is uniform without causing air bubbles inside the calibrated oil. Extra care in this step will help the accuracy of the overall calibration. It is recommended to control the value of viscosity oil at 23°C ± 0.1. Remove the temperature probe
7. Press down the head of the instrument, and the motor will rotate for about 25 seconds. When the rotor stops turning, the first point calibration is complete.
8. Effectively clean the temperature probe and rotor.
9. The instrument will wait before continuing to work, the handle will now be raised.
10. The instrument displays the next value, repeat steps 3-9 with the second tank of oil, then the third tank (see Fig. 7.2).
11. The last calibration is 0.0P. To do this, just remove the canister of viscous oil and lower the machine head so that the rotor is idling. Do not allow the rotor to touch anything while spinning.
12. The instrument displays “Remove key” and pull out the calibration key. After unplugging the calibration key, the instrument is in normal working mode.
13. Measure the viscosity oil to check the calibration accuracy, the error should be within ±2% of full scale.
14. The instrument is now ready for normal use.
sample measurement
1. Turn on the instrument and check whether the display range of the instrument is normal. If the range display is incorrect, it can be adjusted according to the previous method.
2. Pour the sample into the 250mL tank specified in BS1262:1989, the liquid level is 15mm away from the tank mouth.
3. Put the sample jar into the magnetic card slot under the instrument.
4. Insert a calibrated thermometer or temperature probe to check the sample temperature. Gently agitate to ensure uniform sample temperature, but do not create air bubbles.
5. After reaching the required temperature, remove the temperature probe
6. Press the machine head to the lowest position. The motor will accelerate to its final speed.
This is beneficial for the life of the motor and reduces vibrations to the sample.
7. At this time, the viscosity value will be displayed. The rotor will keep turning as long as it is in the sample.
8. After the handle is lifted up, the motor will stop rotating, but the value will still be displayed within 10 seconds. The values during this 30 seconds can be recorded with the 'store' button. A total of 9 data can be recorded, and the recorded data needs to be poured out through the printer.
Routine maintenance (every 6 months)
1. Lightly lubricate the rotor slot with oil.
2. Check the operating handle tension.
3. Apply a little grease to the support column of the machine head for lubrication.
4. Clean the paint dirt on the instrument.
Clean the rotor immediately after use.
Do not allow dirt such as paint to enter the rotor slots.
Do not allow paint to contact support post on rear of instrument.
Keep the panel buttons and screen away from the display.
working environment
Indoor use, working temperature 15°C to 35°C
Alert message "TOO HIGH - CHECK SAMPLE VALUE"
If the viscosity of the sample exceeds the range of the instrument, the instrument will stop working to prevent damage to the motor.