At present, conductivity meters are widely used in the detection of electrolyte solutions. It has the advantages of wide detection range, fast and convenient, assuming that it is equipped with an automatic balance Recorder, it can also track and record the conductance detection in real time.
Measuring principle
According to its principle of action, the conductivity meter is mainly divided into two categories: balanced bridge type and partial voltage direct reading type.
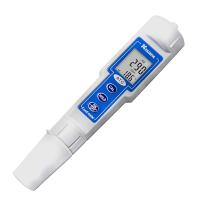
(1) Balanced bridge conductivity meter. This is a simple instrument for measuring conductivity, such as Leici 27 and D5906 conductivity meters, which belong to this category. Its working principle is shown in Figure 3-6.
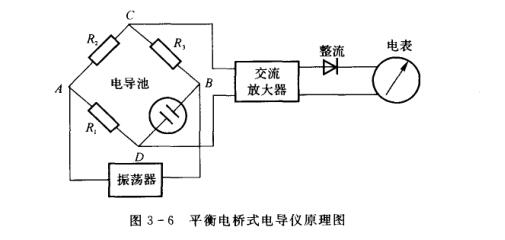
The Wheatstone bridge is composed of standard resistors R1, R2, R3 and the conductivity cell. The current generated by the oscillator passes through the bridge from both ends of A and B. After being amplified by the AC amplifier, it is rectified to convert the AC signal into a DC signal. Push the meter. When the bridge is balanced, the zero indicator (ammeter) points to zero, and the potentials at both ends of C and D are equal. At this time, there is
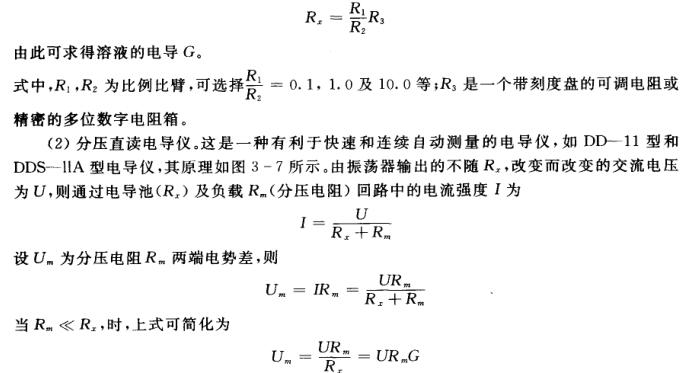
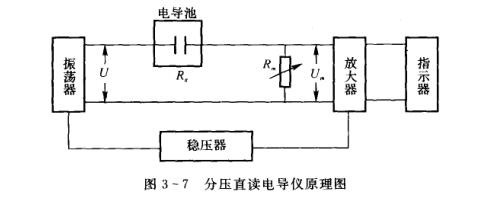
When Ra and U are constant, Um has a linear relationship with G, so the measured partial pressure Um can be used to obtain the conductance of the solution to be tested. Usually, the scale of the meter head directly gives the conductance value (or resistance value) corresponding to the change of Um ).
Instrument structure
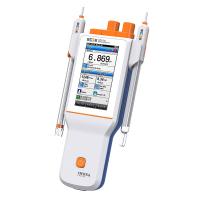
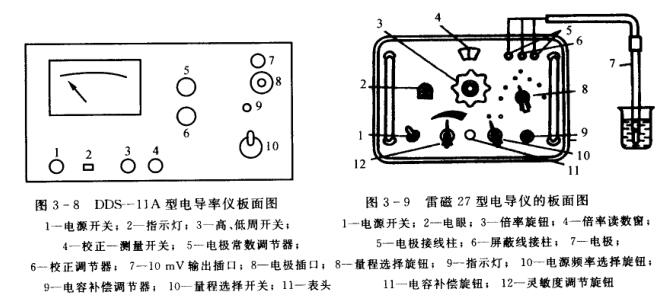
Conductivity meter is mainly composed of conductivity cell, measuring power supply, measuring circuit and indicator. High-precision conductivity meter also has temperature and capacitance compensation circuit. Figure 3-8 and Figure 3-9 are DDS-11A conductivity meter and The outline drawing of Leici 27 conductivity meter.
Instructions
1. How to use the DDS-11A conductivity meter
(1) Set the zero point of meter head 11 (if you don't point to zero, you can adjust the screw on the meter head).
(2) Turn the "calibration-measurement" switch 4 to the "calibration" position, turn on the power switch 1, turn on the power (the indicator light is on), and preheat for 10 minutes, then adjust the "calibration regulator" 6 to make the hands indicate the full scale .
(3) Turn the "high-low cycle" switch 3 to the required position. When the conductivity of the liquid to be tested is less than 30µS·cm-', turn the switch to "low cycle" (1~8 range), when the conductivity When it is greater than 300µS·cm-', switch to "high cycle" (9~12 range).
(4) Turn the "range selection" switch 10 to the required measurement range. If the conductivity (rate) range of the liquid to be tested is not known in advance, it should be gradually lowered from the maximum gear (12 range) to the appropriate range. In case of bending the meter pointer.
(5) Select the appropriate electrode (DJS-1 bright electrode for the 1~5 range, DJS-1 platinum black electrode for the 6~11 range, and DJS-10 platinum black electrode for the 12 range).
Insert the electrode head into the electrode socket 8, tighten the fixing screw, rinse the electrode with a small amount of liquid to be tested for 2~3 times, and insert the electrode into the liquid to be tested. Use the cell constant regulator 5 to adjust the index value to be consistent with the conductivity cell constant value of the electrode used.
(6) Adjust the "calibration regulator" 6 again, so that the pointer of the ammeter is at the full scale, and then turn the "calibration-measurement" switch to the "measurement" position to perform measurement. At this time, the value indicated by the pointer of the ammeter is multiplied by the "range selection" The magnification selected by the "switch is the conductivity (rate) of the liquid to be tested.
2. How to use Leici 27 Conductivity Meter
(1) The electrode should be rinsed with double distilled water 2 to 3 times during use to ensure that its surface is clean and the platinum black is good, and the electrode plug should be wiped clean with cotton dipped in absolute alcohol.
(2) Turn the power frequency selection knob 10 to the selected position (there are two high-low gears of 1000Hz and 50Hz, and 1000Hz is suitable for the solution to be tested with large conductivity).
(3) Connect the lead wire of the electrode to the terminal 5 of the electrode, and connect the metal shielding wire of the electrode to the terminal 6 in the middle. Soak the electrode in the solution to be tested and fix it (the beaker used should be washed 2 to 3 times with double distilled water and then dried, or washed 2 to 3 times with the solution to be tested before use).
(4) Turn on the power, turn on the power switch 1, and the indicator light will be on. Later, after the electric eye emits green fluorescence, it can be used.
(5) Turn the sensitivity adjustment knob 12 until the fluorescence of the electric eye 2 decreases slightly, turn the range selection knob 8 until the fluorescence closes to a smaller value, and then adjust the magnification knob 3 to make the fluorescence close to the minimum 0.
(6) Increase the sensitivity appropriately, and then turn the magnification knob 3 until the fluorescent bright line of the electric eye 2 closes to the minimum. Write down the readings, the black scale is for measuring resistance, and the red scale is for measuring conductance. Multiply the range reading by the magnification reading to get the conductance or resistance value of the solution to be tested.
(7) After the measurement, turn off the power, take out the electrode, wash it with distilled water and put it away, and cover the instrument.
The capacitance compensator knob is a variable capacitance connected in parallel with the internal standard resistance R3 of the instrument, which is used to compensate the capacitance of the conductivity cell and the electrode wire. When the conductance of the solution to be tested is low at 5-0.05µS, if the fluorescent edge of the electric eye is too blurred, you can turn this knob 11 to improve it.
The above is the author's introduction to the structure, working principle and operation application of the conductivity meter, hoping to provide some references for the work in related industries.