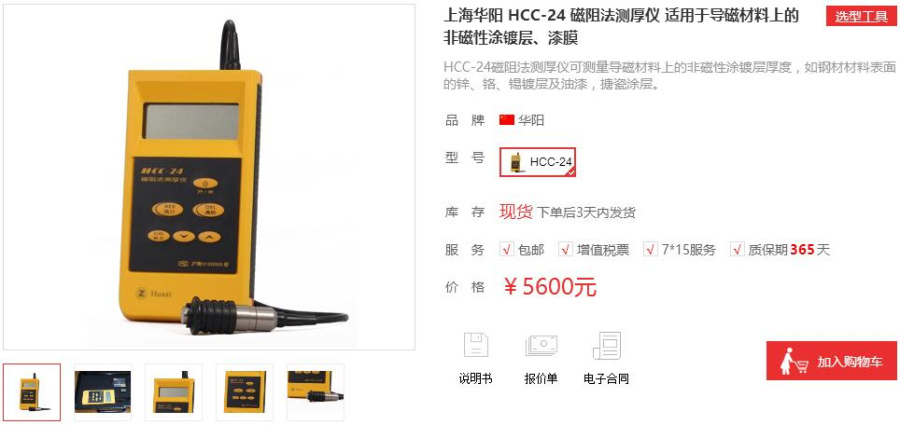
Click to view price and details
1 Overview
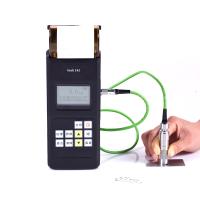
Huayang HCC-24 Magnetoresistive Thickness Gauge is a battery-powered portable measuring instrument, which can quickly and non-destructively measure the thickness of the non-magnetic coating layer on the surface of the magnetic material. For example: copper, zinc, cadmium, chromium plating and paint layers on iron and steel. Due to the application of integrated circuits and microprocessors, the instrument has the advantages of simple operation, convenient use, good stability and high measurement accuracy. The instrument has the function of mathematical statistics, which can directly display the number of measurements, average value, maximum value and minimum value.
The instrument adopts the principle of electromagnetic induction for measurement, which complies with the international standard ISO2178 and the national standard GB/T4956. When the probe is in contact with the covering layer, the probe and the magnetic substrate form a closed magnetic circuit. Due to the existence of the non-magnetic covering layer, the reluctance of the magnetic circuit increases, and the magnitude of the reluctance is proportional to the thickness of the covering layer. Through the measurement of the magnetoresistance, it is analyzed and processed by the computer, and the measured value is directly displayed by the liquid crystal display.
2 Technical parameters
1) Measuring range: 0μm~1200μm.
2) Indication error: ±((1~3)%H+1μm) H is the measured coating thickness.
3) Resolution: 1μm.
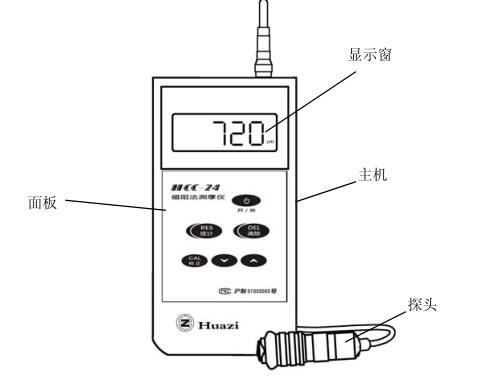
4) The diameter of the smallest measuring surface: φ10mm. Display window host 2
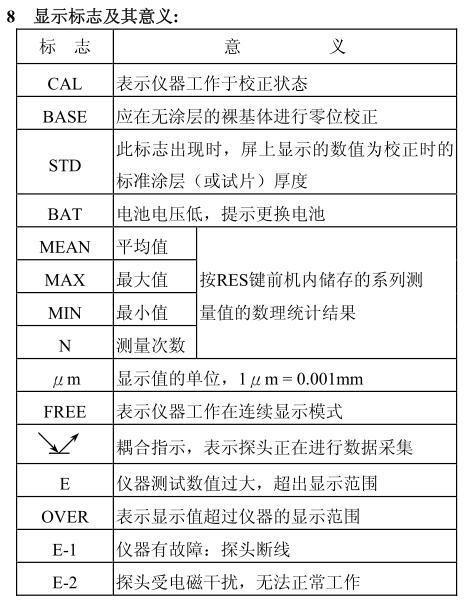
5) Display: 4-digit LCD displays the number of measurements, the average value, the maximum value , and the minimum value, and at the same time indicates the working status of the instrument and the battery usage.
6) Power supply: a 6F22 9V battery.
7) Dimensions: 160mm×80mm×30mm.
8) Mass: about 250g.
9) Operating environment: temperature 0℃~40℃; relative humidity not more than 90%.
3 Appearance of the instrument
In order to ensure the normal operation of the instrument and obtain a good working condition, please pay attention to the following two usage details:
1. When the instrument is turned on, keep the probe away from the test piece and other ferromagnetic objects (above 10cm) until the instrument displays "0μm".
2. After each test, lift up the probe as far as possible to keep it away from the tested part, so that the instrument will be in a good state of environmental adaptation.
6 Preparations before the formal test
用户购买HCC-24 磁阻法测厚仪后的新仪器在进行实际使用前, 都需要要进行仪器的校正, 这是保证仪器达到标称精度的重要保证,请务必重视。仪器有多种校正方法, 使用很灵活, 用户可According to实际需要选择如下一种方式:
1) 全范围高准确度的传统校正法
用户通过随机配备的三个不同厚度的试片和裸基体完成校正,具体步骤如下:
步骤一
在仪器处于开机后的状态时, 按一下 “校正CAL”键,仪器屏上会出现“CAL”,同时会显示一个数值,该数值如果不为“0”,按“>”键,直到该数值由大到小变到“0”为止。然后将探头放在裸基体的测试面上进行测试(注意, 这里的裸基体一定要和实际被测物的材料和形状完全相同。 不要使用随机配备的标准金属基块, 那只能用来验证仪器本身工作是否正常, 不能用来校正仪器) 。 可以测试几下, 待仪器上显示的数值基本稳定后, 按一下“校正CAL”键,仪器的零点便校正完毕,它会显示一个新的数值。
步骤二
该试片平放在裸基体上,探头再压在上面进行测试,可以重复几次。待仪器显示的测量值稳定后,按一下“校正CAL”键,第一个试片的校正结束,仪器又显示下一个校正片的厚度值。
步骤三
用步骤二相同的方法, 只是所用试片要换成厚度200μ m左右的那一片。
步骤四
依然和步骤二相同, 但所用的试片要换成1200μm左右的那一片。到这个步骤的最后阶段,按一下“校正CAL”键, 仪器屏上还会继续显示一个校正片的厚度值, 如“1999”,不用再做下去了,再按一下“校正CAL”键,校正便全部结束了。 这时的仪器便可以进行高准确度的实际测量了。
在以后使用时,如果有必要,可以再次做上面四个步骤的校正。 仪器会记住了上次的零点和每个试片的厚度值, 这样就可以According to仪器提示, 不用再修正试片厚度值,便能轻松完成各个步骤。
2)上下限校正法
在大多数情况下, 用户使用本仪器测试的对象有一定的共性, 如材料和形状相同, 涂层厚度也局限在某个范围内, 此时用户关心的也许是被测对象的涂层是否超差。 如果这些条件成立, 那么就没有必要使用上面多步骤的传统校正法, 而只需要运用上下限校正便能很好地完成使命。
本方法只需要两个步骤校正两点,当然,这两点更好直接选用用户被测件涂层允许范围中的最小和最大厚度。这样校正的结果, 仪器在这两个校正点上的精度非常高,甚至比上面传统的校正还要好。 要实现这一点, 用户首先要设法获得符合这两个校正点厚度的试片, 可以向本公司提出购买特殊试片的要求, 也可以自行寻找符合条件的样品。 不必过于苛求试片或样品的厚度值与称心的校正点完全相符。 有了这两个厚度片或实际样品后, 校正便可按如下步骤进行:
步骤一
先校正两者中较小的那个厚度值。 在仪器开机后的状态下,按一下“校正CAL”键,用“<”或“>”键调整仪器显示的厚度值, 使其和两点中较小的那个厚度值一致。然后,在裸基体上平放对应厚度的试片,探头再压上进行测试。如果是样品,那么直接测试该样品。可以重复几次测试,待仪器显示的测试值稳定后,按一下“校正CAL”键,该点的校正便完成,仪器进入下一点校正。
步骤二
接上一步骤,用“<”、 “>”键调整仪器显示的厚度值, 使其和两点中较大的那个厚度值一致。 按步骤一同样的方法, 用另一块对应的试片或样品进行测试, 待仪器显示的测量值稳定后,按两次“校正CAL”键(后一次按键使仪器退出校正过程),上下限的校正便完成了。
如果以后还要做同样的上下限校正, 借助仪器已经记住的两个校正点厚度值, 能进一步让用户省去上面两个步骤中调整厚度的那部分操作, 使用将更加便捷。
3)单点校正法
有时候,受条件限制,譬如被测体是个凹面,无法使用很难弯曲的厚试片进行校正; 或者用户接触到的涂层厚度局限在一个相对较小的范围内。 此时, 只能或只需要用一个校正点。这个校正点可以是裸基体(零点),也可以是某个任意涂层厚度的样品。 如果用户的接触到的被测件涂层厚度在某个较小范围内, 如100μ m左右, 那么这个校正点选100μ m是较合适的。 校正点定好以后就可以开始校正了, 只有如下一个步骤:
在仪器开机后的状态下,按一下“校正CAL”键,用“<”或“>”键调整仪器显示的厚度值,使其为“0”或与样品的厚度值一致。 然后, 将探头直接放在裸基体上进行测试。 如果是样品, 那么直接测试该样品。 可以重复测几次,待仪器显示的测试值稳定后,按两下“校正CAL”键(后一次按键使仪器退出校正过程),单点校正便完成了。
同样, 如果以后还要做同样的单点校正, 借助仪器已经记住的校正点厚度值, 能进一步让用户省去上面步骤中调整厚度的那部分操作,使用将更加便捷。
相对于上面的几种方法, 本校正法的操作简单。 但代价是仪器的测试精度在远离校正点处可能会有所降低。用户可以不妨试用一下本校正法, 以便判断它能否满足实际的测试要求。
4)任意多个校正点校正法
如果用户接触到的被测物件形状比较特殊, 而且涂层厚度的范围也比较大, 同时精度又有更高的要求, 那么用户可以自行挑选多个校正点 (最多10个) 进行校正, 仪器允许的校正点厚度为0~1999μm。有一点请注意,在实际进行校正的过程中, 多个厚度执行顺序需要由小到大依次进行。具体的操作步骤和上面的传统校正法类似, 此处就不再重复了。
9 仪器的日常维护
1)仪器使用完毕后,应放入清洁、干燥的储存箱里,避免冲击和振动。
2)探头应避免敲击和强烈振动并保持清洁,被测物上的污物在测量前需要被清除。
3) When the instrument is not used for a long time, the battery should be taken out to avoid damage to the instrument due to battery leakage.