I. Overview:
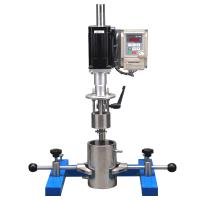
KSM-2 small sand mill is the test equipment. It is suitable for use in laboratories of coatings, dyes, chemicals and other industries. For various related products such as: paints, inks, dyes, coatings, magnetic tape coatings, etc. for crushing tests. The linear speed of the leaf disk of this sand mill can reach 10.5 meters per second, which makes the materials in the cylinder violently turn up and down, and produces strong impact and shear with the grinding medium, so as to destroy the aggregated objects and achieve the purpose of rapid dispersion and uniform mixing. . This machine can provide basic data for large-scale production to improve work efficiency, and provide technological basis for trial production of new products or improvement of product quality.
2. Structural performance:
1. Main technical parameters:
Motor: JY7132 0.55kw 220V 2800 r/min
Spindle speed: 2800 r/min
Cylinder capacity: 2 liters
Blisk diameter: 72 mm
Net size of the whole machine: 650×300×470mm (height×width×length)
Weight: 57kg
2. Cylinder:
The KSM-2 small sand mill cylinder has an outer diameter of 125×285mm and an inner diameter of 100×245mm. It is welded by stainless steel seamless steel pipes, and there is a jacket in the middle for cooling water. There is a filter screen at the discharge port. When the filter screen is damaged, the waist flange can be removed for replacement. The material of the discharge plug is polytetrafluoroethylene, which is more durable. The upper cover of the barrel is of the split type, and it is always closed when it is not in use or in operation.
3. Spindle:
The total length of the main shaft is 265mm, and the surface of the material is 45# steel plated with hard chrome. The lower end of the shaft is equipped with blisks, which are locked with bolts. When the blisks are worn out, they can be replaced.
3. Operating procedure:
1. Before use, the cylinder body should be effectively cleaned with solvent, and the cylinder body should be clamped firmly by turning the hand wheel on the positioning plate, and the discharge plug should be closed tightly.
2. Raise the motor to the highest position, install the shaft on the drill chuck, pay attention to make the shoulder end face of the shaft flush with the end face of the drill chuck, and tighten. Then rotate the shaft by hand to check whether it is properly centered, otherwise remove it and reinstall it. Remember not to drive empty.
3. Lower the motor to the required height, tighten the brake handle, and turn on the cooling water.
4. Dial to the required time on the timer, and dial to the "ON" position from time to time.
5. Pour the medium (glass beads) into the cylinder, and then pour the material. Rotate the shaft a bit by hand and drive. If you find that the shaft shakes after driving, you should stop immediately. (It means that the shaft center is not correct, and the shaft needs to be re-installed)
4. Matters needing attention:
1. When there is no material in the cylinder, remember not to drive empty. The empty axle is easy to twist and bend.
2. After the shaft is installed, tighten the precision self-tightening head to prevent the shaft from loosening and falling down after driving.
3. When turning the knob to the limit position, it should not be too fast or too hard, so as not to damage the parts.
4. If the time required for timing is less, when the rotation angle of the knob is less than 45°, the knob should be rotated through 45°, and then screwed back to the desired timing position.
5. The cooling water should be guaranteed to be unblocked, and it is better to add a regulating valve to control the cooling water volume.
6. Clean the cylinder body and the discharge plug with solvent when it is not in use. In order to avoid the phenomenon of the discharge plug being seized in the next use.