1. Product Features
*Complies with ASTM D4417-B, IMOMSC215 (82), SANS5772, USNavyNSI009-32 , USNavyPPI63101-000. The test method can directly measure the height of the peak and valley of the surface.
*Suitable for: Shot blasting industry, printing industry, spraying anti-corrosion industry and other industries that require surface roughness , calculate the corresponding parameters according to the selected measurement conditions , and clearly display all measurement parameters on the LCD .
*When measuring the surface roughness of the workpiece, place the sensor on the surface of the workpiece to be measured, and feel the roughness of the measured surface with the sharp stylus built into the instrument. At this time, the roughness of the measured surface of the workpiece will cause the stylus to generate a The displacement causes the inductance of the sensor inductance coil to change, so that an analog signal at the output of the phase-sensitive rectifier . The signal enters the data acquisition system after amplification and level conversion. The DSP chip performs digital filtering and parameter calculation on the collected data , and displays the measurement results on the LCD. At the same time, it can communicate with the computer to realize data analysis, statistics and printing.
* High precision inductive sensor.
* Manual shutdown and automatic shutdown.
* With metric and imperial conversion function.
* With average calculation function.
*Using USB data line output and RS-232 data line output to connect data with computer.
*Bluetooth™ data output option available.

2. Product parameters
Display: LCD display
Accuracy: ±5% or ±5um
Resolution: 0.1μm (measured value <100μm)
1μm (measured value>100μm)
Measuring range: 0~750um
Measuring principle: inductive
Working environment: temperature 0~50°C
Humidity<80%RH
Power supply: 2x1.5vAAA batteries
Dimensions: 176x63x25mm
Net weight: 310g (without battery)
4. Measurement parameters
4. Measurement steps
4.1 After the measurement preparations are completed, if the measurement conditions do not need to be changed , start the measurement, and the measured value will be displayed on the display.
4.2 Press the power button lightly to turn on the power of the whole machine.
4.3 Place the instrument vertically on the object to be measured, and let the end face of the indenter touch the sample tightly for 1 to 2 seconds, so that the measured value will be automatically displayed on the LCD. Special Note: The measuring disc of the instrument should not exceed the edge of the surface to be measured.
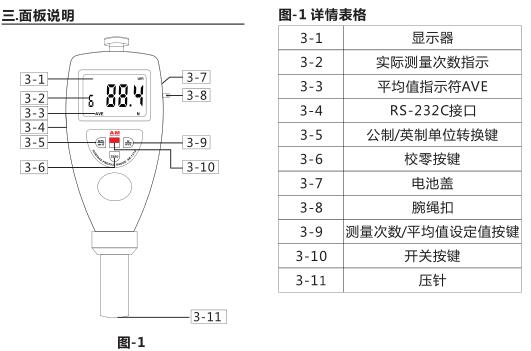
4.4 Average value function and measurement times setting Press the N/AVE key, and the screen will display the setting times indication and measurement times. Continue to press the 'N/AVE' key to set the number of . The maximum number of measurements is 9. After the number of times is set , press the 'ZERO' key to return to the measurement state. After each test, the instrument will display the coarse excess value and the number of tests of this test at the same time. When the set number of tests is reached , it will first display the rough excess value of this test, then display the average value , and display the average value symbol 'AVE' at the same time. And there are two buzzer sounds. Users can also record several times , and then manually calculate the arithmetic mean. After setting the number of measurements, you can press the 'ZERO' key to return to the measurement state, or the machine will automatically enter the test state after a few seconds.
5. Calibrate the instrument
For zero calibration, first put the glass zero plate on the table, hold , press the probe of the instrument against the glass zero plate, and do not let go. At this time, the reading on the display should be zero, otherwise, perform zero calibration. That is, press the 'ZERO' key lightly, so that the reading on the display is 0.
6. Battery Replacement
6.1 When the battery symbol will appear on the display, the battery needs to be replaced. Open the battery cover and remove the battery.
6.2 Install the battery correctly according to the label on the battery box .
6.3 If the meter will not be used for a long time, please take out the battery to prevent the battery from rot and damage the meter.
7. Computer connection
7.1 According to the label on the battery box, the optional "USB data line output", "RS232C data line output" and "Bluetooth™ data output" can be used to communicate with the PC computer to realize data collection, processing, analysis and Printing and other functions.
7.2 Insert the RS-232 cable into the corresponding hole of the instrument
7.3 Connect the instrument with the RS-232 online cable
7.4 Open the software on the operating platform, select the COM port in the system settings
7.5 Click the Data Collection button, then click the Start/ Continue button.
Eight. Instrument maintenance and maintenance
Avoid collisions, violent vibrations, dust, moisture, oil , strong magnetic fields, etc.; the sensor is a precision part of the instrument and should be carefully protected. After each use, put the sensor back into the packaging box; the random standard sample should be carefully protected to avoid scratches and cause errors . .