1. Features
*Suitable for general wire mesh tension and stencil tension measurement.
* Suitable for screen printing screen and stencil measurement, with high accuracy, it is a desirable tool for making precision screen and stencil. And it can avoid the error of measuring by human hand or touch.
* LCD digital display, eliminating reading errors.
*Use USB data line output, RS-232C data connection line and software to communicate with PC.
*In addition, an optional Bluetooth data output option .
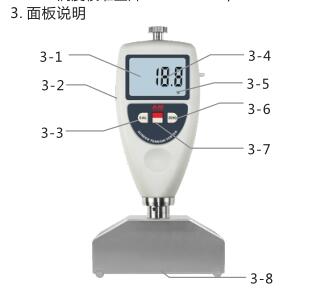
2. Specification
Display: 4-digit 10mm LCD
Test range: 0~45N/cm
Resolution: 0.1
Power supply: 2 AAA batteries
Dimensions: 175x95x40mm
Weight: 490g (without battery)
Operating conditions: temperature 0~40℃, humidity 10~90%RH
Shutdown: The instrument has two shutdown methods, that is, manual shutdown
and automatic shutdown. At any time, just tap the
Multi-function key, when OFF appears on the display, release
You can manually turn off the power of the whole machine by hand;
If you do not press any button within 5 minutes
key, or no measurement is performed, it will automatically turn off
machine to realize the power saving function.
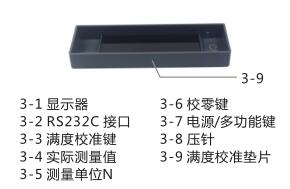
Standard accessories:
Carrying case................................1pcs
Instruction manual................................1 copy
Full scale calibration shim..................... 1 pc
4. Calibration of the instrument
4.1 Zero calibration
Hold the tensiometer vertically and let the pressure needle hang in the air. At this time, the reading on the display should be zero, otherwise, zero calibration should be carried out. That is, press the 'ZERO' key lightly, so that the reading is 0.
4.2 Full scale calibration
Let the pressing foot of the tensiometer be in full contact with the full-scale calibration gasket (or glass plate ). At this time, the extension length of the indenter is zero, and the hardness value on the display should be between 59.7 and 60, indicating the full-scale value Correct, otherwise, press .
4. Calibration of the instrument
4.1 Zero calibration
Hold the tensiometer vertically and let the pressure needle hang in the air. At this time, the reading on the display should be zero, otherwise, zero calibration should be carried out. That is, press the 'ZERO' key lightly, so that the reading is 0.
4.2 Full-scale calibration Let the pressure foot of the tensiometer be in full contact with the full-scale calibration gasket (or glass plate ). At this time, the extension length of the indenter is zero, and the hardness value on the display should be between 59.7 and 60, saying The brightness and fullness value is correct, otherwise, press .
5. Unit selection
The tension of the mesh is usually expressed in N/cm, which means how much tension the mesh has per centimeter of width. This instrument has another unit Kg/cm. Press and hold the power/multifunction button until the word 'UNIT' appears on the display, and let go to switch between N/cm and Kg/cm.
6. Measurement procedure
Put the tensiometer on the gauze, flick the gauze next to the tensiometer to read.
7. Replace the battery
7.1 When the battery symbol will appear on the display, the battery . Open the battery cover and take out the battery.
7.2 Install the battery correctly according to the label on the battery box.
7.3 If the meter will not be used for a long time, please take out the battery to prevent the battery from rot and damage the meter.
8. Technical data
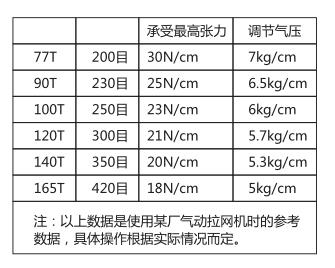
Determination of printing tasks and screen tension

Commonly used wire mesh can bear the highest tension
The data listed in the table is based on Swiss medium-thick mesh yarn as the test condition, which is to the quality of the stretching machine. The quality of the stretching machine is good, and the mesh can reach the highest tension without breaking. It is very easy to break, please refer to it when setting up the net,