1. Brief introduction of belt tensIon Meter
The Belt Tension Meter can be used to measure and adjust the belt tension of motors and other machinery , and it can be displayed in four different units. It uses a special microcomputer circuit and a quartz time base to make the measurement more accurate. During the measurement , the tension of the belt is displayed on the instrument in real time, and at the same time, there are indicator lights and different sounds to indicate whether the tension is within or outside the set value, which provides the user tension when adjusting the belt tension. Convenient, there is no need to stare at the display value of the instrument all the time, the instrument can automatically store the upper and lower limits of belt tension, measurement unit and calibration results, even if the machine is turned off or the battery is taken out, the data will not be lost. It can communicate with PC computer by using the optional accessory communication cable and RS232 software, so as to realize data statistics and printing functions.
Note: The tensIon Meter inspection should meet the relevant requirements of the manufacturer.
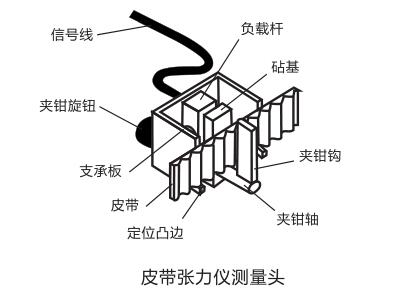
2. Measuring principle
The measuring head is mounted on a belt and the jaws are tightened by means of a knob so that the belt deflects through a known angle defined by an anvil and two struts. The load applied to the jaws produces a force proportional to the tension of the belt. Voltage signal, the tension value of the belt can be accurately given by measuring the voltage generated by the load unit.
3. Specifications and parameters
Display: 4 digits 10mmLCD, and illuminated by color
Tube gives high, low, normal indication
Measuring range: 0-750N (cow)
0-120P(lb)
0-77kg (kg)
0-114 Seems
Belt width: up to 36mm
Overload alarm: 750N
Maximum load: 850N
Resolution: ±1 (measurement unit)
Accuracy: ±5% of full scale
PC interface: RS-232C
Audible alarm: Buzzer
Power supply: 4 AAA batteries
Size: 140×70×30mm
Host weight: 130g (excluding batteries)
Measuring head weight: 230g
Standard accessories:
1. Measuring head... 1
2. Carrying case ................ 1
3. Instructions for use... 1
Optional accessories: RS232 or USB communication cable and software
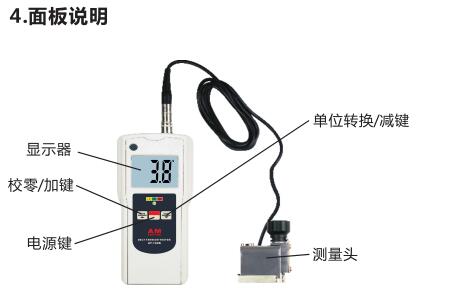
5. Control and instruction
仪器由一个液晶显示器,一个彩色编码的LED指示灯,一个蜂鸣器和三个按键组成,显示器用来显示被测张力和显示仪器设定指示,蜂鸣器According to被测张力的大小发出不同的声音,来告知用户皮带张力是否超限,可避免用户在调节皮带松紧时,眼睛始终盯住显示器。同时,彩色编码LED指示灯也会用不同的颜色来给出张力大小指示。仪器有三个按键,每个键都有双重功能.POWER键: 1.开关仪器电源
2.在仪器操作期间用来做多功能键和确认键ZERO键: 1.校零
2.在设定状态时用作减1键Unit键: 1.选择不现测量单位
2.在设定状态时用作加1键在测量模式下,彩色编码LED和蜂鸣器用来指示被测皮带的张力是低于、位于或者高于预设定值。当皮带张力低于预设定值时,LED的颜色与“LO”的颜色相同,蜂鸣器发出单声;当皮带张力位于预设定值之间时,LED的颜色与"OK”的颜色一致,蜂鸣器不发声;当皮带张力高于预设定值时,LED的颜色与“HI”的颜色一致,蜂鸣器发出三声;用户可自行改变上下限设定值,详见下9部分。
6.注意事项
为得到准确的测量结果,操作必要注意如下事项:
6.1 测量头不能互换,即使同一厂家同一型号的产品也不能互换
6.2 万一使用了非原配测量头,使用之前需要重新校准
6.3 为避免测量头潜在的损坏,任何时候都不能在测量头未插入仪器或未关机的情况下,将测量头钳到皮带上去
6.4 仪器能对测头超负荷给出警示,但如果测量头没接入仪器或关机的情况下则不能警示
6.5 绝不能将测量头钳在诸如金属杆、木杆和非柔性物体上.
6.6 请勿跌落或碰撞仪器
6.7 请勿用连接电缆吊起仪器或测量头.
7.操作
7.1 第一次和时,应取下电池盖装上4节7号电池注意电池极性应与电池盒中的标示一致。
7.2 把测量头的连接头插入仪器的插座。
7.3 按下POWER键接通电源,仪器进入测量状态。仪器上的数字、蜂鸣器的响声及LED的颜色给出了当前张力的情况。
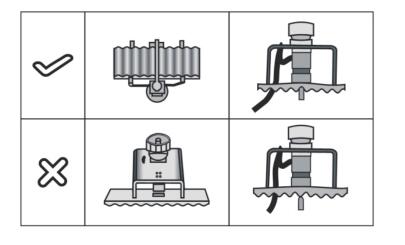
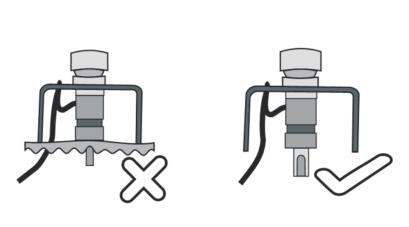
7.4 把测量头的钳钩夹在设备制造厂商指定的皮带位置上,让皮带的边缘接触到测量头的两个定位点上。如果厂家没有标明测量点的位置,要把测量头安装在皮带最长自由部分的中间位置,并确保钳钩位于皮带齿的沟部,见下图:
7.5 顺时针拧张力旋钮,直到皮带的平边接触到铁砧,旋钮稍紧,但不能太紧。
7.6 为确保皮带张力正确分布,应转动机轴,使发动机处于阀门定时检查或更换皮带的位置,这就是通常的上止点。当在收紧皮带时,如果“LED”不亮,蜂鸣器不停地响,屏幕上出现“1NF1“,此时应立即停止收紧,否则测量头将会损坏,一旦测量头损坏,用户需要购买一个新的测量头,经重新校正后才能使用。
7.7 要更换测量单位,只要按一下“UNIT”键即可。
7.8 校零.
将测量头从皮带上卸下,钳口完全松开。此时,显示器上的读数应为“0”,否则,按“ZERO”进行校零。
注意:校零时,测量头不能夹在皮带上,也不能给测量加负载,确保钳口旋钮完全松开。
7.9 怎样设定报警的上、下限值.
要设定上、下限值,只要按下“POWER”键不松手,只到显示器上出现“AL1”或“AL2”才松开。从按下“POWER”键开始,约6秒钟出现“AL1”,约9秒钟出现“AL2”,这里“AL1”、“AL2”分别代表设定的下限和上限。
当显示器上出现“ALI”或“AL2”松开“POWER”键后,仪器进入设定状态,以前设定的报警值就会出现在显示器上。此时,通过“△”或“▽”键就可重新设定新的报警值,设定好即可按一下“POWER”键存储设定值并返回测量状态。如果显示器上出现”Err4”说明设定的下限值大于上限值,应重新设定上、下限值。
注:
a) 要快速改变设定值时,可按下“△”或▽”键不放手,约4秒钟后数字快速改变。
b) 本仪器出厂时,下限值设为200N,上限值为250N,用户可According to所需自行设定。
c) 在不同测量单位下,上下限的最大值就是该单位的测量上限值,但下限值不允许大于上限值。
d) 测量单位改变上、下限值自动换成该单位下的设定值,无须重新设定。
8.怎样得到很好的测量结果
8.1 不同测量头的皮带张力会随着发动机的旋转而不同,这是由于旋转时会对机轴产生,不同的内部载所致。
8.2 要牢记一定要在旋转机轴前取下测量头,如果进行长时间测量,更好每隔10分钟校一零。
8.3 要牢记校零时需要将测量头从皮带上取下,并将钳口旋扭完全松开。
9.校准程序
对于大多数的皮带张力仪而言,仪器的校准只能在配备有专用校准设备的服务中心进行。但对于本张力仪而言,经销商甚至用户都可在简单的条件下进行仪器校准,方法见下图:
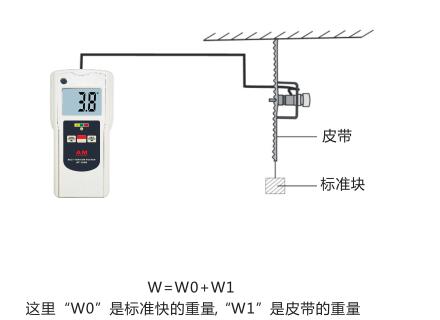
9.1 把测量头正确的钳到皮带上,读数将会出现在显示器上,仪器上的读数值应为W(仪器的单位应与W一致).
9.2 若读数不一致应进行校准.按下“POWER”键不松手,直到显示器上出“CAL”才松手,从按下“POWER”键到出现“CAL”大约需要4秒钟。这里“CAL”是校准的缩写,松开手后,测量值就出现在显示器上,通过“△”或“▽”,将值调整到W值。要存储并返回测量状态可按一下“POWER”键。
注意:
为保证校准的正确性,在进行校准时,要求标准块的重量要大于25公斤。如果标准块的重量小于25公斤,仪器就会拒绝校准,并显示‘Err1',同时退出校准状态。
10.关电源
开机后,如果10分钟之内没有任何按键操作,则仪器将自动关机,要随时关机可按下“POWER”键盘,等显示器上出现“OFF”时松手即可。
11.低电显示
11. After the low battery indicator is turned on, if there is no key operation within 10 minutes, the instrument will automatically shut down. To shut down at any time, press the "POWER" keyboard, and let go when "OFF" appears .
11.1 When the battery voltage is lower than 5V, the battery symbol will appear on the display.
11.2 Remove the battery cover and take out the battery.
11.3 Put 4 AAA batteries into the battery box according to the polarity.
11.4 If the instrument will not be used for a long time, it is better to take out the battery in case
The battery is rotten and leaking.
