brief introduction
The coating Thickness Gauge Surfix®/Pocket-Surfix® is designed and tested according to DIN EN 61 010 Part 1 (safety requirements for electronic measurement, control and laboratory equipment) issued in March 1994, and all technical indicators are guaranteed at the factory Safe and reliable.
The instrument complies with the following standards for coating thickness measurement:
Principle of electromagnetic induction: DIN EN ISO 2178, DIN 50 981, DIN 50 982
Eddy current principle: DIN ISO 2360
About this manual
Menu technology has been widely used in the mobile phone industry, but this is the first time it has been applied to a coating Thickness Gauge.
This manual will guide you step by step on how to operate the Surfix® Thickness Gauge correctly. Following these steps, you can master how to do it in a few minutes.
typical application
The Surfix®/Pocket-Surfix® non-destructive coating Thickness Gauge can be used for:
l All non-magnetically conductive coatings on steel substrates, such as paint, paint, ceramics, galvanized, chrome-plated, copper-plated, etc. (electromagnetic induction principle, ie Type F) and/or
l All insulating coatings on non-ferrous metals and austenitic steel substrates, such as coatings, paints, oxide layers, etc. (eddy current principle, that is, N type).
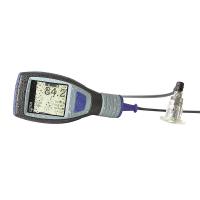
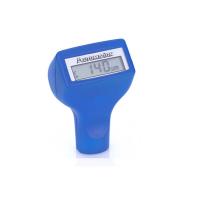
Surfix®/Pocket-Surfix® is available in three models:
FN: Dual-purpose type, can be measured on steel and non-ferrous metal substrates.
F: Can be measured on steel substrates.
N: Can be measured on non-ferrous metal substrates.
Preparation before measurement
Surfix®/Pocket-Surfix® uses two 1.5V alkaline dry batteries (No. 5/No. 7). When the voltage is insufficient, the battery mark will flash on the screen.
Note: Please be careful not to install the reverse polarity when installing a new battery, please replace the battery within 20 seconds
Otherwise, the calibration and measurement data stored by the instrument will be lost.
Use the ⊙ key to turn the instrument on and off. If the instrument is in the automatic shutdown mode, the instrument will
Automatic shutdown after 1.5 minutes of operation or measurement.
After installing or replacing the battery, the instrument will automatically turn on and ask for the language setting, please use the ▲MENU▼up and down keys to select the language and press the OK key to confirm
menu structure
The menu itself is directional. From the menu, you can operate the instrument like most mobile phones. To activate a function, all you have to do is quickly find the main menu and submenu to which the function belongs and enter this menu. The main menu includes 4 major items: calibration function, statistics function, measurement mode and options. All other functions and projects are assigned to these four categories.
The steps to be taken are displayed on the screen, eg "Place probe on the Cal foil". After the steps are completed, the instrument will give a confirmation, such as "Calibration is complete (calibration has been completed)".
Show all strokes (for display tests)
Proceed as follows:
1. Turn off the instrument.
2. Press and hold the up key of the up and down keys, then
3. Press the switch to turn it on, press and hold the two buttons and the screen will display all strokes.
Release the button, and the screen will display four horizontal lines "----".
Standard configuration
Host (including probe)
suitcase
Zero plate for calibration (stainless steel and/or aluminum)
2 standard foils for calibration
2 batteries
Operating Instructions
Optional accessories
Infrared adapter for standard PC (RS232) and portable printer
portable printer
Calibration standard foils of different thicknesses
Precision measuring stand for measuring small items
2. Press the up and down keys once, Calibration (calibration function) will be displayed on the screen.
3. Press the OK key, Zero setting will be displayed on the screen.
4. Then press the up and down keys, and the screen will display Foil calibration (calibration with standard foil).
5. Press the OK key, Put probe on foil Standard will be displayed on the screen (put the probe on the standard foil for measurement).
6. Place the standard foil on the uncoated object to be measured and perform several measurements on the standard foil.
7. According to the thickness marked on the standard foil, use the up and down keys to adjust the displayed reading until the standard thickness.
8. Press the OK key, Calibration has been set (calibration has been completed) is briefly displayed on the screen, and then four horizontal lines "- - - -" are displayed.
Measurement
The Surfix® F instrument measures on steel substrates and displays Ferr (steel) on the screen.
Surfix® N-type instrument can be measured on copper and aluminum substrates, and the screen displays Non-Ferr (non-ferrous metals).
Surfix® FN型仪器在两种基体上均可进行测量,出厂时设置为Automatic FN recognition(自动识别FN),屏幕显示Auto FN。
在Auto FN的模式下,当探头放在被测物上时,仪器会自动识别基体金属为钢铁或铜铝,并自动激活相应的测量原理,即电磁感应(F)或电涡流(N)。
但是在某些情况下,比如钢铁上涂清漆或镀锌,建议预先选定一种测量原理。如果在钢铁上测量,请选择F(Ferr);而在铜铝上则使用N(Non-Ferr)。
步骤如下,也可参考菜单结构:
按上下键直至显示Measuring mode(测量模式)。
按OK键,屏幕上显示Auto FN identification(自动识别FN)。
连续按上下键,直至屏幕上显示所需的Ferrous(F),Non-Ferrous(N)或是Auto FN 。
按OK键,确认所选的测量模式,屏幕上显示AUTO FN ,Ferr或Non-Ferr。
在Measuring mode(测量模式)下,按照同样的步骤可以对下列选项进行设置:(也可参考菜单结构)
下限提示
零位偏置(可在测量结果上自动减去或加上一个固定的数值)
统计功能(主菜单第二项)
Surfix®/Pocket-Surfix®配备在线统计功能,即在每次测量之后,仪器均会对统计值进行重新计算并显示在屏幕的下边。
Surfix®的统计数值包括:
N :测量次数
: :所有测量值的平均值
s :标准偏差
Max: 所有测量值的最大值
Min: 所有测量值的最小值
注意:对于Surfix®/Pocket-Surfix® FN型,F模式和N模式一共可存储200/80个读值。
打印统计值
如果有红外线适配器,一组5个统计值可打印出来或传输入PC。(R红外适配和打印机是选购件。)
步骤如下,也可参考菜单结构:
1.按上下键直至显示Statistics(统计功能)。
2.按OK键,屏幕上显示Printout of statistics(打印统计值)。
3.将Surfix®仪器的红外发射器(顶端面)朝向红外适配器,距离应在30cm到50cm左右,然后
4.按OK键进行数据传输,屏幕上短暂显示Printing…(打印中),然后显示四条横线“- - - -”。
打印统计值及单个测量值
仪器中存储的所有测量值和5个统计值均可通过外围设备进行传输打印,如同统计值的打印.
步骤如下,也可参考菜单结构:
按上下键直至显示Statistics(统计功能)。
按OK键,屏幕上显示Printout of stat. + readings(打印统计值及测量值)。
将仪器的红外发射器(顶端面)朝向红外适配器,距离应在30cm到50cm左右。
然后按OK键进行数据传输,屏幕上短暂显示Printing…(打印中),然后显示四条横线“- - - -”。
显示统计值
存储的5个统计值可随时调出显示.步骤如下,也可参考菜单结构:
1.按上下键直至显示Statistics(统计功能)。
2.按OK键,屏幕上显示Printout of statistics(打印统计值)。
3.按上下键直至显示Display of statistics(显示统计值)。
4.按OK键,屏幕上显示N(测量次数)、(平均值)和s(标准偏差);再按OK键,显示N(测量次数)、Max(最大值)和Min(最小值);再按OK键又回到Display of statistics(显示统计值);在这三个显示之间转换。
如果想继续测量,请连续按ESC(退出),直至屏幕显示四条横线“- - - -”。
显示单个测量值
存储的单个测量值也可随时调出显示.步骤如下,也可参考菜单结构:
1.上下键直至显示Statistics(统计功能)。
2.按OK键,屏幕上显示Printout of statistics(打印统计值)。
3.按上下键直至显示Display of readings(显示单个测量值)。
4.按OK键,屏幕上显示第一个测量值。
5.连续按上下键,会按照顺序依次显示各存储的测量值。
如果想继续测量,请连续按ESC(退出),直至屏幕显示四条横线“- - - -”。
删除统计值和单个测量值
步骤如下,也可参考菜单结构:
1.按上下键直至显示Statistics(统计功能)。
2.按OK键,屏幕上显示Printout of statistics(打印统计值)。
3.按上下键直至显示Deletion stat. + readings(删除统计值及测量值)。
4.按OK键,确认删除统计值和单个测量值,屏幕上短暂显示Statistics delete(统计值已删除),然后显示四条横线“- - - -”。
设 置 测 量 模 式 中 的 上 下 限 提 示 ( 主 菜 单 第 三 项 )
为了对测量读值进行监控,可以设置上下极限值,主要用于:
1.测量时实时监测;
2.测量之后对各测量值进行评价;和
3.测量数据的打印输出。
如果测量值高于上限值或低于下限值,仪器会发出不同的声音提示,屏幕上会显示相应的提示标记(▲或▼)。设置步骤如下,也可参考菜单结构:
按上下键直至显示Measuring mode(设置测量模式)。
按OK键,按上下键直至显示Limits(极限值设定)。
按OK键,屏幕上显示Limits setting(极限值设定)。
按OK键,屏幕上显示Set lower limits(设置下限值)。
按上下键,将数值调整至所希望的下限值。
按OK键,屏幕上显示Set upper limits(设置上限值)。
按上下键,将数值调整至所希望的上限值。
按OK键,屏幕上短暂显示Limits has been set(完成设置极限值),然后显示四条横线“- - - -”
删除极限值
步骤如下,也可参考菜单结构:
按上下键直至显示Measuring mode(设置测量模式)。
按上下键直至显示Limits(设置极限值)。
按OK键,屏幕上显示Limits setting(极限值设定)。
按上下键直至显示Deletion of limits(删除极限值)。
按OK键,屏幕上短暂显示Limits deleted(极限值已删除),然后显示四条横线“- - - -”
注意:对于Surfix® FN型,设置和删除极限值对F和N两个测量模式同时生效。
选 项 ( 主 菜 单 第 四 项 )
可以对该菜单下的各种选项进行设定,这些设定在关机后自动保存,仪器出厂和进行总复位时,所有设置均默认为各选项的第一项(如在测量单位选项中默认为µm)
选择测量单位(公制或英制)
步骤如下,也可参考菜单结构:
按上下键直至显示Options(选项)
按OK键,按上下键屏幕上显示Measuring unit
按OK键,屏幕上显示µm/mm unit (公制单位µm/mm)
按OK键确认此单位,或者
按上下键,屏幕上显示mils unit(英制单位mils)
按OK键确认此单位,屏幕上短暂显示所选的测量单位,然后显示四
条横线“----”
按照同样的步骤可以对下列选项进行设置:(可参考菜单结构)
背景光模式的设置:关闭,显示3秒钟,或保持开启;
关机模式的设置:自动关机或手动关机;
声音提示的设置:开启或关闭;
问候语的设置:开启或关闭;
语言的设置:德语,英语或法语
仪器总复位
对仪器进行总复位会:
1.删除存储的所有测量值和统计值;
2.删除自己设定的校准值并恢复到出厂校准值;以及
3.将所有选项恢复到出厂设置,即所有可选项的第一项。
步骤如下:
1.闭仪器。
2.住ESC键,然后
3.开关开机,屏幕会显示问候语,然后出现四条横线“- - - -”。
按键说明
▲MENU▼ 上 下 键
上下键有几个不同功能。According to所在的菜单,它可以:
1.单各选项之间进行浏览;
2.调整校准值或极限值;
3.在存储的测量值之间进行浏览。
O K 键
此按键可用于:
1.选定的菜单选项进行确认,并进行其相应的子菜单;
2.完成一项选项的设置;
3.对调整过的校准值或极限值进行确认。
ESC 键
此按键可用于:
1.返回上级菜单;
2.在一次测量之后立即删除该测量值;
3.在设置校准值或极限值时退出设置程序。
红外线接口
由Surfix®/Pocket-Surfix®到PC或打印机的红外数据传输,须满足下列三个条件:
1. 红外适配器(选购件)已与PC机或打印机连接好。将仪器的红外发射器平行
朝向红外适配器,距离应在30cm到50cm左右。有关红外适配器的详细信息请见下文。
2. PC机或打印机的串行端口参数设置如下:
- 波特率: 9600
- 数据位: 8
- 停止位: 1
- 奇偶校验: 无
- 颤动: 无
3. 如果数据要传输入PC机,则需要安装相应的数据传输程序。可参见WINDOWS
Help file for the program "Hyperterminal" for data transfer in XP.
error message
If the instrument fails or operates abnormally, an error message will be displayed:
Batteries are empty:
The battery pack must be replaced with a new one, pay attention to the polarity when installing. Please complete the replacement process within 20 seconds to avoid losing various stored data.
Probe is too close to metal (the probe is too close to metal):
The probe is too close to the metal when starting up. Please hold the probe in the air and turn it on again.
Magnetic interference fields
The probe is too close to a strong magnetic field (such as a transformer, a PC display, etc.). Please keep the probe away from strong magnetic field.
Probe defective
If this message appears, please send the instrument back to the supplier or manufacturer for repair.
other error messages
1. If the instrument is no longer measuring or the measured value is abnormal, a total reset of the instrument can be performed.
2. If there is no response to the keys, please remove the battery for 20 seconds, then reinstall the battery and perform a general reset of the instrument.