1. Introduction
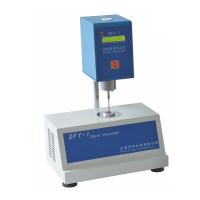
The CAP series viscometer is a cone and plate measuring system with temperature control. The CAP2000+ speed selection range is 5-1000 rpm. The setting parameters can be input directly with the number keys, and the results are displayed in numbers. Different rotors and rotating speeds can obtain different measurement ranges. The viscosity value units can be selected as: centipoise (CP), poise (P), milliPascal second (mPa .s), Pascal seconds (Pa.s), temperature control range is 5-75°C (L series) or 50-235°C (H series).
1P=100CP
1CP=1mPa.s
1Pa.s=1000mPa.s
2. Installation
Note: The instrument should be moved from the base or column, not just the display or handle.
(1) Put the instrument on a clean and firm platform
(2) Check whether the power supply of the instrument matches your power supply (220V)
(3) Connect the power supply
(4) If you use a printer, connect it from the printer port
(5) If you use a computer to connect to the serial port with an R3-232 cable
Note: Turn off the power of the printer and CAP-2000+ when connecting the cables
3. Keyboard function
Numbers 0-9: for entering data;
ENTER: confirm key;
STOP/ESCAPE: Stop the cone rotor or exit the setting;
DELETE: delete the entered data;
PRINT: print key;
RUN: start key, the cone rotor rotates, and performs measurement or calibration;
RUNTIME: set the cone rotor rotation time;
HOLDTIME: Set the hold time
SPINDLE: set the cone rotor number;
TEMP: set temperature
4. Start
(1) Turn on the power. Turn on the power switch at the back of the instrument base, and the instrument will display information such as the model and version number of the instrument.
(2) Selection and installation of cone rotors CAP2000+ has 10 types of rotors to choose from, and their measurement ranges are shown in Appendix A. You should choose the appropriate rotor according to the viscosity of the sample, but it should be noted that rotors 7 to 10 can only be used at 5 It is used at -400 rpm, and if it exceeds 400 rpm, the measured results are unreliable.
Loosen the screw, put the cone rotor into the cone connector, put it up as far as possible, and then screw in the screw.
The sample hood prevents the sample from drying out. When using CAP2000+L, it can be omitted, but when using high-temperature type CAP2000+H, use the sample cover. At this time, install the sample cover to the cone rotor connector first, and then install the cone rotor.
Press the SPINDLE key, and then enter the two-digit rotor number, and press the ENTER key to confirm after inputting. At this point, the instrument will display: "SPINDLEOX, CALLBRATEYES/NO" prompting you whether calibration is required, if not, press "NO" and then press "ENTER" to confirm, if calibration is required, press "YES" and then calibrate according to the calibration section.
(3) Speed setting
Directly input the rotational speed with the number keys, and then press ENTER to confirm. To cancel the setting, press the ESCAPE key before pressing ENTER to confirm.
(4) Temperature setting
Press the TEMP key, input the desired temperature with the number keys, and then press the ENTER key to confirm, the temperature setting interval is 0.1°C
(5) Holding time setting: The holding time is the period from when the RUN key is pressed to when the rotor starts to start. It can ensure that the temperature between the sample and the rotor is equal. The setting range of the holding time is 0-999 seconds. When setting, press the HOLDTIME key and use the number keys to input the required time, and then press the ENTER key to confirm.
(6) Running time setting: The running time is the time of rotation. When setting, press the "RVNTIME" key, input the time with the number keys and press the ENTER key to confirm. Its setting range is from 0 to 999 seconds. If it is set to 0, the rotor will only rotate when the "RUN" button is pressed, and it will stop when it is released. The time required for the reading to stabilize is related to the rotation speed and the measured sample. We recommend at low RPM. Run a little longer.

(7) Print: If you press the print key PRINT, the instrument will send the test parameters to the print port, but the data such as viscosity, full scale range and shear rate can only be printed during the test.
(8) Run key and stop key
The run key has three functions:
1. Press the RUN key to start measurement
2. When the running time is set to 0, press and hold the RUN key to rotate the rotor for measurement
3. Used for rotor calibration
The stop key has three functions:
1. Press the STOP key to stop the rotor
2. When turning on the power, press and hold the STOP key to set the granularity unit and
3. Press the STOP and PRINT keys at the same time, the instrument will automatically send the data to the printer after the measurement is completed.
5. Operation
1. Turn on the power switch. If the instrument has been turned off for a period of time (such as one night), it should be preheated for 30 minutes.
2. Install the cone rotor.
3. Set the rotor number.
4. Set the temperature
5. Set the speed
6.压下手柄,使锥转子接近加热板,并且使手柄位于最低位置。等待约10分钟,使锥转子与加样板温度接近。
7.提起手柄,把样品加至加热板上,样品量请参考附录A。轻轻地压下手柄,样品应完全覆盖锥转子底部表面,并且溢出其边沿1.0mm。
8.等待约1至3分钟,使锥转子、加热板及样品的温度到达设置温度。
9.设置运行时间及保持时间。
10.若使用打印机,使仪器与打印机连机。
11.按下RUN键开始测量。
12.读取及打印测量结果。
13.提起手柄。
14.取下锥转子,并且清洁干净。
15.清洁加热板。
六、校准
新的随主机一起订购的锥转子,在出厂时已经校准时,可以不用进行校准。但用过一段时间,用标准液测试后,其结果超出误差范围时或更换过锥板子后需要进行校准。
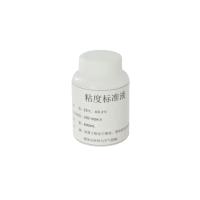
判断是否需要校准:用CAP专用的粘度标准油,按常规操作进行测试并记录测量结果。
其允许误差为标准液的误差与仪器本身的误差之和。
如:用03号锥转子,在900转/分的转速下,测量在25℃粘度为350CP标准油CAP-3L。
满量程范围=范围系数÷转速度
由表A2查得,范围系数为7500
则满量范围为7500÷900=8.33(833CP)
其误差范围为833CP的±2%,即±16.7CP
标准液的粘度为350CP,其误差范围为350CP的±1%,即±3.5CP总的允许误差为±(16.7+3.5)CP=±20.2CP
所以,若测量结果在(350±20.2)CP,即在329.8CP至370.2CP间,则仪器是正常的。若超出这个范围则需要校准。
锥转子的校准According to表A1选择标准液。我们建议在校准1至6号锥转子时,选择900转/分的转速,校准7至10号转子时,选择100转/分的转速。
1. Turn on the power switch
2. Connect the sample cover to the rotor connector
3. Install the cone rotor
4. Add the standard solution to the Hot Plate
5. Depress the handle to the lowest position
6. Lower the sample cover
7. Set the cone rotor number to be calibrated
8. When prompted whether calibration is required, press YES, then press ENTER to confirm
9. Set speed, temperature, viscosity
10. Wait for about 30 minutes to make the Heating Plate, standard liquid and cone rotor reach the set temperature
11. Press the RUN key to start calibration
After the calibration is completed, the cone rotor stops rotating, and "CALIBRATECOMPLETE" is displayed, and the ENTER key confirms the completion of the calibration.