I. Overview
The FJA-6 laboratory intelligent digital conductivity meter can not only cooperate with conventional conductivity electrodes to measure the conductivity of various electrolyte solutions and pure water, but also cooperate with TYC-2 or imported soil salinity sensors to measure soil content. Salinity and its dynamics.
Important features of the instrument:
1. The instrument has a digital temperature compensation function, which can conveniently and directly display the measured conductivity value or conductivity and temperature value at 25°C, which overcomes the troublesome shortcomings of manual calculation.
2. The conductance measurement range is 1µS-100mS (divided into 5 ranges) and the range is automatically converted.
3. The instrument works stably, has good reproducibility, and is easy to operate and convenient to read. It is suitable for laboratory or field applications with AC power supply conditions.
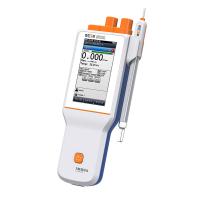
4. The photo of the instrument is shown on the right.
2. Technical characteristics
1. The range is automatically converted. Conductance measurement range is 1µS-100mS (divided into 5 ranges).
(1) 10mS—100mS
(2) 1mS—10mS
(3) 100µS—1mS
(4) 10µS—100µS
(5) 1µS—10µS (0.1µS can be read when the accuracy requirement is not high)
2. Conductivity measurement accuracy: <±1.5%
3. Temperature compensation error: <±2%
4. Stability: ±0.1% (full scale) ±1 word (per hour).
5. Weight: less than 0.5Kg.
6. Volume: 183Х130Х60mm
7. Conditions of Use:
⑴Ambient temperature: 0~45℃
⑵Relative humidity: ≤85%
⑶ Power supply: 5V DC
(4) There is no strong electromagnetic field interference around.
3. Principle
1. When using a conductivity electrode to measure the conductivity of a solution, the relationship between conductivity, conductance value and electrode constant is:
Conductivity = cell constant × conductance value
The electrode constant is input into the sensor parameter setting through man-machine dialogue, and the instrument can directly display the measured conductivity. While measuring the conductivity, the temperature sensor measures the temperature of the measured liquid, and the instrument can automatically calculate the conductivity at 25°C. No matter what temperature the sensor is in, the display value of the instrument will always maintain the conductance value at 25°C
2. There is a linear relationship between the salt content of the soil and the electrical conductivity of the soil at 25°C. Therefore, the former can be obtained only by measuring the latter. The salinity sensor used to measure soil salinity contains a salinity sensing element and a temperature sensing element. The salinity sensing element is made of two square platinum meshes that are closely attached to both sides of a circular porous ceramic sheet to form a platinum mesh. electrode. When the sensor is buried in the soil, the ions in the porous ceramic sheet and the ions in the pores of the ceramic sheet reach equilibrium through diffusion, and the solution concentration in the ceramic sheet can represent the solution concentration in the soil pores. The porous pores will be filled by the soil solution, and the salt ions in the soil solution will
Timing, the relationship curve between the conductivity value measured by the platinum grid electrode and the soil conductivity displayed by the instrument is approximately a straight line within a certain range, which can be expressed by the formula Y=BX+A where A is called the intercept. B are called slopes and they are the decision senses .
Two constants of the device characteristics. Therefore, in actual use, as long as the conductivity value Y at 25°C is measured, the soil conductivity X and salt content at 25°C can be calculated.
4. How to use
(1) Preparation
First insert the conductance electrode and temperature sensor into the corresponding sockets, and insert them into the sample to be measured. Plug the instrument into the power supply (5V DC regulated power supply). If you want to print the results, you need to use the RS-232C dedicated line to connect the instrument with the printer, and fix the RS232 socket fixing screws on the measuring instrument and the printer.
(2), use
1. Start the instrument
After the instrument is plugged in, the main menu is displayed on the LCD:
AutoConductometer
1. Measure
2. Parameters Set
3. MemoryOper.
At this time, if you select "1" (press the "1" key, the same below), conduct conductance and temperature measurement; if you select "2", conduct transmission
Sensor parameter setting; if "3" is selected, the storage operation will be carried out. The specific operation of each function is introduced as follows.
2. Sensor parameter setting
Enter the sensor parameter setting, the following prompts will appear on the LCD:
Cond. Electrode:
Const.:X.XX
T.coe.:X.XX
1. OK 2. CANCEL
Among them, "X.XX" represents the specific parameter value. "Const." is the conductance cell constant. "T.coe." is the conductivity electrode temperature coefficient. You can press the "←" key to delete a number before the cursor, and press the number keys "0" to "9" and "." to modify these two parameters .
当修改参数完毕或不需要修改时,按“↓”键让光标在第二到四行之间切换。
在第四行时,如果按“1”键,仪器则保存这两个参数(修改后的)值,进行下一步操作。
如果按“2”键,仪器则放弃对这个参数的修改,进行下一步操作不管选择“1”或“2”,显示。
屏出现如下提示:
TSensorSet:
Inter.:X.XX
Slope:X.XX
1.OK2.CANCEL
其中“X.XX”代表具体参数值。“Inter.”为温度传感器的截距,“Slope”为温度传感器的斜率,它们为实数,最多7位。修改操作方法同上。
3、测量
进入测量功能,仪器按以上设置先后自动进行温度测量、电导校正和测量。测量结束后,仪器According to测量值计算25度时的样品电导率,接着屏幕显示测量结果,并出现以下提示:
1.Meas.2.Prn.
3.Save0.Exit
选择“1”则测量下一个样品,选择“2”则打印结果数据,选择“3”则保存结果数据(保存后,屏幕显示“Datasaved.Hitanykeytoback.”,这时需要按任意键返回),选择“0”则退回主菜单。
4、存贮操作
存贮操作可以查看已保存的测量结果的数量、内容,也可以对它进行清空。进入存贮操作后,仪器显示:
7.Showdata
8.Datalength
9.ClearMemory
0.Back
这时,如果选择“7”则显示已保存的测量结果;如果选择“8”则显示已保存测量结果的数量;如果选择“9”则清空已保存的结果;如果选择“0”则返回主菜单。
当选择“7”查看已保存的测量结果时,如果没有保存的测量结果,此时显示:“Nodatasaved.Hitanykeytoback..”如果存在已保存的测量结果,仪器显示第1个测量结果,并显示“1.→2.←3.Prn0.Bk”这时,按“1”仪器显示后一结果(如果已到最后一个结果,再按“1”。
"Nodatanext" will be displayed), press "2" to the previous result of the instrument, press "3" to print the result, press "0" to return to the previous menu.
5. Matters needing attention
1. The instrument is powered by 5V DC voltage. Do not change the power supply voltage without authorization, so as not to burn out the instrument or not work properly. 2. Special attention: Do not expose the LCD screen to strong light for a long time, so as not to cause aging and shorten the life span.
3. If you do not measure, please turn off the instrument in time.
4. During the use process, if you have constructive comments on the product, please report it to us in time so that we can improve it in time. If there is a fault and it cannot work normally, please contact us in time for maintenance. Users please do not repair it yourself.