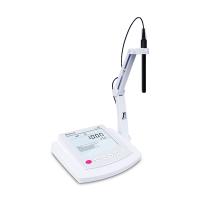
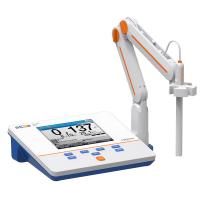
Connect power supply, electrode probe:
1. Plug the 12VDC transformer into a power source.
2. Plug the pH combination electrode's snap ring connector (BNC) into the port on the back of the machine.
3. Connect the temperature probe to the interface of the temperature probe.
pH Calibration:
1. Calibrate the instrument professionally before measuring.
2. Pour a small amount of buffer solution into a clean beaker.
3. Usually a two-point calibration is performed, one for the zero point and one for the slope.
pH single point calibration:
1. Insert the pH electrode and temperature probe 4cm (4.01, 7.01) below the surface of the standard buffer solution you choose. The temperature probe should be close to the pH electrode and shake gently.
2. Press the CAL key, the instrument will display "CAL", "BUF" symbols and the standard value of "7.01".
3. If manual temperature compensation is required, the set temperature value can be adjusted by "▲℃" or "▼℃".
4. When the reading is unstable, the screen will display “NOT READY”.
5. When the reading is stable, "READY" and "CFM" will be displayed, press the CFM key to confirm the calibration.
6. If the number approaches the selected buffer value, the instrument stores the reading. The first shows the calibration value and the second shows "4.01".
7. If the number is not close to the selected buffer value, "WRONG(BUF)" and "WRONG" will flash alternately. At this point, check whether the buffer has been used and check that the electrode is clean and replace if necessary.
8. Press "CAL" to exit the calibration mode and return to the measurement state, and store a point of calibration data.
pH two-point calibration:
1. Use pH7.01 as the first point of calibration, and pH4.01 as the second point of calibration.
2. The steps are the same as "single-point calibration", but do not press "CAL" to end the calibration at the end.
3. After confirming the first calibration point, insert the pH electrode into the second standard buffer and shake gently.
4. Press "▲℃" or "▼℃" to select different buffer values.
5. When the reading is unstable, the screen will display “NOT READY”.
6. When the reading is stable, "READY" and "CFM" will be displayed and flashing, press the CFM key to confirm calibration.
7. If the reading is close to the selected buffer value, the instrument will store the value and return to the normal measurement mode.
8. If the number is not close to the selected buffer value, "WRONG(BUF)" and "WRONG" will flash alternately. At this point, check whether the buffer has been used and check that the electrode is clean and replace if necessary.
pH measurement procedure:
1. Make sure that the instrument has been calibrated in a calibration solution of known sample measurement range before measurement.
2. Press the ON/OFF button to turn on/off the instrument, and the instrument will automatically perform pH measurement.
3. Dip the electrode and temperature probe into about 4cm below the water sample to be tested, and stop for a few minutes to allow the electrode readings to stabilize.
4. The second displays the pH value (large characters) and the second displays the temperature (small characters).
5. If the instrument has tested several different sample solutions, please clean the electrode with tap water, or wash the electrode with the sample to be tested before inserting the sample .
6. The temperature will affect the pH reading, in order to measure the accurate pH value, the temperature should be within the appropriate range, automatic compensation:
A) Use the H17669/2W temperature probe to immerse in the sample solution, close to the electrode and stop for a few minutes. If the temperature of the supplementary measurement solution is known or the measurement is carried out at the same temperature, you only need to manually compensate . At this time, the temperature probe does not need to be connected, and the temperature reading will be displayed on the screen with the ℃ signal flashing.
B) Record the temperature of the sample solution with an accurate reference thermometer.
C) Adjust by "▲℃" or "▼℃".
7. Reading lock function:
A) Press and hold the MEM key, the reading will be fixed on the display until the key is released, and the instrument will save .
B) Press and hold the MR key while the MEM indicator is displayed on the display.
C) Press MR key to call out the previously saved value.
ORP measurement
1. An ORP electrode is required for measurement. Insert the ORP electrode into the port on the back of the instrument.
2. Make sure the surface of the ORP electrode is clean and smooth.
3. Press ON key and RANGE key to enter the mV value measurement state.
4. To measure the millivolt value of the solution, just insert the ORP electrode about 4cm below the solution level, and stop for a few minutes to allow the reading to stabilize.
5. The meter displays the mV reading on the screen. If the reading is out of range, "..." is displayed.
Precautions:
1. Do not store or soak electrodes in distilled or deionized water.
2. If the reading deviates greatly (±1pH), it is due to no calibration or the electrode is not dry.
3. To avoid electrode damage, remove the pH electrode from solution before shutting down.
4. When it is turned off, the electrode should be removed from the instrument .
5. Cleaning procedure: Soak in Hana common cleaning solution HI7061 for about half an hour to remove dirt on the dialysis membrane. Soak in Hana Protein Cleaner HI7073 for 15 minutes to remove protein. Soak in Hanna Inorganic Cleaner HI7074 for 15 minutes to remove inorganics. Rinse by soaking in Hana Oil/ Fat Cleaner HI7077 to remove grease