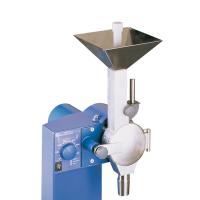
1. The grinding cup can be unscrewed counterclockwise.
2. When filling, pay attention that the bore in the grinding cup cannot exceed the maximum capacity height line (the metal inner liner of the grinding cup). Exceeding the maximum capacity will hinder normal operation and cause the instrument to overload. There is no limit to the minimum amount of grinding.
Note: A smaller amount (50%-80% of the maximum grinding amount) can be ground faster, and the final particles will smaller and the particle size dispersion will be smaller. When the amount of grinding is large, it can be divided into 2-3 batches of grinding. Although the total time will be slightly longer, the grinding effect will be much better.
3. Loose grinding materials (such as hay and straw) can exceed the edge of the inner tank of the metal shell, but the tank should not exceed 10mm below the upper edge of the grinding cup. For loose materials, when the driving part is pressed, the loose materials will be naturally pressed to the grinding area. Rotate the grinding cup to the bottom (you can hear a click), and after turning on the power, you can start the grinding operation.
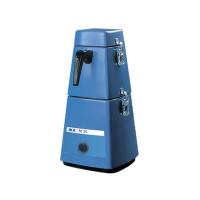
4. Hold the upper end of the Grinder with one hand, press the switch key (ON/OFF) with your thumb, and the Grinder starts . Slowly press the driving part down along the driving axis to make the blade touch the material to be ground for grinding ( do not press it obliquely to one side, otherwise it will accelerate the wear of the driving shaft seal).
5. When the blade cuts into the grinding material, you can hear that the motor speed will slow down. If the speed drops sharply, you should pull it up lightly to increase the speed. During the grinding process, depending on the material, it may be necessary to repeat the process of gently pressing down and gently pulling up. When the blade is pressed down and back up, the motor speed is relatively stable, indicating that the grinding work has been completed.
6. Before finishing the grinding operation, the driving part of the instrument should be fully returned to the normal position, and only then can the key be released. This way the blades can be cleaned automatically. Do not unscrew the grinding cup until the motor has come to a complete stop. Materials sticking to the grinding bowl can be brushed into the grinding cup with a cleaning brush (metal brushes are not allowed).
Note: At this time, the blade, grinding cup and motor shaft may be very hot. When cleaning or replacing the blade, it is necessary to wait for the instrument to cool down.