special measuring tasks
How does the PHYNIX coating Thickness Gauge measure under harsh conditions? Not every measurement object is "desirable". You will often face practical difficulties that can lead to negative effects on measurement accuracy. Typical sources of error are curved, rough surfaces, edges or measurements on soft and sensitive coatings. Usual measurement calibrations result in accurate and reliable measurements. On the following pages you will find a list of suggested solutions for several typical sources of errors. "> When using a coating Thickness Gauge to measure coating thickness, not every measurement object is a satisfactory environment. You will often face practical difficulties that may lead to negative effects on measurement accuracy. Typical sources of error are Curved, rough surfaces, edges or measurements on soft and sensitive coatings. Usual measurement calibrations result in accurate and reliable measured values. On the following pages you will find a list of suggested solutions for several typical sources of error.

Surface measurement

Measurements on rough surfaces
Method 1 (applicable to roughness RZμ less than 20 m):
Zero Instrument: Position the probe approximately 10 times the rough surface for zeroing A two-point calibration is performed: approximately 5 times the probe position, "foil calibration". You can now measure: the number of times the probe was positioned. The average value corresponds to the average coating thickness of the peak
Method 2 (applicable to roughness RZμ greater than 20 m):
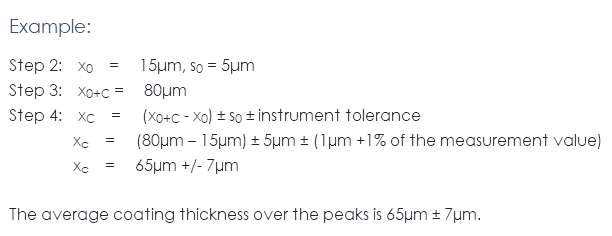
Calibrate the instrument on the same surface with a rough measurement object of the same shape and steel as the same type of coating (one-point or two-point calibration correction). Position the probe about 10 times over the rough coating to measure the object and form the average x0+C {xzero+coating } from the measured value. this average x 0 It is the effect on the roughness measured by the coating Thickness Gauge. You can also use the instrument's statistical averaging. Measurement of coating thickness on rough surfaces. Position the probe approximately 5 to 10 times over the coating to take measurements. determine the mean x0+C {xzero+coating } From measurements described in 2. this average x 0+C Influenced from coating thickness and roughness. Calculate the difference in mean x x0+C -x0 . . The difference is that the average coating thickness x C in the mountain


Measurement across sides
The different probe diameters are shown in the table below:


