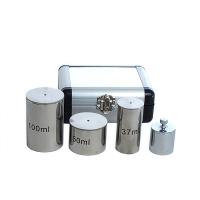
The weighing cup (all parts) is completely clean and dry, note the weight. Release the pressure on the housing by turning the handle (a) counterclockwise. Remove the pressure release cap (B) Unscrew the plunger (C) (D) by turning the handle counterclockwise and seat it in the cup. Put the test sample into the cylinder until almost full. Verify that the temperature for the test is correct. Replace the pressure relief cap (B) and reassemble the pressure relief housing, over the clip cap. Make sure the lid is in the center of the cup and turn the handle (one) clockwise to release the pressure. Allow 30 min for the pressure density cup and sample to reach temperature equilibration. With a firm grip on the cup, slowly turn the handle (D) to its fully depressed position (clockwise) to increase internal pressure by 10.3 bar (150 lbs). When doing so, the pressure relief housing should be pointed at a suitable container to catch any expulsion material. Wash off any dislodged samples and effectively dry the outside of the cup. Also known as cup and note value. Calculate the mass of the sample by subtracting the full weight (step 10) from the empty weight (step 1). (This is a sample of 100ml ± 0.1ml.) 
Completely disassembled cups are clean and effective on materials that dry or harden on the surface.
Operation of Pressure Density Cups


Guess you like it


Relevant knowledge
- 1Application of Specific Gravity Cup in Coating Density Detection
- 2Paint specific gravity detection method
- 3Frequently Asked Questions about the 2022 Gravity Cup
- 4What is specific gravity? How to measure it?
- 5Main test subjects of powder coatings and their reference standards
- 6What is the specific gravity of ink? How to measure?
- 7Determination of paint density
- 8List of commonly used testing instruments in laboratories of latex paint manufacturers
- 9How to evaluate the defoaming performance of defoamer by high-speed stirring test method?