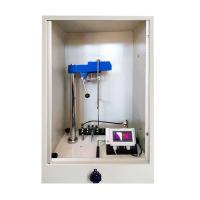
Initial installation of the instrument
(1) Place the instrument on a stable and firm workbench. Remove the plexiglass cover and adjust the instrument level. If using a Konig sway, turn the sway lever to the right first; if using a Persoz sway, turn the sway lever to the left first.
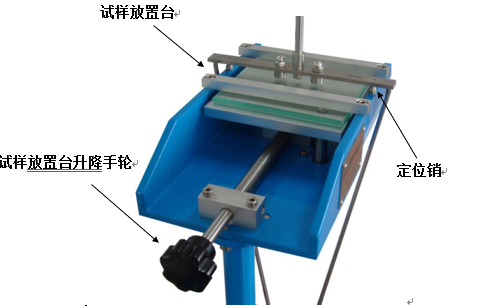
(2) Lower the sample placement platform and put in a flat glass piece (supplied). Take out the swing lever you want to use, and clean the ball contact of the swing lever with a clean soft cloth. Align the small holes on the pendulum with the positioning pins on the console, and place the pendulum (the side with the "Konig" or "Persoz" mark on the pendulum is facing forward).
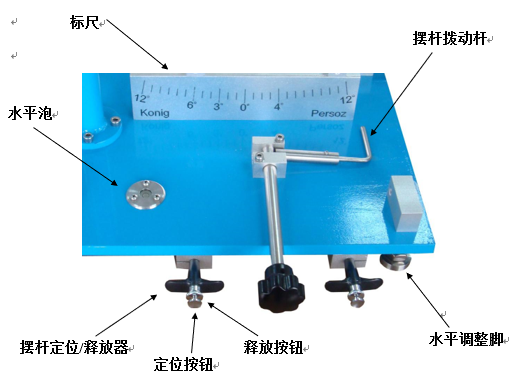
(3) Check the zero position of the scale: raise the sample placing table to clamp the flat glass (the pendulum will be raised accordingly, and the spherical contact will be in contact with the flat glass), and after the swing stops, check whether the tail of the pendulum is at the zero point of the scale. bit. If it is not at zero position, adjust the scale to zero position (it has been adjusted before leaving the factory).
(4) After positioning the pendulum to the initial position, check whether the tail of the pendulum is at the position of 6o (or 12o) on the scale (it has been adjusted before leaving the factory).
(5) After completing the above inspections, remove the flat glass sheet, install the plexiglass cover, connect the signal line between the instrument and the control box, and turn on the power of the control box. The instrument installation is complete and the instrument is now ready to use.
Instrument Control Box Operating Instructions
(1) The instrument control box is used for swing counting control of the pendulum. The "Select" button is used to set the pendulum shape, which needs to be consistent with the selected pendulum. Select "Konig pendulum" to enable the photoelectric counter on the left side of the instrument (position of scale 3o); select "Persoz pendulum" to enable the photoelectric counter on the right side of the instrument (position of scale 4o).
(2) "Start" button is used to start the instrument to enter the counting preparation, and clear the previous display at the same time.
(3) When the counting is over, the instrument control box will beep to prompt, and the number of swings (osc) and swing seconds (sec) will be displayed in a freeze frame. The instrument control box measures the number of swings and the number of seconds of swinging simultaneously, and one measurement simultaneously provides two kinds of result displays.
Instrument pre-test inspection
(1) Take off the operation hole cover on the right side of the plexiglass cover, clean the spherical contact of the pendulum rod, place the pendulum rod on the positioning pin, put in the flat glass piece, and then cover the operation hole cover again.
(2) Confirm that the level bulb of the instrument is in the horizontal position, and turn on the power of the instrument control box.
(3) Raise the sample placement table to clamp the flat glass (the spherical contact of the swing rod is in contact with the flat glass sheet), and slowly move the swing rod to the initial swing position (6o or 12o position of the scale) with the swing rod. ), use the swing rod positioning/release device to position the swing rod, and confirm that the tail of the swing rod is at the corresponding position of the scale.
(4) Press the "Start" button of the instrument control box, release the pendulum with the pendulum positioning/release device, and let the pendulum swing back and forth on the flat glass. Confirm that the instrument control box stops counting at the specified end swing position and beeps (3o or 4o position of the scale); confirm that the number of swings using the Konig pendulum is between 172 and 185, and the number of swings using the Persoz pendulum is ≥420.
(6) After completing the above inspections, take out the flat glass piece, and then you can do the test operation. If there is any discrepancy in the above checks, the instrument needs to be recalibrated.
Instrument test operation
(1) Usually, the entire test should be carried out under laboratory temperature and humidity conditions (temperature 23±2oC, relative humidity 50±5%).
(2) Take off the operation hole cover on the right side of the plexiglass cover, and clean the sample operation table.
(3) Clean the spherical contact of the pendulum and place the pendulum on the positioning pin.
(4) Put in the test sample (if the test sample is thin, a flat glass sheet can be placed underneath).
(5) Cover the operation hole cover.
(6) Raise the sample placement platform to clamp the test sample, and move the pendulum to the corresponding starting position and position it.
(7) First press the "Start" button of the instrument control box, and then release the pendulum.
(8) After the buzzer of the instrument control box prompts the end of the test, record the displayed number of swings and swing time.
(9) Lower the sample placement platform, remove the operation hole cover, take out the test sample, and complete a test.
(10) After the test is completed, please cover the operation hole cover in time to reduce the entry of dust.
Precautions for use
(1) Do a good job of cleaning the spherical contact of the pendulum in time. If the spherical contact is corroded, it is necessary to replace the steel ball with a new one and recalibrate the instrument.
(2) When placing the pendulum on the console, the marked side faces forward.
(3) When placing the Konig pendulum, first turn the pendulum lever to the right; when placing the Persoz pendulum, first turn the pendulum lever to the left.
(4) If the positioning button of the pendulum positioning/release device cannot be self-locked, first press the release button and turn it counterclockwise to make the release button pop out, and then press the positioning button to self-lock.
(5) When testing the operation, press the "Start" button of the instrument control box before releasing the pendulum.
(6) The test needs to be carried out with the plexiglass cover covered.
(7) The small error of the zero position of the pendulum can be calibrated by fine-tuning the 4 leveling feet (without affecting the accuracy of the level bubble).