1 Diagram of equipment
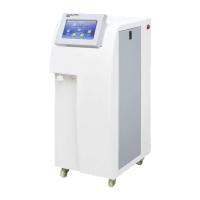
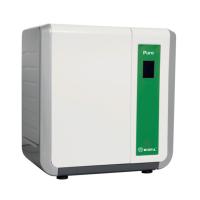
1.1 Equipment Appearance

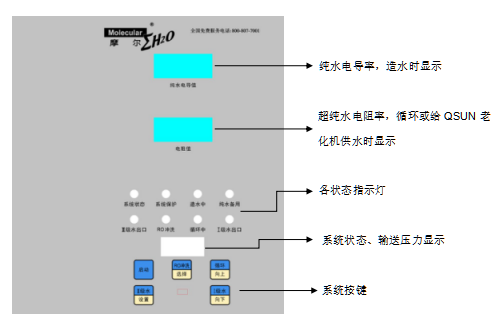
1.2 Equipment operation panel
2 Introduction to the basic principle of the equipment
PP fiber filter element: unique outer loose and inner tight structure, can effectively remove suspended matter, sediment, and particulate impurities above 5micron or 1micron (determined according to the pore size of the PP fiber filter element) in the water source; effective activated carbon filter element: has a very strong Adsorption and filtration performance can effectively remove impurities such as color, odor and organic matter in distilled water.
Activated carbon filtration: chemical adsorption to remove chlorine, organic adsorption to remove soluble organic matter. Because the reverse osmosis membrane is sensitive to chlorine and soluble organic matter, carbon columns are often placed in front of the RO membrane to remove these substances.
Reverse Osmosis Membrane: Osmosis is the flow of water through a semi-permeable membrane from the low concentration side to the high concentration side. If a high-pressure pump is used to provide a high-concentration solution with a pressure greater than the osmotic pressure difference, water molecules will be forced to pass through the semi-permeable membrane to the low-concentration side. This step is called reverse osmosis. Reverse osmosis can filter out 90%-99% of most pollutants. Because of its superior purification efficiency, reverse osmosis is a very effective technology for water purification systems. Because reverse osmosis removes most of the contaminants, it is often used as a pretreatment method, which can significantly extend the life of the deionization column. Reverse osmosis treated water is high quality pre-purified water suitable for routine use in many laboratories. The reverse osmosis membrane made in the United States can effectively remove various salt ions, organic matter, bacteria, and viruses in the water, and the total salt removal rate can reach more than 99%, and can remove organic matter with a molecular weight greater than 300dalton;
Purification column: US ultra-pure water special ion exchange resin and special flow path design, high ultra-purification efficiency, can effectively remove trace ionic substances in water.
The operation control of the machine adopts intelligent microcomputer control, touch the button, and has the operation status display, and the water quality online monitoring, fully realizes the man-machine dialogue.
3 Mole water purifier working conditions
Operating Voltage | 220V±10%/50Hz, with reliable grounding |
power | 200W |
raw water temperature | 5-40℃ |
tap water pressure | 0.15-0.25Mpa (if it is higher than 0.25 Mpa, the customer needs to take decompression measures, otherwise it is prone to overpressure damage and water leakage; if it is lower than 0.1 Mpa, the equipment will alarm and shut down, and a booster pump needs to be added) |
working environment | The installation site should ensure a ventilated and dry environment, and the temperature should be between 5-30°C; especially in northern areas, prevent the instrument from freezing in winter, as the water in the instrument will freeze and cause the instrument to be effectively damaged; do not place the equipment in a place with high acidity big environment |
4 Water purifier equipment installation steps
4.1 Requirements for installation conditions
4.1.1 The equipment should be installed in a ventilated and dry environment as much as possible.
4.1.2 The specifications of the inlet and outlet pipes should meet the requirements of the supporting interface of the water purifier, and should be within 2 meters from the host.
4.1.3 The equipment is placed stably, reliably and in the correct position.
★ 4.1.4 There should be drainage ditches or drainage channels and cofferdams next to the equipment.
4.1.5 The power supply and wire configuration of the system meet the design requirements.
4.2 Installation
4.2.1 Check that the packing list of the machine is consistent with the actual parts;
4.2.2 Please disconnect the water source and power supply;
4.2.3 Please connect the metal joints and faucets in the accessories to the customer's water supply, and then use a 3-point white PE pipe to connect the original water outlet at the rear of the machine to the outlet of the faucet;
4.2.4 Connect 2 white PE pipes from the two waste water ports at the rear of the machine to the sink and insert them into the downpipe; the insertion length is about 0.5 meters;
4.2.5 Connect 3 points of white PE pipe from the overflow port at the back of the machine to the sink and insert it into the downpipe; the insertion length is about 0.5 meters;
4.2.6 The QSUN aging machine interface at the rear of the machine is connected to the corresponding hose to the QUV aging machine.
4.2.7 It is required to be clean and fresh after installation.
4.2.8 Insert the power plug of the machine into a 220V socket that meets the installation standards.
4.3 Schematic Diagram of Equipment Installation

Schematic diagram of pipeline connection at the rear of the main chassis
5 Standard procedures for equipment operation and maintenance
5.1 Function description
5.1.1 Working mode selection
After shorting the K2 of the circuit board, the system works in the pressure control mode, and the digital display pressure value (in kilograms).
After K2 is disconnected from the circuit board, the system works in the fixed time water intake mode, and the digital display time (unit S).
E01: The water inlet pressure of the machine is low, and the machine cannot produce water normally.
E02: The pure water level in the pure Water Tank is lower than the low level switch, and the machine cannot draw water.
5.1.2 Settings
When setting the state, the following keys are multiplexed.
during normal work | function at setup | illustrate |
Tertiary key | set up | When in standby, press and hold for 3 seconds to enter the settings |
RO flush key | choose | In the pressure control mode, select the high-low pressure control points to be set, high H xx, low L xx. (Note: After this operation is adjusted for the first time, do not adjust it arbitrarily in the future, otherwise it will cause transmission failure) Select the hundreds, tens and ones to be modified in the fixed time water intake mode |
cycle key | up | increase the number |
primary key | down | reduce the number |
When the system is in the standby state, press and hold the setting button for 3 seconds to enter the setting state, press the selection button to select the data item to be modified, and press the increase or decrease to modify the data. You can press the standby button or press the setup button again to exit the setup.
5.2 Indicator light description
indicator light | state | illustrate |
start light | red | standby |
green | work, set | |
Call the police | 1 second - 1 second flashing | 进水压力低或进水压力开关故障 |
0.5秒-0.5秒闪烁 | 中或高液位开关故障 | |
0.3秒-0.3秒闪烁 | 水位低于低液位或低液位开关故障 | |
三级取水 | 闪烁 | 三级定时间取水且窗口显示三级取水剩余时间 |
常亮 | 一级随机取水,或一、三级同时处于定时间取水但窗口显示处于一级取水剩余时间显示的时段。 | |
冲洗 | 闪烁 | 处于上电冲洗、定时冲洗或造水后冲洗等程序性自动冲洗。 |
常亮 | RO人工冲洗 | |
纯水备用 | 闪烁 | 水箱水位在中液位和高液位之间 |
常亮 | 水箱水位到达高液位 | |
灭 | 水箱水位低于中液位 | |
造水 | 亮 | 造水状态 |
5.3 启动
打开自来水阀门后,打开机器背部的电源开关,按下控制面板上启动键,“系统状态”灯亮;设备开始进入开机自动冲洗状态,“RO冲洗”灯闪烁;约3分钟后,如果纯水未满水,会自动切换到造水状态,“造水中”灯亮;反之,则“纯水备用”灯亮。
5.4 冲洗
5.4.1 上电自动冲洗。当按下启动按键后自动自行上电冲洗功能,可由RO冲洗键中断上电自动冲洗进入RO人工冲洗。
5.4.2 造水后自动冲洗。当造水水满后,自动执行造水后冲洗,可由RO冲洗键中断造水后自动冲洗进入RO人工冲洗。
5.4.3 定时冲洗。当累计造水超过两小时后,自动执行2分钟定时自动冲洗,定时自动冲洗未完成时可由RO人工冲洗中断进入RO人工冲洗,但不能立即消除系统的定时冲洗记忆,当中断RO人工冲洗后还会执行定时冲洗。但当执行上电冲洗或RO人工冲洗时间超过2分钟后,可消除系统中定时冲洗的记忆。
5.4.4 RO人工冲洗。当按下RO键,执行人工冲洗,再次按下RO按键中断RO人工冲洗,否则5分钟后自动结束冲洗。
上电冲洗、定时冲洗、造水后冲洗属于系统自动执行的冲洗动作,当执行自动冲洗时,冲洗指示灯闪烁指示,当自行RO人工冲洗时,冲洗指示灯常亮。
5.5 造水
当系统检测到水箱水位在中液位下时,启动造水,当水位到达高液位时,停止造水。但当虽然检测到中液位无水而高液位水满时(液位开关有故障),或检测到进水压力低时,则不会执行造水动作,如果正在执行造水动作也会立即中断,系统会进入报警状态(见报警)。
5.6 循环(电阻显示按键)
当水箱超过低液位有水时,按下循环按键,电阻表显示屏亮,显示水质电阻值,再次按下循环键停止循环,电阻表灯灭。需查看电阻时请按“循环”按键,平时请勿使用循环,循环时将消耗树脂。
5.7 取水
当低液位有水时,按下三级取水按键,执行三级取水功能,再次按下三级取水按键,停止取水动作。
虽然操作面板上有一级取水按键,但本机无一级取水功能。
5.8 压力控制
当选压力控制模式时,显示窗口显示压力桶压力。当水箱低液位有水10分钟后或当中液位有水时,系统判断压力值,当压力值低于设定的压力低限时,系统输出控制信号驱动外部故态继电器,反之,当压力高于等于设定的压力高限时,系统关闭该驱动输出。
5.9 报警及保护
5.9.1 当系统检测到进水压力低时,不能执行或中断执行的造水动作,系统发出1s-1s间隔的声光报警。按任意键或一分钟后自动消除报警声音。
5.9.2 当系统检测到中液位无水高液位水满时,不能执行或中断执行的造水动作,系统发出0.5s-0.5s间隔的声光报警。按任意键或一分钟后自动消除报警声音。
当系统检测到低液位无水时,不能执行取水、循环或中断当前的取水、循环动作,系统发出0.3s-2s间隔的声光报警。按任意键或一分钟后自动消除报警声音。
5.10 操作说明
常 操 作 内 容 | 1. 检查自来水水有足够压力并且阀门已经打开(压力范围0.15-0.25Mpa)。 2. 将设备电源插头连接在220V电源上,按下启动开关,“系统状态”灯亮;设备开始自动进行RO冲洗,“RO冲洗”灯闪烁;约3分钟后设备停止冲洗开始造水,“造水中”灯亮;如果纯水箱内的水位已经达到了高液位,设备处于待机状态,面板上“纯水备用”灯亮。 3. 从机器后面的老化机接口可以放出纯水,当老化机取水工作时,电阻表显示出水水质;如需冲洗RO膜,请手动直接按下“RO冲洗”键,再次按下,则停止冲洗。 4. 当需要直接从纯水机上取水时,可按下“Ⅲ级水”按键即可。 5. 当纯化柱mp5和mp3中的树脂出现饱和时(即电阻表显示值小于10MΩ.cm),此时需更换此耗材(纯化柱mp5和mp3),更换完毕后,即可正常使用,更换方法详见后续的耗材更换操作步骤。 6. 如果不使用此纯水器时,请再次按下启动开关,设备关闭,“系统状态”灯熄;关闭仪器旁边的总电源开关,关闭自来水阀门,断开电源。 |
维 护 | 1. 开机时请对RO膜进行冲洗,如果设备闲置过长时,RO膜冲洗时间需久点。 2. PP滤芯的更换周期一般在1-2个月,According to自来水的实际情况而确定更换周期; 3. AC滤芯的更换周期一般在1-2个月,According to自来水的实际情况而确定更换周期; 4. 若设备长时间不使用,建议每周运行10分钟,防止系统内细菌滋长。 |
备注:
当老化机未用水,三级水在使用时,此时本纯水机电阻表上显示值为虚值,不准确。
当老化机在使用水,三级水同时在使用时,此时本纯水机电阻表上显示值为准确数值。
当老化机机在用水,三级水未使用时,此时本纯水机电阻表上显示值为准确数值。
6 耗材更换操作步骤
先关闭自来水进水阀,当低压开关报警后关闭电源开关,这样可减少滤芯中的余水量,便于耗材更换,再打开机箱两侧活动门,可利用简单工具进行设备的更换:
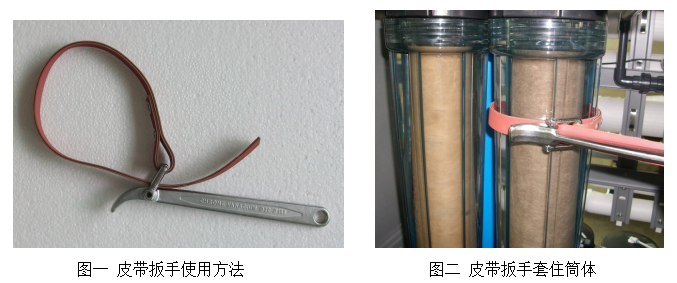
6.1 一级预处理器滤芯:用皮带扳手套住标有一级预处理器滤芯(PP滤芯)的筒体逆时针旋转,慢慢将一级预处理器滤芯筒体拧松,取下筒体,将内部的滤芯取出,清洗一下筒体(清洗时请注意筒体内的黑色橡胶圈不要弄掉),将新一级预处理器滤芯(PP滤芯)装回筒体,注意PP滤芯的中心孔要与筒体的中心孔对齐,然后把筒体装到固定的端盖接口上,用皮带扳手套住筒体,顺时针旋转拧紧,参考示意图一、图二。
6.2 二级、四级预处理器滤芯:二级(活性炭滤芯)、四级(精滤滤芯)预处理器滤芯的更换与一级预处理器滤芯更换一样(请注意活性碳上的黑色橡胶垫圈不要弄掉)。
6.3 Molp mp3和mp5号纯化柱的更换:松开固定纯化柱的抱箍和纯化柱两端的PE管快插接头,换上新的纯化柱即可。更换时注意PE管快插接口要插紧,并用蓝色卡子卡紧。
6.4 反渗透膜的更换:了解膜的三个接口的进出水方向,特别注意纯水口与废水口不要混淆。然后松开固定膜的抱箍或单夹,接上新到的反渗透膜,连接好各对应接口管子,并用蓝色卡子卡紧。
注意:
①、按顺序安装,对号入座。
②、各个部件要拧紧,卡到位,否则设备在制水过程中容易漏水。
③、安装完毕后,接通电源进行冲洗和运行,如果发现漏水,请及时紧固接头,确认不漏水和水质达到标准方可使用。
7 耗材更换判定与方法
名称 | 型号规格 | 标配量 | 更换周期 | 判定方法 |
一级预处理滤芯 | Molcot 20 | 1支 | 1-2个月 | 通过透明筒体观查滤芯顔色变成深黄色即可更换 |
二级预处理滤芯 | Molgac20 | 1支 | 4-6个月 | 如果当地水质差,漂泊粉多,更换时间应缩短。 |
四级预处理滤芯 | Molpp20 | 1支 | 4-6个月 | 通过筒体观查滤芯顔色变成较深黄色即可更换 |
反渗透膜 | 3支 | 1年左右,3支同时更换 | 通过机器上显示的电导率判定,当电导率>5μs/cm时(不得超过7μs),需更换. | |
纯化柱 | Mp3 | 1支 | 1年左右,3支同时更换 | 通过机器上显示的电阻率判定,当电阻率<10MΩ.cm 时(不得小于7MΩ.cm ),需更换. |
Mp5 | 2支 | |||
注:耗材实际使用寿命与进水水质有关,自来水水质不同,更换周期有所不同。 | ||||
8故障现象诊断和处理
序号 | 常 见 故 障 | 原 因 分 析 | 解 决 方 法 |
1 | 开机出现系统保护,设备报警 | ① 进水阀门未打开 ② 自来水压力低于0.1Mpa ③ 滤芯被堵 ④ 进水电磁阀没有全打开 | ① 打开进水阀门 ② 调整自来水压力 ③ 更换新的滤芯 ④ 更换对应型号的新进水电磁阀 |
2 | 主机纯水备用后,纯水箱有水溢出 | ① 进水电磁阀有异物卡住 ② 纯水箱上的溢水口未接出至水槽内 | ① 清除杂物更换电磁阀 ② 用白色PE管接溢水口至水槽内 |
3 | 按下取水键后,取水指示灯不亮,不能正常取水 | ① 纯水箱水位低于低液位开关 ② 液位信号线松脱 | ① 待水箱水位升高后再取用 ② 重新连接信号线 |
4 | After pressing the water fetching button, the water fetching indicator light is on, and water cannot be fetched normally | ① The water intake solenoid valve is broken ② The smart controller is broken ③ There is air entering the system | ① Replace the solenoid valve with a new one ② Replace with a new intelligent controller ③Place the Water Tank higher than the host to exhaust the air |
5 | After plugging in the power plug, the indicator light on the panel does not flash, and the machine cannot be turned on | ① Outlet is dead ② The fuse is blown ③ The gray connection wire on the smart controller is loose ④ The switching power supply has 220V input but no 24V or 48V output | ① Change to a powered socket ② Replace the fuse ③ Reconnect the gray cable ④ Replace the corresponding model with a new switching power supply |
6 | Reduced water production | ① The pretreatment filter element is clogged ② RO membrane clogged ③ The weather temperature is lower than 10℃ | ① Replace the pretreatment filter element ② Replace the RO membrane ③ After the temperature rises, the water production will naturally increase |
7 | The quality of effluent water is reduced | ① The cycle time is too short ② Expired consumables ③ The probe of the resistance meter or conductivity meter is broken | ① Extend the cycle time before taking ② Replace consumables ③ Replace the corresponding probe |
8 | The machine does not make water | ① The pipeline is wrongly connected ② The machine will not start without power ③ Expiration of consumables ④ The booster pump does not work ⑤ The intelligent controller is broken | ① Connect the pipeline correctly ② Replace circuit accessories ③ Replace consumables ④ Replace the booster pump ⑤ Replace the smart controller |