As a commonly used spraying tool, the Spray Gun will encounter various failures in daily use . This article takes the SATA Spray Gun as an example to list several common causes and corrective and preventive methods. Hope that through the following introduction, it can help spray paint technicians to solve the confusion in the process of using the Spray Gun.
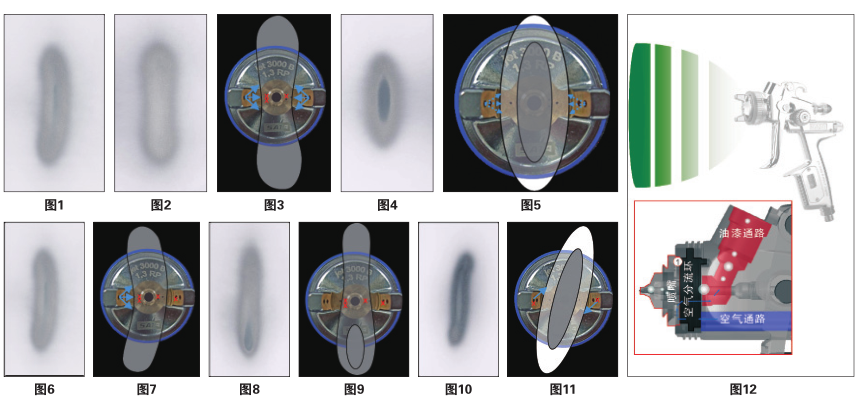
1. Defects of spray pattern - spray pattern deformation (Figure 1)
Cause: The air holes (fan-shaped holes or auxiliary atomization holes) on the wind cap are blocked by dry paint, so that the abnormal air flow deforms the spray width; incorrect air intake pressure (too high/too low) causes spray width to break open or too small.
Correction method: Clean the air holes on the Spray Gun and wind cap according to the cleaning instructions; use SATA adam 2 digital pressure regulator Adam, SATA DIGITAL digital Spray Gun, or install a SATA gun tail pressure gauge to adjust the air inlet pressure of the Spray Gun.
2. Defects of the spray pattern - the spray pattern is narrow in the center and large at both ends (Figure 2)
Reason: The viscosity of the paint is too low, the viscosity of the paint does not match the spraying air pressure; the spraying air pressure is too high, and the air pressure in the fan-shaped hole is too high, so that the center of the spray width is depressed; the atomization hole is blocked, and the blockage of the atomization air hole makes relatively more air go to the fan. The hole makes the center of the spray pattern depressed (Figure 3).
Correction method: adjust the paint viscosity or use a suitable caliber nozzle; use SATA adam 2 digital pressure regulator Adam, SATA DIGITAL digital Spray Gun, or install a SATA gun tail pressure gauge to adjust the appropriate spraying air pressure; use suitable cleaning tools to clean Wind cap air hole, replace nozzle set if necessary.
3. Defects in the spray pattern - the paint is gathered in the center, and the spray pattern cannot be scattered (Figure 4)
Reason: The spraying air pressure is too low, the air pressure in the fan-shaped hole is too low to press out the fan surface (Figure 5); the paint viscosity is too high, the air pressure in the fan-shaped hole is not strong enough to press the high-viscosity paint into a fan surface ; the nozzle is damaged, and the spray width adjustment knob Not open.
Correction method: adjust the paint viscosity or use a suitable caliber nozzle; use SATA adam 2 digital pressure regulator Adam, SATA DIGITAL digital Spray Gun, or install a SATA gun tail pressure gauge to adjust the appropriate spraying air pressure; adjust the paint viscosity, or use For nozzles with suitable caliber, if the nozzle is damaged, replace the original nozzle set; check whether the spray width adjustment knob is fully opened.
4. Defects in the spray pattern - the spray pattern is bent in the shape of a banana (Figure 6)
Reason: one of the fan holes is blocked or deformed, and the air pressure of the fan holes on both sides is inconsistent; the blockage of the atomization hole makes the air go to the fan holes, which increases the air pressure of one of the fan holes (Figure 7).
Correction method: Clean the air cap with a special SATA cleaning kit, and replace the original nozzle .
5. Defects in the spray pattern - the wet area in the spray pattern is biased to one side (Figure 8)
Cause: The fan-shaped hole or atomizing hole is blocked or deformed, and the atomized paint (Figure 9); the nozzle is damaged, and the gap between the atomizing hole in the center of the wind cap and the nozzle is uneven, so that the atomized paint Lean to one side.
Correction method: Clean the air cap with a special SATA cleaning kit, and replace the original nozzle .
6. Defects in the spray pattern - the spray pattern is twisted and inclined or S-shaped (Figure 10)
Reason: The fan-shaped holes are blocked or deformed, and the diagonal fan-shaped holes on both sides are blocked or deformed to make the spray width tilt (Figure 11).
Correction method: Clean the air cap with a special SATA cleaning kit, and replace the original nozzle .
7. Defects of spray width - discontinuous spray width, beating (Figure 12)
Reason: The nozzle is not tightly installed, the nozzle and the air distribution ring are not completely sealed, and the air runs to paint passage; the nozzle or the air distribution ring is not cleaned, and the paint residue prevents the nozzle and the air distribution ring from being completely sealed; the sealing surface of the air distribution ring Damage affects its seal with the nozzle; the gun pot vent is clogged, and a clogged gun pot vent creates a vacuum that draws air from the nozzle into the paint passage.
Correction method: Use the original wrench to tighten the nozzle, clean the nozzle with a SATA special cleaning kit, and replace the air distribution ring. Clean the canister vent and replace the canister if necessary.
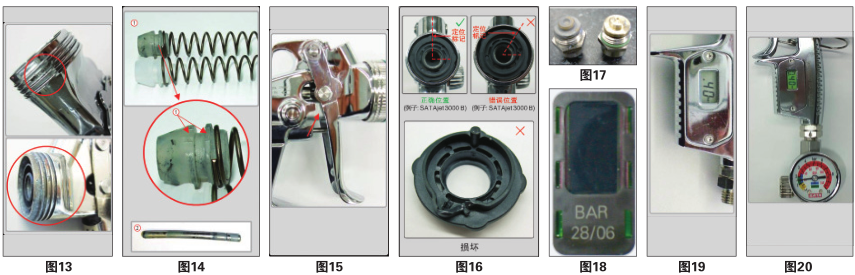
8. The electroplating layer of the wind cap thread on the gun body falls off (Figure 13)
Reason: The pH value of the cleaning solution used to clean the Spray Gun is lower than 6 or higher than 8, acid or alkaline damages the electroplating layer; the Spray Gun is not dried effectively after cleaning or the wind cap is not removed and dried, and the cleaning solution residue is on the thread Damage to the surface of the plating layer.
Correction method: Use a neutral cleaning solution to clean the Spray Gun, pay attention to the pH value of the cleaning solution, and dry the Spray Gun effectively after cleaning and during assembly and disassembly.
Prevention: Never immerse Spray Gun in solvent; make sure to clean Spray Gun properly .
Nine, Spray Gun air valve leakage
Reason: Improper cleaning of the Spray Gun, the air valve sealing ring is damaged by dried paint residue (Figure 14①); when the Spray Gun is hung, it touches the air valve plunger, and the air valve plunger is deformed, causing air leakage (Figure 14②).
Correction method: check and clean the sealing ring frequently, and replace the air valve ejector rod.
Prevention: Never immerse the Spray Gun in solvent! Make sure to clean ; place the Spray Gun on a suitable Spray Gun rack.
10. Spray gun leaking paint (Figure 15)
Cause: The fixing screw of the needle sealing ring is not tightened, and the loose needle sealing ring causes leakage wear of the needle sealing ring causes paint leakage; the dry and solid paint residue on the needle damages the sealing ring, and the damaged needle Seals causing paint leaks.
Correction method: use SATA original tools and tighten the needle sealing ring by hand; check (each SATA Spray Gun has a special sealing ring); replace the nozzle set when necessary.
11. The spray width cannot be adjusted normally—but the spray width adjustment knob operates normally
Reason: The air distribution ring is damaged or the installation position is improper (Figure 16), and the abnormal air flow affects the spray width.
Correction method: replace the air splitter ring, align the positioning rod behind the splitter ring with the small hole of the gun head , press the splitter ring evenly and lightly into the gun head with the thumbs of both hands, then install the nozzle and use the original SATA wrench Tighten it, then loosen and retighten.
预防方法:使用SATA原装工具装拆喷嘴。
十二、喷幅不能正常调校 — 喷幅调节旋钮不能正常操作
原因:喷幅调节旋钮被油漆残渣堵塞,旋转喷幅调节旋钮时把螺纹弄坏(图17)。
修正方法:更换喷幅调节旋钮及轴心。
预防方法:永远不要把喷枪泡浸在溶剂内,确保以正确的方法清洗喷枪。
十三、数字显示屏故障 — 黑屏(图18)
原因:喷枪浸泡在溶剂内或存放在洗枪机内(保修失效),电池盖子的密封圈损坏,溶剂或溶剂气体渗透到数字电子组件,引致黑屏。
修正方法:把喷枪通过经销商送到总代理维修。
预防方法:永远不要把喷枪泡浸在溶剂内,确保以正确的方法清洗喷枪,每次更换电池同时换上新的密封盖子。
十四、数字显示屏故障 — 显示屏没有显示或持续显示
原因:清洁液渗透空气通道并堵塞进入数字组件的气压感应通道。
结果:显示屏没有显示或持续显示,显示不准确(图19)。
修正方法:把喷枪通过经销商送到总代理维修。
预防方法:当使用洗枪机清洁喷枪时,确保喷枪空气通道有压缩空气充满以免清洁液进入;不要把喷枪泡浸在溶剂内,确保以正确的方法清洗喷枪。
十五、数字显示屏故障 — 气压显示不准确
原因:喷枪清洁方法不正确,空气通道被清洁液或油漆残渣堵塞。
结果:气压显示不正确(太高或太低),见图20。
修正方法:把喷枪通过经销商送到总代理维修。
预防方法:当使用洗枪机清洁喷枪时,确保喷枪空气通道有压缩空气充满以免清洁液进入;永远不要把喷枪泡浸在溶剂内! 确保以正确的方法清洗喷枪。
Each set of SATA Spray Guns comes with a set of tool kits. When disassembling and cleaning the Spray Guns, use the special tools provided by the original factory. Never use wire brushes, sharp objects, files, screwdrivers, cleaning tools containing silicon, etc. to clean the gun. Important tips . It is recommended to use the cleaning solvent recommended by the paint manufacturer to clean the Spray Gun. You need to confirm the pH value of the cleaning solvent you use. The pH value of the cleaning solvent should be in the range of 6~8 . When using cheap solvents, the acidity will be increased by distillation, which will corrode the metal. We recommend regularly checking the pH of the cleaning solvent with pH test paper, and that the Spray Gun needs to be dried immediately after cleaning.