Install
installation steps:
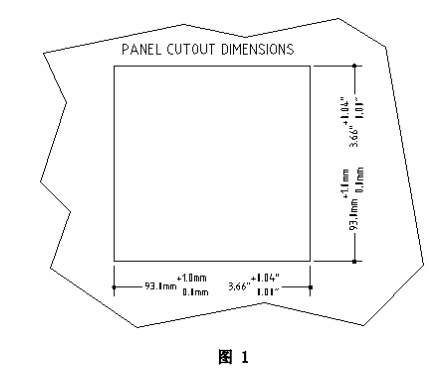
1. Dig a square hole with a size as shown in the above picture on the mounting plate with a thickness of 1.5mm to 9.5mm;
2. Remove the bracket first, and put the machine into the above square hole;
3. Install the bracket and push the bracket forward to ensure that the machine is fixed on the mounting plate.
Note: Please install the machine in a place with little or no vibration and electromagnetic radio frequency interference.
Keep machine and sensor wires at least 1 foot away from high voltage conductors
preparation
Unscrew the screws on the four corners of the back cover of the machine with a screwdriver, take off the back cover, you can see
To the terminal as shown in the figure below:
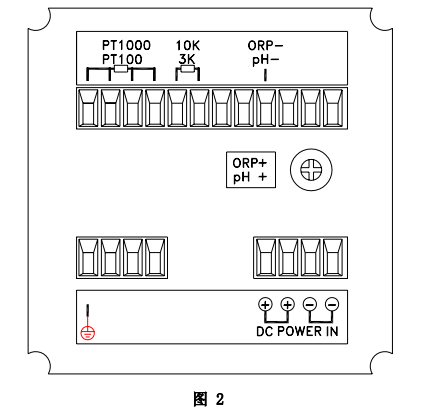
There are two openings on the machine shell of the TX transmitter, one for power wiring and one for sensor wiring, first pass all the cables through these two holes. Use a screwdriver to loosen the screw on the socket , insert the cable, and tighten the screw. After making sure all the wiring is correct, tighten the waterproof cable head and reinstall the back cover.
Electrode
The 6TX transmitter accepts any standard pH (ORP) electrode.
For automatic temperature compensation (ATC), the 6TX transmitter needs to be connected to a temperature probe, and the user can choose one of the three types of temperature sensors: PT, 3K Balco or 10K thermistor .
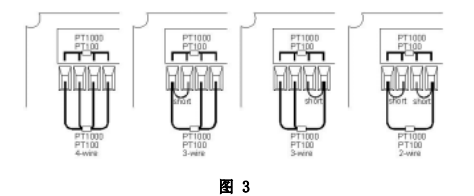
The 6TX transmitter has two terminals for 3K Balco or 10K thermistor temperature probes. There are also four terminals for connecting four-wire PT temperature probes. If you want to use two-wire or three-wire PT temperature probe, the wiring is special.
Note: The temperature probe needs to be used with the pH electrode.
The DC power supply voltage required by the 6TX transmitter can be from 12 to 36V DC, and the ideal working voltage is 24V DC. Other Recorders or PLCs can also be connected in series. The positive and negative terminals of the 6TX transmitter have two terminals respectively, so that multiple transmitters can be easily connected in one system .
用双绞线屏蔽电缆将机器和电源接起来,屏蔽层接地于电源端。为了安全,机器上的接地端子应接地于较近且干净的电气接地网
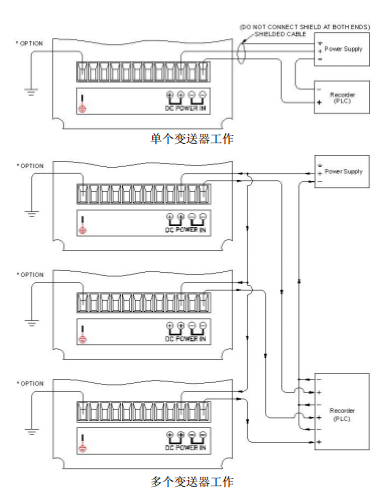
注意:为了提高 EMI/RFI 抗干扰性能,电源接线应使用屏蔽电缆,电源线缆和传感器线缆应安置于接地的金属导管内。禁忌将电源线缆和传感器线缆与交流电源线缆、继电器执行讯号线缆置于同一导管内。保持电源线缆和传感器线缆离高压电气设备 6 英尺(2 米)距离。
最大负载, R, 由下面的公式决定:
R = [电源电压 - 12] / 21 x 1000Ω
最大负载,R,应包括电源接线的总环路电阻。
上电后,机器将会起动并可以使用。
使用说明


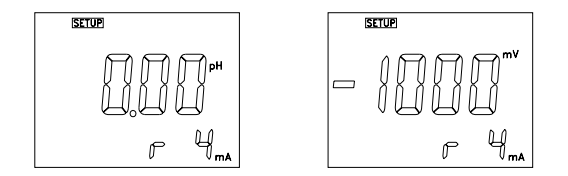
6TX 变送器有两种测量模式:
1.pH MEAS 模式: 测量 pH 值,在此模式下 MEAS 和 pH 指示常亮;
2.mV MEAS 模式: 测量 mV(ORP)值,在此模式下 MEAS 和 mV 指示常亮。
6TX 变送器有两种特殊工作模式:
1.pH CAL 模式:pH 校正,在此模式下 CAL 指示常亮;
2.SETUP 模式: 设定或初始化本变送器,在此模式下 SETUP 指示常亮。
6TX 变送器有两种变送模式:
1.pH 变送模式:变送 pH 值;
2.ORP 变送模式:变送 ORP(mV)值。
6TX 变送器有两种温度补偿模式:
1.ATC 模式:自动温度补偿,在此模式下需要接温度探棒;
2.MAN 模式:手动温度补偿,在此模式下不必接温度探棒,但温度传
感器的类型需要设定为 MAN,在 pH MEAS 和 pH CAL 模式下按▲或▼键可调节温度
有两组校正液可供选择:(4.01, 7.00, 10.01pH)和(4.00, 6.86, 9.18pH)。
1.用蒸馏水或清洗液有效地清洗电极和 ATC/温度探棒。甩掉多余的液
体。
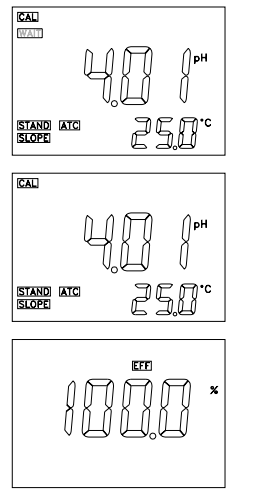
2.在 pH MEAS 模式下,按 CAL 键进入 pH CAL 模式。机器将恢复默认理想的 pH 校正值。CAL 指示符将会亮。STAND 指示符将会开始闪烁。如要退出 H 校正,请按 MODE 键
第一点 pH 校正
3.将电极放入第一点校正液中, 电极的底端必须完全浸入校正液。按 ENTER 键开始校正。STAND 指示符将会亮,WAIT 指示符将会开始闪烁。
4.待数值稳定后,WAIT 指示符将会停止闪烁并且消失。SLOPE 指示符将会开始闪烁。此时机器完成第一点校正。如有需要,按 CAL 键将重复第一点校正。如果只需一点 pH 校正,请按 MODE 键退出 pH校正。否则,请继续下面的步骤。

5.用蒸馏水或清洗液有效地清洗电极。甩掉多余的液体。
第二点 pH 校正
6.将电极放入第二点校正液中,电极的底端需要完全浸入校正液。按 ENTER 键开始校正。SLOPE 指示符将会亮,WAIT 指示符将会开始闪烁。
7.待数值稳定后,WAIT 指示符将会停止闪烁并且消失。此时机器完成第二点校正。如有需要,按 CAL 键将重复第二点校正。按ENTER键确认此次校正,机器完成两点校正。主显示器显示 pH 电极的效率约 5 秒钟后,机器退出 pH CAL 模式进入 pH MEAS 模式。
电极的效率的定义: 电极的效率 = (新斜率 / 称心斜率) x 100 %
注意:当电极的效率低于 80%或高于 120%,建议用户更换使用新的 pH 电极。
完成一点 pH 校正或两点 pH 校正后,清洗电极,即可进行 pH 测量应用
用户可以在 SETUP 模式下设置 6TX 送变器。
1.在 pH MEAS 模式或 mV MEAS 模式下,按 Setup 键进入 SETUP 模式。注意:在 SETUP 模式下,按 MODE 键将直接到下一步。
温度传感器类型选择
2.机器将显示温度传感器类型

按 ▲ 或 ▼ 键选择温度传感器类型:10K thermistor, PT, 3K Balco 或 MAN。
按 ENTER 键确认。
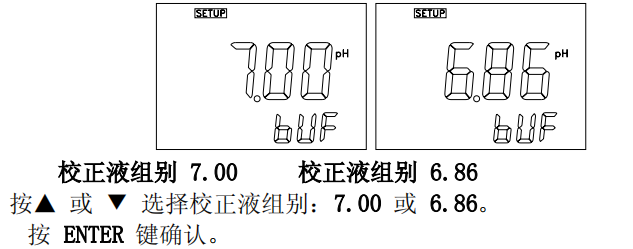
校正液组别的选择
3.主显示器将显示校正液组别:7.00 或 6.86。
变送模式的选择
4.机器将显示变送
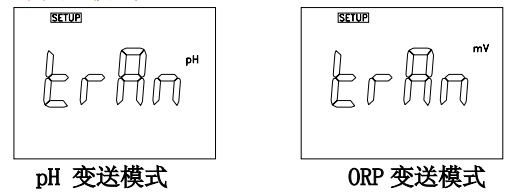
按▲ 或 ▼ 选择变送模式:pH 变送模式或 ORP 变送模式。
按 ENTER 键确认。
4 mA 输出值的设定
5.主显示器将显示 pH 值或 mV 值,副显示器将显示 r 4mA。
设定 4 mA 输出对应的 pH 值或 mV 值。 按 ▲ 或 ▼调整 pH 值或mV 值。
按 ENTER 键确认。
20 mA 输出值的设定
6.主显示器将显示 pH 值或 mV 值,副显示器将显示 r20 mA。

设定 20 mA 输出对应的 pH 值或 mV 值。按 ▲ 或 ▼调整 pH 值或 mV 值。
按 ENTER 键确认,机器将退出 SETUP 模式。
4-20mA 电流输出
4-20mA 电流是通过两根电源线环路输出;它由以下因素决定:变送变模式,4mA 输出对应的 pH(mV)设定值,20mA 输出对应的 pH(mV)设定值,已知的 pH 或 mV 值。
4-20mA 电流输出值的计算公式如下:
mA(输出) = 4mA + 16mA x ( Kv – r4mA ) / ( r20mA – r4mA )
mA(输出) = 4-20mA 电流输出值
Kv = 已知的 pH 或 mV 值
r4mA = 4mA 输出对应的 pH(mV)设定值
r20mA = 20mA 输出对应的 pH(mV)设定值
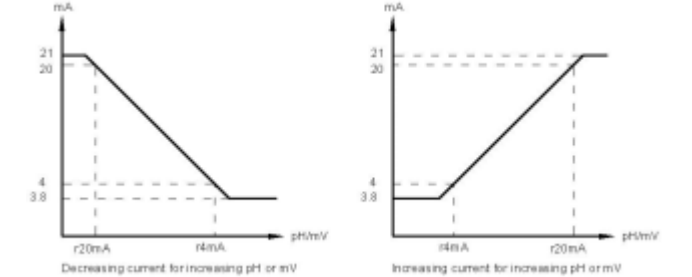
注意:
1.4mA 输出对应的 pH 设定值,r4mA,和 20mA 输出对应的 pH 设定值,r20mA 的范围是从 0.00pH 到 14.00pH。
2.4mA 输出对应的 mV 设定值,r4mA,和 20mA 输出对应的 mV 设定值,r20mA 的范围是从–1000mV 到 1000mV。
3.4mA 输出对应的 pH (mV)设定值,r4mA,和 20mA 输出对应的pH (mV)设定值,r20mA,不能相等。
4.4mA 输出对应的 pH (mV)设定值,r4mA,和 20mA 输出对应的pH (mV)设定值,r20mA,用户可以在设置过程中设定。
5.电流输出的下限 3.80mA,电流输出的上限 21.00mA。
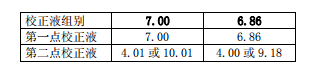
校正液与温度的关系表
pH 校正液 4.00, 6.86, 9.18 和 4.01,7.00,10.01 的温度系数被储存在仪器内部。用校正液校正时,须出现对应温度的 pH 值(如下表)。
校正液与温度的关系表
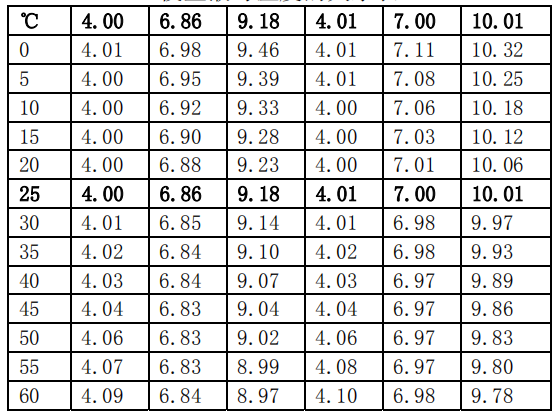
注意 : 仪器的读值与此表值会有±0.01pH 的误差。
Specification

