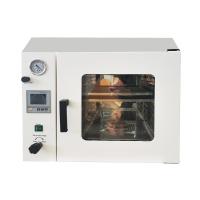
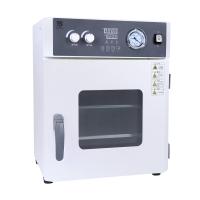
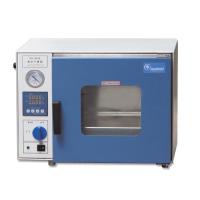
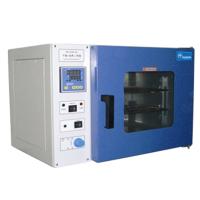
1. Schematic diagram

1. Cabinet 2. Door handle 3. Temperature controller switch 4. Vacuum gauge
5. Air release hole 6. Nameplate 7. Box wheel 8. Box door 9. Observation window
10. Shelf 11. Temperature controller 12. Vacuum switch 13. Power switch
2. Scope of application
For factories, mines, universities, colleges, scientific research and various laboratories to dry and heat items under vacuum conditions. Heating and drying items under vacuum has the following advantages:
Ø It can reduce the drying temperature (low pressure, low temperature).
Ø Avoid heating and oxidation of some items, without dust particle damage.
Ø Avoid heating the air to kill biological cells.
4. Structure and working principle
DZF-6000 series vacuum Drying Ovens are all table-top structures except 6090 and 6210 types which are vertical. The vacuum box is composed of four parts: the box body, the liner, the vacuum system and the temperature control system.
The cabinet is made of high-quality thin board, the surface is sprayed with plastic, and the color is bright. The liner is made of general galvanized steel or stainless steel. The shape of the inner cavity is a square with an inner angle of a semicircle. The inner and outer boxes are filled with ultra-fine glass wool as heat insulation material; the middle of the box door adopts a double-layer glass structure, which is convenient for observing the dried items in the box; a piece of thickened tempered glass is installed on the inside of the box door, and a long columnar door is used Buckle, in this way, adjust the distance between the door buckle and the tempered glass, so that the door can press the rubber sealing ring tightly after closing, so as to ensure that there is no air leakage during vacuuming. (Note: The rubber sealing ring is not resistant to oil!) The Vacuum Pumping system is composed of a Vacuum Pump, a vacuum gauge, a vacuum valve (6090, 6210 models use a solenoid valve instead of a vacuum valve), and an air release valve. According to the user's needs, it can be equipped with a dry filter tank (device) or an air inlet valve, etc. The 6090 and 6210 models are supplied with a Vacuum Pump, and the Vacuum Pumps of other types of vacuum boxes are optional accessories. (The pumping rate index of the user-provided Vacuum Pump cannot be less than 2L/S) The temperature control system is composed of a sensor (Pt100 platinum resistance), a temperature controller, a heater, etc. When the temperature controller receives the sensor output resistance signal (0°C is 100Ω, 0.3Ω/℃), measure the actual temperature in the working room displayed on the PV screen, when the input signal is less than the set value, the power tube (triac) is turned on, so that the heater can obtain enough electric power to generate heat. On the contrary, the power tube has no electric power output and the heater does not heat. The temperature controller has the characteristics of PID adjustment output, adjustable electric power output, error correction of temperature measurement, timing control and other functions, as well as safety deviation alarm function with over-temperature light and automatic cut-off. Except for 6030B and 6050B models, which are heated by inner tanks, the heaters of other models are installed in the shelves. The temperature of each shelf of 6090 and 6210 models is controlled by two and three temperature controllers independently.
5. Operation method of temperature controller
◆ Panel description


◆ Instructions for use
1. Temperature setting
a. In the normal working state, press the SET button to enter the temperature setting state. At this time, the PV display shows SP, and the first digit of the SV display flashes;
b. Press the shift key to move the blinking to the desired setting position;
c. Press the minus key or the plus key to adjust the number to the desired value;
d. Press the SET button twice, the meter returns to the normal working state, the temperature setting is completed, and the meter runs according to the new set value.
2. Timing function
a. In the normal working state, press the SET button twice to enter the timing setting state. At this time, the PV display shows ST, and the SV display shows 0 and flashes;
b. Press the shift key to move the blinking to the desired setting position;
c. Press the minus key or the plus key to adjust the number to the desired value;
d. 按一下SET键,仪表进入定时运行状态,此时运行指示灯闪烁;
e. 定时功能为倒计时运行,在定时运行状态下,按一下移位键,SV显示屏显示定时剩余时间;
f. 定时剩余时间归零,仪表进入定时结束状态,此时SV显示屏显示End,并闪烁,同时除风速指示灯以外的所有指示灯均熄灭;
g. 在定时结束状态下,按一下SET键,仪表恢复到正常工作状态。
h. 在定时结束状态下,由于仪表温度控制部分停止工作,PV显示屏显示的测量值会下降到环境温度,此为正常现象。
i. 如果无需使用定时功能,请务必将定时时间设置为零。
j. 定时功能运行过程中,如发生意外断电,重新上电后,定时剩余时间自动归零。
k. 本设备的定时范围:1~9999分钟或1~9999小时。(请定货时注明!)
3. 自整定功能
如果温度控制过程中,出现较大的温度过冲,或较大的温度波动时,请按下列操作启动自整定功能
a. 关闭电源开关,打开箱门,使设备自然冷却至环境温度;
b. 关闭箱门,打开电源开关,将温度设至为常用温度值;
c. 按照控制参数调整方法,将自整定参数调整为1;
d. 在正常工作状态下,按住减键5秒钟,即进入自整定状态,此时PV显示屏显示ATU,并闪烁;
e. 自整定结束后,仪表自动恢复到正常工作状态。
f. 在自整定状态下,按任何键均无效。
4. 控制参数调整方法
a. 同时按下加键和SET键,PV显示屏显示LCK;
b. 按加键,使SV显示屏显示为7;
c. 再按SET键,使PV显示屏显示需要调整的控制参数的提示符;
d. 按加键或减键,使SV显示屏显示为该控制参数所需要的值,所有控制参数可以一次调整完毕;
e. 再按SET键5秒钟以上,回到正常工作状态;此时温度控制器执行新修改的参数。
注:控制参数调整过程中,若无键按下30秒,仪表自动恢复到正常工作状态,但所改变的数据视为无效。
由于产品出厂前都经过严格地测试,一般不要进行修正。但是,在第一次开机;产品使用一段时间;使用环境恶劣;使用的环境温度与生产制造时的环境温度不一致;使用控制温度前后值改变时 etc.情况下,可通过修整功能参数从而达到出厂标准。
5. 测量温度与箱内实际温度的误差修正方法
a. 将水银温度计(0.1℃精度的水银温度计)放入工作室内,水银端应置于室内几何中心位置;水银温度计的读数即为实际温度。
b. 开机,当设备运行至恒温状态(1~2小时左右),比较实际温度与PV显示屏显示温度的差值,其差(实际温度-PV显示值)即是测量值修正参数SC需要修改的值,即:
SC=原始SC值+(实际温度-PV显示值)
c. According to上式计算SC值输入即可。
◆ 控制参数表
提示符 | 名称 | 设定范围 | 说明 | 出厂设定值 | ||
第一 块 搁 板 | 第二块 搁 板 | 第三块 搁 板 | ||||
/ AL1 | 偏差报警 | -99.9~999.9 | 当温度超过SP+AL1值时, ALM灯亮,蜂鸣器响,切断加热电源 | |||
/ SC | 测量值修正 | -99.9~100.0 | 测量箱内实际温度与PV显示温度比较, 以修正显示误差 | |||
/ ATU | 自整定 | 0 / 1 | 0:OFF,1:ON。 可自整定出一组的PID参数。 | |||
/ P | 比例带 | 0~100.0 | 加热比例控制, 可提高系统控制精度,清除静差。 | |||
I / | 积分时间 | 1~4320 | 积分作用时间常数 | |||
/ d | 微分时间 | 0~1200 | 微分作用时间常数,一般d取(1/4)倍I。 | |||
T | 加热周期 | 1~60 | 可控硅输出一般为2~3秒,对剩余功率大 的设备将T调大可减小PID控制的静差。 | |||
提示符 | 名称 | 设定范围 | 说明 | 出厂设定值 | ||
第一 块 搁 板 | 第二块 搁 板 | 第三块 搁 板 | ||||
/ HL | 斜率 | 0.500~1.500 | 保证整个量程控温精度的一致 | |||
OUTˉ | 输出功率 | 0~100 | 可调整加热器的输出功率 | |||
产品出厂前都经过严格地测试,当干燥箱技术指标符合要求,工作正常情况下,一般不要进行修正。
六、使用方法
1. 使用环境要求:
a) 温度: 5~40℃
b) 相对湿度:≤85%RH
c) 电源电压: AC220V±10% 50Hz
d) 周围无强烈震动及腐蚀性气体影响
2. 抽真空调试:
a) 将箱门关上并将门拉手旋紧到位,关闭放气阀(使橡皮塞上的孔与放气阀上的孔扭偏90°),开启真空阀(由逆时针旋转90°),第一次使用可能真空阀开关较紧,可用力旋转。
b) 用随机配件真空连接管(内径:Φ16mm壁厚:10mm)将真空干燥箱抽气管(外径:Φ16mm)和真空泵(2XZ-2型,进气口外径Φ16mm)连接牢固(6090及6210型已连接好)。接通真空泵电源,开始抽气,当真空表指示值达到-0.1Mpa时,先关闭真空阀后关闭真空泵电源,以防止真空泵机油倒流到工作室内,(6090及6210型无真空阀,可直接关闭面板上真空泵电源)此时箱内处于真空状态。
3. 真空箱调试:
在真空度调试完毕后,可作如下操作:
a. 打开真空箱电源,此时电源指示灯应亮(6090及6210型应再分别打开控温仪开关)控温仪通电自检,PV屏显示工作室内测量温度,SV屏显示出厂时设定的温度。温度控制器上RUN及HEAT等灯应亮,表示仪表进入加温的工作状态。
b. 修改设定温度
1. 按一下控温仪的功能键(SET);PV屏显示SP字符后,可用 、 键进行设定温度的修改(6090与6210型对2及3个仪表应分别设定修改,以下类同)。
2. 修改完毕后,再按一下SET键,PV屏显示ST字符,设定定时时间。
如不使用定时功能,则仍然让其ST=0
3. 再按一下SET键,使PV屏显示工作室温度,SV屏显示新的设定温度。仪表RUN及HEAT灯亮,此时仪表重新进入加温的工作状态。
c. 当工作室内温度接近设定温度时,HEAT灯忽亮忽暗,表示加热进入PID调节阶段,仪表有时测量温度超过设定温度,有时低于设定温度属正常现象。当测量温度接近或等于设定温度后,再待1~2h后工作室进入恒温状态,物品进入干燥阶段。
d. 所需温度较低时,可采用二次设定方式,如所需工作温度70℃,第一次先设定60℃,等温度过冲开始回落后,再第二次设定70℃,这样可降低甚至杜绝温度过冲现象,尽快进入恒温状态。
e. 当物品干燥完毕后,关上电源,如果加速降温,则打开放气阀使真空度为0,待5分钟左右再打开箱门。
4. 若工作室内干燥物的湿度较大,产生的水气会影响真空泵的性能,建议在干燥箱和真空泵之间,串入一个“干燥/过滤器”。能按需配一个外形尺寸为Φ120×300mm,接口外径Φ16的干燥器。
5. 若在干燥物品的过程中,需要加入氮气等惰性气体,应在合同中注明,增配一个进气阀。
注意:
1. 若真空泵正常且符合技术要求,不能抽真空,则打开箱门使用产品附件中的板手将箱体上的门扣向里拧一圈收短,重新关门。
2. 此真空干燥箱不能作为电热干燥箱使用,因工作室不在真空状态,测量温度与工作室内实际温度误差极大 。
七、注意事项
1. 真空箱外壳需要有效接地,进而保证使用安全。
2. 真空箱应在相对湿度≤85%RH,周围无腐蚀性气体、无强烈震动源及强电磁场存在的环境中使用。
3. 真空箱工作室无防爆、防腐蚀等处理,不得放易然、易爆、易产生腐蚀性气体的物品进行干燥。
4. 真空泵不能长时期工作,因此当真空度达到干燥物品要求时,应先关闭真空阀,再关闭真空泵电源,待真空度小于干燥物品要求时,再打开真空阀及真空泵电源,继续抽真空,这样可延长真空泵使用寿命。
5. 干燥的物品如潮湿,则在真空箱与真空泵之间更好加入过滤器,防止潮湿气体进入真空泵,造成真空泵故障。
6. 干燥的物品如干燥后改变为重量轻,体积小(为小颗粒状),应在工作室内抽真空口加隔阻网,以防干燥物吸入而损坏真空泵(或电磁阀)。
7. 真空箱经多次使用后,会产生不能抽真空的现象,此时应更换门封条或调整箱体上的门扣伸出距离来解决。当真空箱干燥温度高于200℃时,会产生慢漏气现象(除6050、6050B、6051、6053外),此时拆开箱体背后盖板用内六角扳手拧松加热器底座,调换密封圈或拧紧加热器底座来解决。
8. 放气阀橡皮塞若旋转困难,可在内涂上适量油脂润滑。(如凡士林)
9. 除维修外,不能拆开左侧箱体盖(6090及6210型除外)以免损坏电器控制系统。
10. 真空箱应经常保持清洁。箱门玻璃切忌用有反应的化学溶液擦拭,应用松软棉布擦拭。
11. 若真空箱长期不用,将露在外面的电镀件擦净后涂上中性油脂,以防腐蚀,并套上塑料薄膜防尘罩,放置于干燥的室内,以免电器元件受潮损坏,影响使用。
12. 使用中出现异常现象,请切断电源并及时与我公司取得联系!
八、故障处理
故障现象 | 原因推测 | 处理方法 |
开机无电源 | 外电源插座无电 | 检查线路是否跳闸,插座是否好 |
电源线插头未插好或断线 | 重插或修复电源线 | |
熔断丝管未装或断 | 检查真空箱内线路无短路,更熔断丝管(仪表电源变压器短路,加热器短路,接地短路均造成保险丝烧断)。 | |
仪表PV屏显示“□ □ □ □” | 温度传感器Pt100坏 | 检查Pt100,更换(0℃为100Ω,0.3Ω/℃) |
温度传感器接线脱落 | 重新接线 | |
仪表测量范围不对 | 重新设置 | |
不升温 | 设定温度低 | 设定温度SV≥RT+10℃ RT为(环境温度) |
仪表输出回路接线脱落 | 重新接线 | |
控温仪无输出信号或坏或可控硅坏 | 调换 | |
电热器坏(开路、短路) | 调换 | |
启用定时功能或设置不正确 | ST=0或ST=(加热+恒温)时间 | |
温度失控或设定温度与测量温度误差超差产生静差、过冲 | 控温仪输出失控 | 3041或BTA坏,调换 |
不符合使用条件 | SV≥RT+10℃ | |
Pt传感器接触不良 | 清除接触电阻 | |
有关参数设置不对 | 重新设定有关参数 例P等 | |
测量温度与箱内实际温度 超差 | 无真空度 | 抽真空度 |
测量水银表感温头不在搁板上 | 重新放置 | |
仪表或参数变化 | 重新修正SC、HL参数 | |
不能抽真空 | 真空泵选用型号规格不对 | 应选抽气速率不小于2升/秒 |
各种连接管(头)松,内径选用太细 | 重新选用合适内径连接管,接头处紧固牢 | |
真空表坏 | 更换 | |
箱门未关严 | 调整门扣距离 | |
门封条橡胶老化失去弹性 | 更换门封条 | |
放气阀、真空阀位置不对 | 调整位置 | |
电磁阀坏(6090型、6210型) | 更换电磁阀 | |
漏气(24小时内真空度由0.1Mpa降到小于0. 092Mpa) | 各种连接管漏气 | 检查后更换 |
除6050、6050B、6051、6053型外,加热器“O”型密封圈变形造成未压紧现象 | 用内六角扳手拧紧加热器底座(在内胆背面)或更换“O”型密封圈 | |
放气阀位置不对 | 放置正确位置 | |
真空阀漏气 | 调换 | |
Solenoid valve does not close tightly and leaks air (applicable to 6090, 6210 models) | exchange |