The covering rate Tester has four buttons, Calibration key/Back key, Shift key/Delete key, Test key, Confirm key. Calibration key/return key and shift key/delete key are multifunctional compound keys, and test key is a frequently used key, so there is also a test key on the sensor. This instrument has four functions, reflectance measurement, covering rate measurement, query data, and calibration.
1. Reflectance measurement
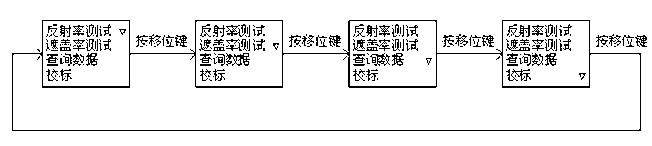
When measuring, it can simultaneously display the current reflectance measurement value, the number of measurements and the average value of reflectivity. Can store up to 20 groups of measurement data, with power-off protection function for future inquiries. Figure 1 is the selection of the main menu and working status after the instrument is turned on (press any key after turning on to enter the main menu immediately), press the "shift" key to move the cursor. When the "Shift" key is pressed continuously, the cursor will move circularly according to the sequence shown in the figure.
When the cursor is flashing at the reflectance test menu, press the "OK" button to enter the reflectance test working state, as shown in Figure 2. The screen displays the current reflectance test value, the number of measurements and the average value, and the average value refers to the average value of N reflectance tests. Press the "Test" button to test the reflectivity, and each time you press it, you can perform a test, and save the test results in the memory of the instrument, and can store up to 20 sets of measurement data.

During the test, if you are not satisfied with the current test data, you can delete it. The operation process is as follows: For example, the third reflectance measurement data 20.7 is not satisfactory and requires deletion. Then press the "Delete" key first, and the cursor starts to flicker at this time, indicating that the data has been activated, and then press the "OK" key to delete the current test data, as shown in Figure 3. If you want to exit the reflectance test working state, press the "Back" key to return to the main menu.

2. Opacity Determination
In the main menu state, when the cursor is moved to the coverage measurement menu, press the "OK" key to enter the coverage measurement working state. The screen displays the current reflectance test value and measurement times of the black sample; the current reflectance test value, measurement times and covering rate of the white sample. Whether it is a test against a black sample or a test against a white sample depends mainly on the position of the cursor. If the cursor is at the position of the black sample (press the "OK" button to move the cursor), press the "Test" button to test the black sample. The covering rate is the percentage of the ratio of the average reflectance of the black sample N times to the average reflectance of the white sample N times,
(If the average reflectance of the black sample is greater than or equal to the average reflectance of the white sample, the alarm coverage will display zero)
As shown in Figure 4. The test sequence can be several times of black sample and then several times of white sample, or it can be carried out alternately with one test of black sample and one test of white sample. The maximum number of measurements is 20, and the test results are stored in the memory of the instrument at the same time. When the cursor is at the position of the white sample, press the "OK" button to view the average reflectance of the black sample N times before, the average reflectance of the white sample N times before and the current covering rate. Press the "OK" button again to return to the test state where the cursor is at the position of the black sample.

In the coverage rate test, if the current test data is not satisfactory, it can be deleted. For example, if the cursor is at the position of the white sample, the second reflectance measurement data 90.7 of the white sample is not satisfactory and needs to be deleted. Then press the "Delete" key first, and the cursor starts to flicker at this time, indicating that the data has been activated, and then press the "OK" key to delete the current test data, and return to the previous test data as shown in Figure 5. If you want to exit the working state of the coverage rate test, press the "Back" key to return to the main menu.

3. Query data
When the instrument is turned off, the last measurement data is still kept in the memory of the instrument, and the user can view it at any time. However, after a new round of measurement starts, the data stored in the previous round will be cleared automatically. The query data has two branches, the query reflectance test data and the query coverage test data.
(1). Query reflectivity test data
In the main menu, when you move the cursor to the query data menu, press the "OK" button to enter the working state of query data, move the cursor to the reflectivity and press the "OK" button to query 20 sets of data, each time you press " "OK" key to query a set of data, as well as to cycle, as shown in Figure 6. The average value displayed on the screen refers to the average value of 20 test data, you can delete any one of the 20 test data. The operation process is as follows: When you find a certain set of data and feel dissatisfied, press the "Delete" button, the cursor starts to flicker, and then press the "OK" button to delete the current data, and the average value will change accordingly. Press the "Back" key to return to the main menu.

(2). Query coverage test data
In the main menu, when moving the cursor to the query data menu, press the "OK" button to enter the data query working state, move the cursor to the coverage rate and press the "OK" button to query 20 sets of data. Press the "OK" key three times in succession to query a set of numbers, that is, the reflectance measurement data of a certain black sample, the reflectance measurement data of the white sample, the average reflectance of the black sample N times, the average reflectance of the white sample N times and Coverage, as shown in Figure 7. During the query process, if you are not satisfied with a certain data, you can delete it. For example, if you are dissatisfied with the reflectance measurement data of the white sample in the fourth set of data and want to delete it, the operation process is as follows: when you query the fourth set of data, press the "OK" key to move the cursor to the position of the white sample, Press the "Delete" key, the cursor starts to flash, and then press the "Enter" key to delete the data. The computer will recalculate the average reflectance of the black sample, the average reflectance of the white sample and the covering rate.

4. Calibration
After each start-up and before measurement, it is necessary to use the special white standard plate matched with the instrument for calibration, otherwise the measured value is zero. Calibration method: place the sensor window of the instrument on the white standard plate, (note: the white point on the sensor needs to be aligned with the white point on the white standard plate) In the main menu, when the cursor is moved to the calibration menu, Press the "OK" key to enter the calibration work state. At this time, press the "calibration" button and the computer will automatically calibrate, and the sensor cannot move during the calibration process. After calibration, the screen will display the standard value of the white standard plate and the calibrated nominal value. The nominal value should be the same as or basically close to the standard value of the white standard plate, as shown in Figure 8. In order to ensure the measurement accuracy, calibration is very important. If the standard plate is contaminated, it is necessary to clean the standard plate with a clean soft cloth or lens paper to remove the stain. During the calibration process, when the computer finds that the error is large, it will sound an alarm and display the nominal value as zero. After the calibration, press the "Back" key to return to the main menu, and then enter reflectance test state, place the window of the instrument sensor on the black standard plate, press the "Test" key to display the reflectance 0.0, indicating that the instrument is normal, if not If it is zero, it means that the zero point of the instrument has shifted, which will bring a certain error to the measurement. The function of the black

