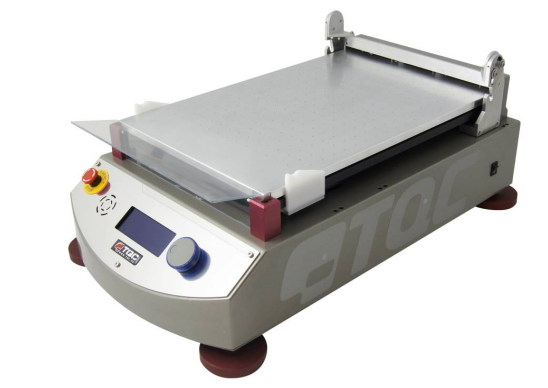
Preparation of experimental tools
Place the glass plate or vacuum cups between the designated red support studs on the 4 corners of the unit.
1. Plate glass pane
The board 470 x 300 x 12 mm can be used directly as an application carrier or (for example) as a smaller card or foil.
Once tested, the chart or foil is automatically clamped in a special device at the end of the device.
The glass plate can be removed for cleaning purposes.
2. Vacuum suction cup
Once placed between the red support studs, this vacuum cup automatically connects to the Vacuum Pump. Vacuum panels are used to hold thick foils, charts and other papers for coating.
The size of the area under vacuum depends on the selection in the instrument menu.
Dual channel vacuum.
A dual-channel vacuum plate is used for testing on foil. Otherwise, the foil will not stay smooth on a normal vacuum table. A dual channel has two concentric rings of vacuum on the outside of the plate only. This requires the dirt on the vacuum table to be about A3 size to be able to hold them.
To prevent contamination of certain holes outside the chart dimensions, we recommend covering the surrounding area with paper.
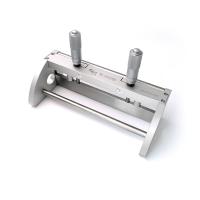
3. Coating rod (tool)
Spiral Wand Applicator, Bird Applicator, Baker Applicator, Quadruplex Applicator, SAG Quadruplex Applicator Adjustable Micron Applicator, Dimple and Flat Applicator. Place the applicator as shown in the image below: ( Komen via Ed !!!)
For more information on Film Applicators, visit www.tq.eu
4. Test paper jam
We offer a range of test charts (TQC, Leneta® or equivalent) such as:
Opacity (hiding power) charts, opacity reveal charts, sunken and level charts, brush out charts,
Plain white chart or otherwise. Certified TQC test chart!!!
Menu display information and operations
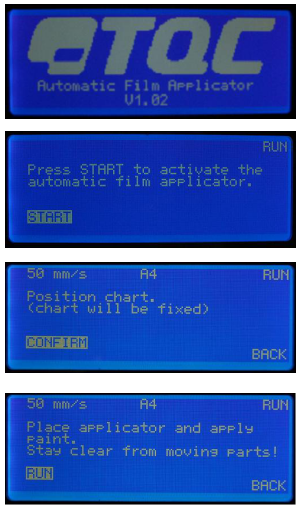
1. Open the TQC start screen.
Switch on the instrument via the power switch on the right side of the housing.
This is the first screen displayed after turning on the instrument.
NOTE: The version number shown in Firmware Version Number.
2. RUN - automatically the first selection screen or main menu appears.
Press the Jog shuttle knob to start the sequence.
Move the applicator carrying rod and set it in place.
3. RUN - positioning map.
The current drop rate and length are shown at the top of the display. Press the Jog shuttle knob to confirm or turn it to return to the menu and make changes.
Place the pulldown on a glass plate or vacuum table. Choose the appropriate applicator to complete the test.
4. RUN - applicator and paint application.
涂上足够的油漆,以完成所选测试图表的测试。
按下Jog shuttle旋钮开始运行或转动它返回菜单并进行更改。 显示屏显示“正在运行”。双手远离活动部件。
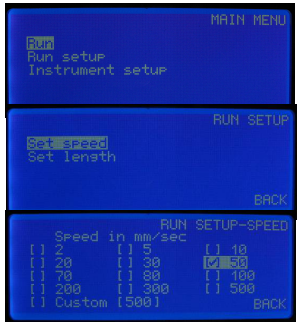
5、主菜单 - 运行,运行设置,仪器设置
在主菜单中,您可以According to需要更改参数。
旋转Jog往复旋钮进行选择,然后按进行选择。
6、RUN SETUP - 设置速度
按下Jog shuttle旋钮设置下拉速度。
7、RUN设置速度
有12种预设速度可供选择,2 - 500 mm / s。
Custom是1mm / s间隔的自由选择速度。更改后旋转至BACK并按下Jog往复旋钮。
8、RUN SETUP - 设置长度
按下Jog往复旋钮设置移动长度。
9、RUN设置 - 长度
可选择3种预设图表尺寸,A5 - A4 - A3,然后自动返回刀架。选择“自定义”可以在平台上设置开始和结束点。According to以毫米为单位的起点/终点自动设置移动长度。
更改后旋转至BACK并按下Jog往复旋钮。
VACUUM只会According to测试图表的长度切换为A4或A3。
注意
使用自定义长度设置时,不能使用螺旋杆释放螺栓,需要将其设置在应用表的末端,尽可能靠近显示屏。
10、MAIN-MENU - 仪器设置
在主菜单中,将旋转飞梭旋钮旋转到仪器设置并按下它。
11、INSTRUMENT SETUP。
选择语言以设置所需的语言。
选择要设置的单位:速度单位为mm / s,cm / s或inch / s,长度单位为mm,cm或英寸。
选择声音信号:信号关闭,低音量或高音量。
12、警告信号
由于情况,显示屏显示:
“释放紧急停止”由手动按下红色紧急情况引起按钮。 检查故障或处理错误。
“升降机处于错误位置”由错误的运动或定位引起螺旋杆升降后的情况。 当您感觉到咔哒声时,升降器就位。
"Hand detection" for safety's sake 3 sets of detection sensors at each location of the housing register the proximity of a finger to close any movement of the instrument.


Steps
1. Preparation
Connect the instrument to the mains power supply on the rear side of the enclosure.
When using glass plates, place the test chart or foil completely on the rear and automatic clamping device.
When using the vacuum suction cups, place the test chart completely on the back and allow the chart or foil to suck for a few seconds.
Install and secure the knife holder and corresponding Film Applicator.
2. Application for coating stick
For film applications, a suitable flat and homogeneous substrate, a glass plate or a vacuum suction plate, and an applicator of a suitable type of use are required.
3. Start the instrument
Start the instrument following the steps outlined in section 8.
Precautions
1. Inspection and maintenance
• The device is durable and precision machined. Never drop or hit it.
• Always clean the instrument after use.
• Clean the instrument with a soft dry cloth. Never use mechanical means such as wire brushes or sandpaper to clean the instrument. This may result in the use of aggressive cleaning agents, causing permanent damage.
• Do not use compressed air to clean the instrument.
• Normally, TQC Film Applicators do not require any maintenance.
• After finishing film application, remove Film Applicator and clean immediately.
Make sure no paint or other liquids are spilled on the electronics or left in the holes of the vacuum plate.
Film applicators are subject to some natural wear and tear and need to be checked from time to time to ensure they are in trouble-free condition.
2. Material handling
Disposal Materials used for instrument operation or auxiliary functions and exchanged items should be disposed of in a safe and environmentally friendly manner. Follow local regulations.