Artists love to paint on a variety of surfaces and objects, and with a variety of mediums, but the surfaces or paints may not be compatible. We know most people don't have a standard crosshatch adhesion Tester at home, so we wanted to provide artists with a way to perform a simple test to determine if paint will stick to a surface or other coating.
The importance of testing before applying for your final work cannot be overemphasized. It's no fun when you're spending hours toiling on a painting only to find out it's faulty, so testing beforehand with the exact material you plan to use will save time and heartbreak!
It is also necessary to allow proper drying time before performing the adhesion test, as some surfaces may take longer than others to fully cure, resulting in what initially appears to be a failure of the bond, but can be resolved by simply waiting longer significantly improved. Most heavy-body or fluid acrylic films take about 3 days to initially cure at room temperature, while thicker films can take weeks or even months to cure depending on thickness, environment and substrate. Slower drying paints like high flow and slower drying and slower curing paints like OPEN, can take a considerable amount of time to see good adhesion. For example, it may take some time to see good adhesion on non-porous surfaces like Plexiglas®. Acrylic dries by evaporation; first the water evaporates, followed by other volatiles, and on non-porous surfaces, the direction of these evaporations is upwards. On canvas, however, they can also evaporate through the backside. In very humid environments, it will also take longer for the paint film to dry and cure.
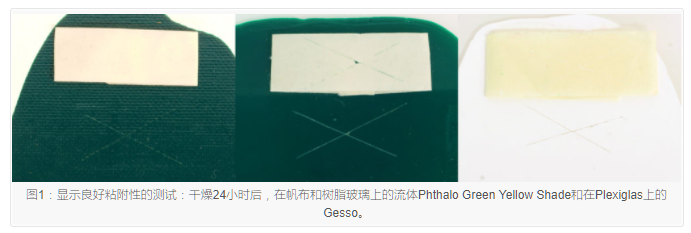
Figure 1: Tests showing good adhesion: Fluid Phthalo Green Yellow Shade on Canvas and Plexiglas and Gesso on Plexiglas after 24 hours of drying.
The process is as follows, and uses common tools you may already have in your studio. Make sure the surface to be tested is clean and dry. Apply the intended paint or medium to the intended surface sample. Allow to fully cure for great results. For heavy-body or fluid acrylic films, this usually takes about 3 days. You can start the test after 24 hours and then test again at 48 and 72 hours to look for improvements. If there is still a fault, then try the test again every week if necessary, especially on non-porous surfaces. Using an X-ACTO® or utility knife, make two cuts in the film, each cut meeting 1.5 inches (4 cm) in the middle, forming an "X". ASTM (American Society for Testing and Materials) recommends two angles between 30° and 45°, as shown in Figure 1. If adhesion to a substrate is being tested, ensure that the cut penetrates all of the film being tested and down to the substrate. Brush away any material removed from the cut. Use 3" (7.5 cm) of masking tape, off-white and not low-tack painter's tape, and center the tape over the intersection of the cuts, running in the same direction at a slight angle. Use a pencil eraser or the back of your nail to rub the tape firmly, but leave one end free. Grab the free end of the tape and quickly pull the tape back on itself as if pulling off a BAND-AID off-white, not low-tack painters tape, and place the center of the tape over the intersection of the cuts, and Run in the same direction at a smaller angle. Use a pencil eraser or the back of your nail to rub the tape firmly, but leave one end free. Grab the free end of the tape and quickly pull the tape back on itself as if pulling off a BAND-AID off-white, not low-tack painters tape, and place the center of the tape over the intersection of the cuts, and Run in the same direction at a smaller angle. Use a pencil eraser or the back of your nail to rub the tape firmly, but leave one end free. Grab the free end of the tape and quickly pull the tape back on itself, as if unplugging a BAND-AID®. It may be helpful to run multiple tests on your creations. Determine the level of adhesion by observing the area after the tape was removed and observing the tape. Great results without peeling or removing paint. If there is a faint "X" shape mark left on the tape, this can still serve as good adhesion. A jagged removal along both sides of the cut will show adequate adhesion. Removal from most of the "X" onto the tape or removal beyond the "X" is evidence of poor adhesion. If you are testing multiple layers and only one layer is removed, then this will show failures of that layer against the layers below. Where it fails is very convincing.
If you experience adhesion failures, it may be necessary to use a suitable primer as a "bridging coat", as shown in Figure 2, where the paint fails on bare aluminum but adheres well to the direct metal primer.
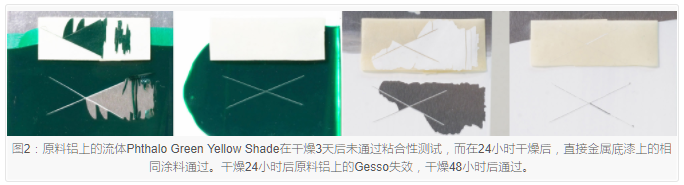
Figure 2: Fluid Phthalo Green Yellow Shade on raw aluminum failed the adhesion test after 3 days of drying, while the same paint on direct metal primer passed after 24 hours of drying. Gesso on raw aluminum failed after 24 hours of drying and passed after 48 hours of drying.
