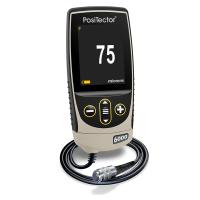
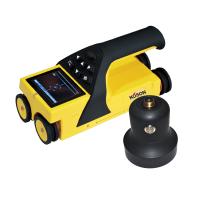
![Operation Manual of Positector200 Ultrasonic Thickness Gauge [Translation] with Figure 1](http://img.nbchao.com/upload/editor/image/20190418/1555559809873008657.jpg)
Click on the picture to view Positector200 product information and price
The Positector 200 is a handheld Thickness Gauge that uses non-destructive ultrasound to measure paint thickness on many different substrates.
The Positector 200 probe emits high frequency pulsed sound waves which are passed by the couplant through the paint, then through any material surface of different density and reflected back. Thickness gauges read by measuring the time it takes for an ultrasonic signal to travel from the probe to the substrate surface and reflect back to the probe. The transmission time is divided by 2, and then multiplied by the speed of the ultrasonic wave in the paint to obtain the thickness of the paint.
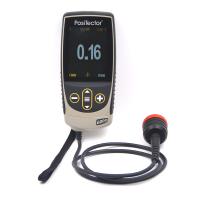
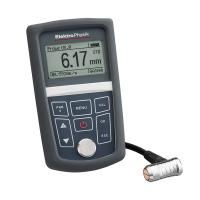
![Operation Manual of Positector200 Ultrasonic Thickness Gauge [Translation] with Figure 2](http://img.nbchao.com/upload/editor/image/20160514/1463229864578035692.jpg)
On/off:
When any button is pressed, the Positector 200 will be activated. To ensure battery life, the Thickness Gauge will automatically shut down after 3 minutes without any further operation. All settings will be preserved.
Certification:
All probes and Thickness Gauges are shipped with a calibration certificate. When the user needs to re-calibrate, it can be returned to the factory for calibration after a period of time. Defelsko recommends that users set calibration intervals based on their own experience or the operating environment of the instrument. According to our product experience, data and customer feedback, it is recommended to calibrate once a year from the date of calibration or the date of purchase.
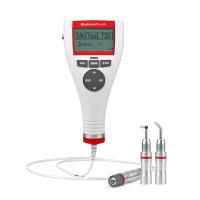
Operation overview:![Operation Manual of Positector200 Ultrasonic Thickness Gauge [Translation] with Figure 3](http://img.nbchao.com/upload/editor/image/20160514/1463229929680032280.jpg)
1. Turn on the Thickness Gauge (refer to page 1 to turn on/off)
2. Reset the Thickness Gauge to zero
3. If necessary, please adjust to a known thickness
4. Measurement
Coupling agent:
![Operation Manual of Positector200 Ultrasonic Thickness Gauge [Translation] with Figure 4](http://img.nbchao.com/upload/editor/image/20160514/1463229977750007375.jpg) The transmission of ultrasonic waves in coatings requires a couplant. Water is a very good couplant for smooth paint. The matching glycol glue is used for rough paint. However, sometimes the couplant can damage the surface or leave contamination, and we recommend testing the sample surface with the couplant first. If the test shows that contamination has formed, a certain amount of water can be used instead of the couplant. If you suspect that the couplant will damage the paint, you can obtain material safety data from our website and paint suppliers, and you can also use other liquids such as soapy water as a couplant.
The transmission of ultrasonic waves in coatings requires a couplant. Water is a very good couplant for smooth paint. The matching glycol glue is used for rough paint. However, sometimes the couplant can damage the surface or leave contamination, and we recommend testing the sample surface with the couplant first. If the test shows that contamination has formed, a certain amount of water can be used instead of the couplant. If you suspect that the couplant will damage the paint, you can obtain material safety data from our website and paint suppliers, and you can also use other liquids such as soapy water as a couplant.
Menu operation:
The functions of the Thickness Gauge are all controlled by the menu. Turn on the Thickness Gauge and press the button to enter the operation menu.
During operation, press (-) to move down or (+) to move up, press to select. To exit the menu, press (-) and (+) simultaneously or select the EXIT option.
There is an arrow on the right side of the drop-down list window, use (-) or (+) to select until the option you need appears, then press to select this item, and move the dot to the desired option.
![Operation Manual of Positector200 Ultrasonic Thickness Gauge [Translation] with Figure 5](http://img.nbchao.com/upload/editor/image/20160514/1463230015415031007.jpg)
How to measure:
1. Apply couplant to the surface you are measuring;
2. Turn on the Thickness Gauge, place the probe flat on the surface and press down;
3. Pick up the probe when you hear two "beep" sounds or see the green light on. Measurement results are displayed on the LCD screen.
4。、当完成测量后,将探头擦拭干净然后将探头及测厚仪放置于盒子中。存放时,无需将探头与测厚仪分离。
归零选择:
![Operation Manual of Positector200 Ultrasonic Thickness Gauge [Translation] with Figure 6](http://img.nbchao.com/upload/editor/image/20160514/1463230058422098512.jpg) 测厚仪需要定期归零,以补偿温度及探头磨损的影响。在使用前,使测厚仪达到周围的环境温度,清洁探头上的耦合剂。
测厚仪需要定期归零,以补偿温度及探头磨损的影响。在使用前,使测厚仪达到周围的环境温度,清洁探头上的耦合剂。
如果在非常酷热或寒冷的温度条件下进行测量,建议将探测仪在工作温度下归零。
如果探测仪在非常粗糙的表面介质上进行测量,建议将探测仪定期归零以补偿磨耗的损失。
设置阀值:
每个探测仪都有一个测量范围(如第9页所述)。例如:C型测厚仪能够测量涂料的厚度为50到3800微米(2-150密耳)
阀值用于缩小测厚仪的测量范围。阀值A是用来设置最小厚度值,阀值B则是最大厚度值。
在多数情况下,默认阀值是不需要再调整的。但实际使用中有些因素可能导致测厚仪显示很低或是不重复的读数。包括以下因素:
粗糙或有纹路的涂料;
硬(致密)的涂料;
多涂层涂料;
应用于极薄、极硬的底材上的涂料;
注意:在测量时,测厚仪将探测反射较强而且在两个设定阀值之间的那些信号。如果涂料的厚度超出这个范围,就可能出现错误的或不存在的读数。PosiTector 200将会探测出涂料/底材反射信号更强的且在设定阀值之间的那些信号。
如何调整:
1、测量有涂料的部分;
2、从菜单中选择设置阀值;
3、阀值A先被设定,调节(+)或(-)使其增加或减少;按![Operation Manual of Positector200 Ultrasonic Thickness Gauge [Translation] with Figure 7](http://img.nbchao.com/upload/editor/image/20160514/1463230153761030468.png) 进入确定并进行阀值B设定。
进入确定并进行阀值B设定。
4、设置阀值B, 调节(+)或(-)使其增加或减少;
5、按进行确定。如果你使用的是标准型测厚仪,将自动退出菜单。
6、如果你使用的是高级型测厚仪,显示屏将显示一可移动的游标和波形图 ,按(+)或(-)可使游标上下移动从而分析该波形图 。按确定并退出菜单
注意:利用游标可测量3种以上涂料涂层的厚度;
下面举例说明阀值的设置
| 预测厚度 | 阀值A | 阀值B | 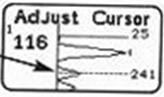 |
| 500微米 | 130微米 | 1000微米 | |
| 50微米 | 25微米 | 250微米 |
注意:当设置的阀值改变时,测厚仪的读数可能改变。新的读数就是在这个新的阀值区间内信号更强的涂层厚度。这个特点使它可以忽视诸如粗糙表面的其它测量值。
要了解更多关于阀值的应用请查阅第7页。
调校厚度:
选择标准参照物时,要尽可能选择与待测试样厚度接近的。为得到更好的结果,标准参照物的厚度应与待测量的涂料的厚度一致或者稍微大一点。
1、在参照底材滴一滴耦合剂;
2、测量标准参照物;
3、拿起探头,选择调校厚度菜单;
4、选择(+)或(-)调整到标准参照物的厚度;
5、按 钮来保存设置,如果你使用的是标准型测厚仪,将自动退出菜单。
6、如果你使用的是高级型测厚仪,可继续设置第二层厚度。调整厚度(如第4步)并保留设置。当完成所有各层的厚度都调整后,测厚仪将储存设置数据。
注意:重新设置会将测厚仪恢复到出厂时设置。
记忆模式:
PosiTector 200可储存10000个数据到最多1000个数据组(批次)里面,供数据统计、打印(需购买红外打印机)或利用PosiSoft软件和USB数据线将数据下载存储于私人电脑。
新数据组:
关闭目前的数据组,并以下一个大数目字为名字创建新的数据组。例如:如果只存在组 1和组3,则会创建出组4。屏幕上将同时显示每个测量结果和统计值,并存储于这个新的数据组。每次测量,显示屏上的统计数据将立刻被更新。每个数据组创建时都会被烙上创建时间。
小窍门: 当打开一个数据组后,按(+)将创造出新的数据组。

打开
打开一个先前创造出的数据组作为当前数据组。如果它包含测量数据,统计值将马上显示于屏幕上。
关闭
停止记录,关闭当前数据组,并除掉显示屏上的统计数据;
删除
有效删除一个数据组。名称被删除,所有的测量数据也别擦除;
查看
查看当前或者最近的数据组的所有读数。它首先显示最后10个测量数据,用(+)或(-)来翻页。每按住用(+)或(-)1秒可翻1页。
如要改变或删除一个数据,移至此数据并选中它(选中时旁边有”+”标志),然后进行测厚即可改变该数据,或按 按钮来删除它。统计数据将被更新。
打印
将所有测量数据打印到红外打印机,或利用USB接口及PosiSoft软件连接到电脑进行打印。同时按(+)与(-)打印将取消。
注意
按(-)键可以删除当前数据组的最后一个读数。
利用USB连线及PosiSoft软件可将记忆卡中的数据下载到电脑。下载后,测厚仪中的测量值是不会被删除。
PosiSoft®允许将编写记录、注解,打印柱形图和基本的图表,进行数据处理以及将读数导出为文档或者电子数据表。
设置菜单:
重置:“reset”是恢复出厂设置。重置后,以下情形将会发生:
1、所有的数据组将关闭,所有的存储的数据将被清除;
2、所有的校准调整将被清除,并恢复到出厂时的校准;
3、测厚仪回复到缺省值;
4、菜单设置回复到以下状态:记忆=关闭状态; 图表=关闭状态
两外一种重置方法是在测厚仪关闭状态下,持续按住(+)键直至出现重置符号 。此项操作与菜单中的重置选项功能相同,还同时将单位重置为微米,语言重置为英语;
图表:(只限高级型号)
显示屏可用于显示超声波穿透涂料体系时的图表。如图
小窍门:
按(+)来打开或关闭图表。(只在记忆功能关闭的时候可用)
测量时,超声波在涂层体系中传播,当超声波遭遇到两种不同密度的涂料或者涂料与底材的接触面的时候,其脉冲将发生变化。
这类交界面会以波峰的形式表现。密度变化越大,波峰越高;密度变化越缓和,波峰宽度越大;例如:两个采用本质一样的材料做成的涂层,将会产生低且宽的波峰;而两种截然不同的涂层,其波峰将是高而窄。
当测量涂层的厚度时,PosiTector 200会选择那些峰值最高的那些波峰。例如:涂层数被设置为3时,在设定的阀值区间内那3个最高的波峰就被作为这些涂层的接触面。测厚仪选定的这些波峰将以黑色三角箭头的形式显示。
阀值A和阀值B在图表中将以最高和最低水平线形式显示。它们的数值显示于对应水平线的右边。最小值下限阀值A,在最高处。最大值上限阀值B,在最低处。回声或波峰(厚度值)如超过设置值将会被忽略。阀值的设置及改变请参照 设置阀值 菜单。
图表的显示可通过设置阀值来巧妙地处理。为容易调整阀值,可以在两个阀值间移动游标线来勘测其它的波峰。
单位:
此菜单键可将所储存的和显示的读数单位在密耳(mils)与微米之间切换。
时钟设置:
所有的数据组都标有创建日期,所有存储到这些数据组的测试数据也都时间记录(24小时格式)。这个菜单的功能就是调整日期和时间,确保记录正确。另外,如果将测厚仪连接到PosiSoft软件并使用其中的Gage Utilites(仪器工具) Set Clock(时钟设置)功能,时间和日期将被自动更新。
多层厚度测试
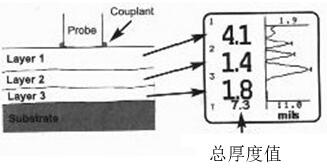 对于一个多层体系,高级型号的PosiTector200可以显示最多3个不同层的厚度。
设置测厚仪测量多层涂层的方法:
1.选择“校准设定”菜单,然后选择“分层”;
2.按(-)或(+)来选择层数,按 确认。
确认。
提示:建议在设定仪器测量多层涂层厚度前,先做单层检测模式测量,并且用图表功能来分析测量结果。
可选配件:
多种可选配件可以帮助你在使用PosiTector200涂层测厚仪时获益更多
校准、鉴定、调试
三个步骤可以确保更好的精确度…
1 校准 – 一般在厂家或者认证实验室进行。
2精度鉴定 – 由用户完成。
3 调试 - 用已知的厚度进行调试
校准:
校准是一个受控的、文件指引的和可溯源的测量校正标准,它确保测量结果精度在仪器规定的精度范围内。校准通常由仪器生产厂或者有认证校准资格的实验室在规定的环境温度和文件指引下进行的。
鉴定:
鉴定是用户在标准片上进行的精度核实。一个成功的鉴定要求仪器的读数精度要同时在仪器和标准片的精度范围内。
调试:
调试或者调校就是使仪器的读数与参考样品的厚度相匹配,这是为了改善仪器在特定涂层上的测量精度。
PosiTector 200是工厂校正的。但是为了对某一材料进行准确的厚度测量,用这种材料对仪器进行调试是有必要的。为了确定调校是否有必要,可用已知涂层厚度的材料作为样品进行测量。如果一系列测量值的平均值与实际厚度不相符,就调校仪器到实际厚度值。样品应该是平的、光滑的,其厚度要与待测品最大厚度相当或者稍厚。
使用注意事项:
PosiTector 200是应用超声波原理来测量几乎所有底材上的大多数涂层厚度。超声波信号是一种非常高频率的声波。就象你在一个大堂或山谷喊叫时听到的回声,PosiTector 200也是在“听”各个界面的回声。
PosiTector 200的探头发出高频率的声脉冲,脉冲经由耦合剂穿过涂层,然后在任何不同密度的表面反射回去。测厚仪通过测量超声波信号从探头发射到涂料/底材接触面并反射回去的时间来读数。这个时间除以2,然后乘以超声波在涂料中的速度,即可得到涂层的厚度。涂层/底材接触面的反射信号的强度决定了测厚仪的能力。由于很多实际需要测量的涂层都不是单一均匀的,测量时仪器会“听”到很多的回声。所有这些回声都是在仪器探测范围内的,仪器会将信号更强的那个作为涂料/底材的反射信号(只对单涂层而言)。阀值的设定使仪器忽略掉样品中那些不需要的回声。下面几个例子可以说明阀值的用途。
测试粗糙不平的涂层表面:
当测量粗糙不平的表面时,测厚仪一般是测量涂层的波峰最顶端到底材表面的厚度(#1)。耦合剂填满在探头和涂层之间的空隙(#2),因此多增加了一个接触反射面。如果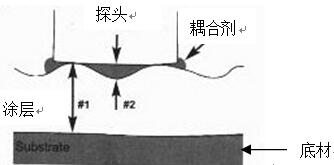 从耦合剂/涂层接触面(#2)的回声比涂层/底材接触面的回声(#1)强,请增加阀值A以便显示相对较弱的(#1)的回声。
测量致密(硬)涂层:
在探头/涂层的交界处有一个明显的回声。According to它与涂层/底材交界的回声强弱对比的关系,判断是否需要增加阀值A。
测量多涂层的总厚度:
多涂层体系的各个涂层/涂层/底材的交界会产生数个回声。用户需要调整阀值,忽略涂层/涂层间回声的影响。
故障排除:
仪器不能开机
Make sure that the positive and negative terminals of the inserted batteries are correct, and use new alkaline batteries.
Instrument power can be turned on but will not stay on
Replace with a new alkaline battery, if the problem persists, please send it back to the after-sales service.
Instrument readings are much lower than expected
Maybe the surface measured by the instrument is too rough, increase the threshold A. See page 3.
Readings are much higher than expected
It may be that the thickness measured by the instrument is the thickness of the coating and the substrate, and the threshold B can be reduced, see page 3.
Instrument readings are inaccurate or unstable
See Threshold Setting on page 3 and Calibration Thickness on page 4 to ensure the instrument is optimized for your application. Check instruments against traceable standards.
The instrument displays an error message when the probe is zeroed
Hold the probe in the air and make sure there is no couplant on the probe. If the problem persists, please contact our technical service department and report the error message.
Replacement battery
A full battery icon is displayed, indicating that new alkaline batteries are installed. When the battery power is weakened, the bar will decrease. When the battery power is very low, the battery image will be displayed. The instrument can still be used, but it is recommended to replace the battery as soon as possible. Be sure to use "AAA" alkaline batteries. Nickel-cadmium and nickel-metal-hydrocarbon rechargeable batteries will also work, but the instrument may indicate low battery. In order to retain all user settings and store readings, please replace the battery after the instrument is automatically turned off.
return for repair
Before returning for service:
1. Correctly insert new alkaline batteries according to the instructions of the battery box.
2. Check the probe end for dust or damage.
3. Please reset the instrument (see page 5) and return to zero (see page 2).
4. Put a plastic spacer on a hard surface (such as glass) and take a measurement (see page 2).
If you need to return the instrument for repair, please describe the entire problem in detail and attach test results if possible. When returning, please be sure to provide the name of the instrument, probe and your company, company contact information, telephone, fax or email address.