installation, commissioning

1. Installation
The vacuum Drying Oven should be placed in a room with good ventilation and no strong vibration, and no flammable and explosive items can be placed around it.
Two, debugging
⑴ Close the box door and close the purge valve, open the vacuum valve.
(2) Connect the Vacuum Pump to the suction port with a suction pipe, turn on the power of the Vacuum Pump to start pumping, when the indication value of the vacuum gauge reaches -0.1Mpa, first turn off the vacuum valve, and then turn off the power of the Vacuum Pump (to prevent back suction). Vacuum state. If the heating function is not needed, the vacuum box debugging is over.
⑶ Turn on the power of the vacuum Drying Oven, and set the temperature controller to the required temperature. The digital display on the temperature controller is divided into two rows. The upper row shows the actual measured temperature, and the lower row shows the set temperature. When the displayed temperature is close to the set temperature When the temperature is high, the heating indicator light will flash, the temperature control will enter the constant temperature state, and the vacuum Drying Oven will work normally.
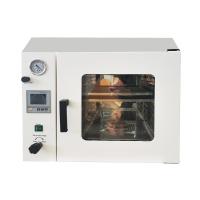
3. Instrument panel indication

five. Operation and usage
1. When the controller is powered on, the upper row of the display window will display "graduation number (P, C, K, S)", and the lower row will display "range value" for about 3 seconds before entering the normal display state.
2. Reference and setting of temperature and constant temperature time
Click the "Setting" button to enter the temperature setting state, the prompt "SP" will be displayed on the lower row of the display window, and the temperature setting value will be displayed on the upper row (the first digit flashes). Modify to the desired set value; then click the "Setting" button to enter the constant temperature time setting state, the lower row of the display window will display the prompt "St", and the upper row will display the constant temperature time set value (the first digit flashes ), which can be modified to the required set value by shifting, increasing, and decreasing keys, (1, such as long-term operation, the time setting value is "0". 2, if there is time, if there is time setting, the time is up , the operation is finished, the lower row of the display window will display "End", the buzzer will sound for 30 seconds, and all outputs will be turned off); then click the "Setting" button to exit this setting state, and the modified setting value will be automatically saved.
3. When an over-temperature alarm occurs, the buzzer will sound continuously and the "ALM" alarm light will be on. If an over-temperature alarm occurs due to changing the temperature setting value, the "ALM" alarm light will light up, but the buzzer will not sound.
4. Press any key to silence the buzzer when it sounds.
5. "Shift/Auto-tuning" key: Long press this key for 6 seconds in the non-setting state to enter or exit the system self-tuning; click this key in the setting state to make the set value shift and flash to modify.
6. "Decrease/Rerun" key: In the non-setting state, when the operation is over, press and hold this key for 3 seconds to restart the operation; Press the key continuously to set the value.
7. "Increase/Backlight" button: Click this button in the non-setting state to turn on or off the backlight of the LCD screen (this function is only available for LCD series); click this button in the setting state to increase the set value, long press This key can make the set value increase continuously.
8. In the setting state, if no key is pressed within 1 minute, the controller will automatically return to the normal display state.
9. If "----" is displayed on the upper row of the display window of the controller, it means that the temperature sensor or the controller itself is faulty, please check the temperature sensor and its wiring carefully.
six. System self-tuning
When the temperature control effect is not satisfactory, the system can be self-tuned. During the self-tuning process, the temperature will have a large overshoot, and the user should fully consider this factor before performing the system self-tuning.
Press and hold the "Shift/Auto-tuning" button for 6 seconds in the non-setting state to enter the system self-tuning program, the "RUN/AT" indicator light flashes, and the indicator light stops flashing after the self-tuning is over, and the controller will get a Set better system PID parameters, and the parameter values are automatically saved. During the system self-tuning process, press and hold the "Shift/Auto-tuning" key for 6 seconds to stop the self-tuning procedure.
If there is an over-temperature alarm during the system self-tuning process, the "ALM" alarm light will not light up, and the buzzer will not sound, but the heating alarm relay will be automatically disconnected. The "SET" key is invalid during the system self-tuning process. During the system self-tuning process, regardless of whether there is a constant temperature time setting, the lower row of the controller display window always displays the temperature setting value.
seven. Reference and setting of temperature internal parameters
Press and hold the set button for about 3 seconds, the password prompt "Lc" will be displayed on the lower row of the controller display window, and the password value will be displayed on the upper row, and the required password value can be modified by increasing, decreasing and shifting keys. Then click the setting button, if the password value is incorrect, the controller will automatically return to the normal display state, if the password value is correct, it will enter the temperature internal parameter setting state, and then click the setting button to modify each parameter in turn. Then press and hold the set button for 3 seconds to exit this state, and the parameter value will be saved automatically.
Internal parameter table -1

Internal parameter table -2

Internal parameter table -3 (this parameter table is standard for LCD series, and optional for digital series)

(7) Product maintenance and precautions
1. Vacuum Oven The Drying Oven should be kept clean, and the door glass should be wiped with a soft cloth. Do not use chemical solvents to avoid chemical reactions and scratches on the glass.
2. The vacuum drying box should be kept clean. If it is not used for a long time, it should be covered with a plastic bag dust cover and placed in a drying room.
(8) Others
After the vacuum drying box is packaged, the user shall repair the product and provide parts for the user free of charge if the product fails to work normally within one year from the date of delivery under the condition that the user abides by the storage and use rules.
(9) Common failure phenomena and treatment methods

Instrument wiring diagram