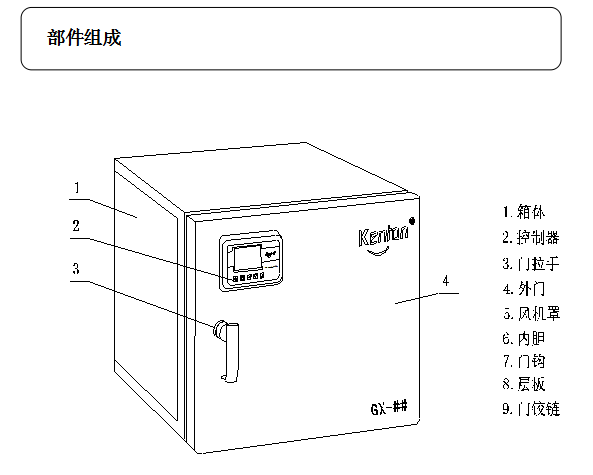
product structure


Key definition
1. "ON" button: to turn on or off the controller.
2. "Setting" key: to set or refer to temperature, time and related parameters.
3. "Shift/Auto-tuning" key: Long press this key for 6 seconds in the non-setting state to enter or exit the system self-tuning; click this key in the setting state to make the set value shift and flash to modify.
4. "Decrease/Rerun" key: In the non-setting state, after the operation is over, press and hold this key for 3 seconds to restart the operation; key can make the setting value decrease continuously.
5. "Increase/Backlight" button: Click this button in the non-setting state to turn on or off the backlight of the LCD screen; click this button in the setting state to increase the set value; The value increases continuously.
6. "ALM!" Indicator light: Alarm indicator light, when there is an over-temperature alarm or temperature overflow alarm, the indicator light will be on.
7. "HEAT" indicator light: heating indicator light, when there is heating output, the indicator light is on.
8. "AT" indicator light: Auto-tuning indicator light, when the auto-tuning is in progress, the indicator light flashes.
9. "RUN" indicator light: When the instrument is running normally, this indicator light is on.
Installation Location
In order to ensure the normal operation of the equipment and obtain good performance, please install the equipment in a place that meets the following conditions:
Note: ambient temperature 10~40℃; relative humidity below 70%
■ A location that is not exposed to direct sunlight.
Do not install the device in direct sunlight. Installation in locations exposed to direct sunlight may cause the device to perform less than expected.
■ An adequately ventilated location.
If the device is used in a small and airtight room, it may not be able to dissipate heat in time and the device may not work properly. There needs to be a distance of more than 10cm between the device and the wall.
■ A location away from heat sources.
Avoid installing the unit near heat sources such as boilers or heaters. Excessive external heat will affect the normal operation and control performance of the equipment.
■ A site with firm, level ground.
Be sure to install the device on a solid and flat ground. Uneven ground or inclined installation of the device may cause equipment failure or personal injury. Install the device under stable conditions to avoid shaking and noise of the device.
■ A location not prone to high humidity.
Install the device in a place where the humidity is not greater than 70%. If it is installed in a place with high humidity, it may cause electric leakage or electric shock.
warn
Do not use this device outdoors. If the device is exposed to rain or water, it may cause electric leakage or electric shock.
Do not place the device in a wet place or a place where it may be splashed with water, otherwise it may cause electric leakage or electric shock due to insulation degradation.
■ A location free of flammable or corrosive gases.
Do not install the device in a place with flammable or volatile substances, otherwise it may cause explosion or fire. Or it may cause leakage, electric shock or equipment damage due to corrosion.
Install
1. remove packing material
After removing all packing material, open the door and ventilate the unit. If the shell and panel are dirty, please use neutral detergent to remove the dirt and clean the remaining neutral detergent with clean water. After cleaning, wipe it with a damp cloth, and then wipe it with a dry cloth.
2. balance equipment
After the cabinet is placed in place, before using the equipment, the equipment needs to be raised until it is balanced due to uneven placement, so as to prevent the equipment from shaking and affecting the use.
3. grounding
4. If the device is idle
Make sure the inside of the box is completely cool and dry before closing the door before leaving the unit unused.
5. Before moving equipment
Before moving the equipment, if there are items placed on the loading bracket in the box, they must be taken out to prevent possible slipping.
warn
Please use a power outlet with a ground wire to prevent electric shock. If the electrical outlet is not grounded, a ground wire needs to be installed by a qualified engineer.
Never ground the device through gas pipes, water pipes, telephone wires, or lightning rods, etc. This type of grounding has the potential to cause electric shock due to an incomplete circuit.
Before running
Before starting the device for the first time, please operate as follows:
1. Remove accessories such as shelves inside the device.
2. Wipe the inner wall of the box with gauze to clean it.
3. Put the shelf into the equipment according to your own drying or experimental requirements.
4. If you need to place items on the same shelf, leave space between them to facilitate air convection circulation.
Notice:
Do not clean this unit with sodium chloride solvents or other halide solutions as this may cause rust.