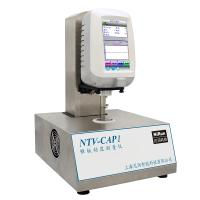
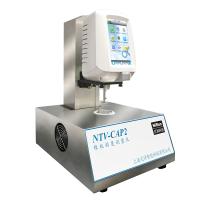
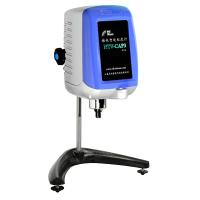
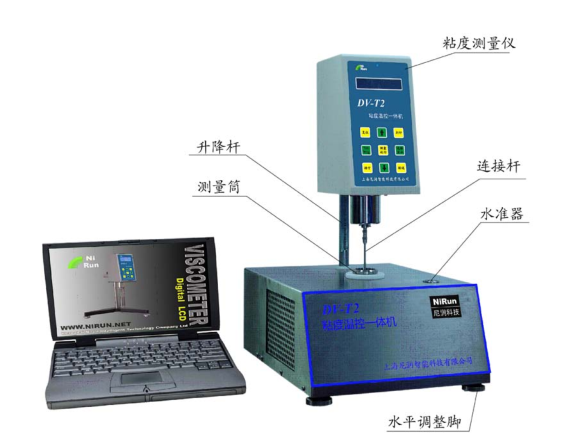
Viscosity temperature control all-in-one machine is a combination of viscosity measurement and precise temperature control. It breaks through the existing market that has a constant temperature Water Tank, a viscosity measuring instrument, and a small amount of sample adapter to form a split machine. The all-in-one viscosity measurement system is composed of a small sample adapter (SSR) cylindrical sample sleeve and an SC4 rotor, which can perform accurate measurements at a certain shear rate. The sample volume only needs 2 to 16m, and the SC4 rotor has a cylindrical geometry Can provide very accurate viscosity measurement, and can get accurate shear rate data. The small sample cylinder is easy to load and unload, which brings convenience to the cleaning work. The small-volume sample cylinder is closely connected with the temperature controller, so that the temperature of the sample can be kept very accurately. The stirring action of the rotor, combined with the small sample volume, minimizes sample temperature non-uniformity. The constant temperature time is greatly shortened.
Precise temperature control is very helpful for testing the performance changes of your samples and predicting the behavior of products. Controlling the temperature when measuring the viscosity is helpful to ensure the accuracy of the experimental results. Since the temperature controller is composed of a semiconductor and a built-in automatic optimization temperature program control, the temperature rise/fall is adjustable, and the temperature control accuracy is ±0.1. Temperature control is operated by DV-T2 data acquisition and program-controlled analysis software, which has good operational performance and flexibility.
Please note: During the operation, it is strictly forbidden to gradually immerse the rotor into the sample, especially the high viscosity sample, so as not to damage the internal structure of the instrument and cause measurement errors.
Maintaining a good AC power ground can eliminate internal circuit damage caused by static electricity.

1. Main technical indicators of DV-T2 viscosity temperature control machine:
Model: LDV-T2
Range: 10-1M (M means million)
Rotor speed: 0.1-200 rpm (infinitely variable speed)
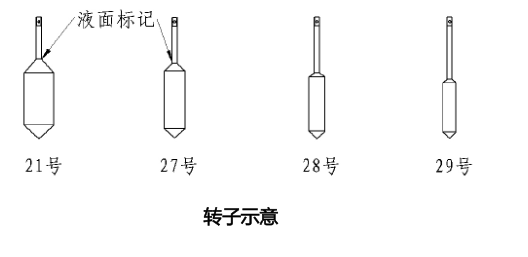
Number of rotors: Standard configuration SC4-21, 27, 28, 29 4 rotors
(Optional rotors SC4-14, 15, 16, 18, 25, 31, 34)
Sample volume: 2-16ml
Temperature range: -1—150 (temperature control accuracy ±0.1 )
Measurement accuracy: ±1.0% (F/S)
Repeatability: 0.5% (F/S)
Configuration: DV-T2 data acquisition and program-controlled analysis software (RS232-USB interface)
Power supply: Input AC100-240V, 50Hz/60Hz. Output DC15V1.2A
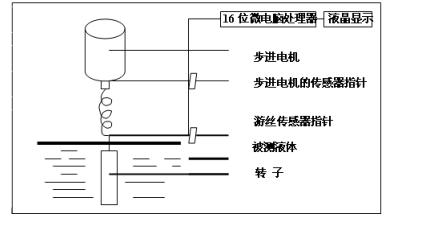
2 .结构原理
如图所示, 以高细分驱动步进电机带动传感器指针,通过游丝和转轴带动转子旋转。
如果转子未受到液体的阻力,游丝传感器指针与步进电机的传感器指针在同一位置。反之,如果转子受到液体的粘滞阻力,游丝产生 扭矩与 粘滞阻力抗衡,最后达到平衡。这时分别通过光电传感器输出信号给 16 位微电脑处理器进行数据处理,最后在带夜视功能液晶屏幕上显示液体的粘度值 ( mPa·s )。
安装(参照总装示意图后按下列步骤进行)
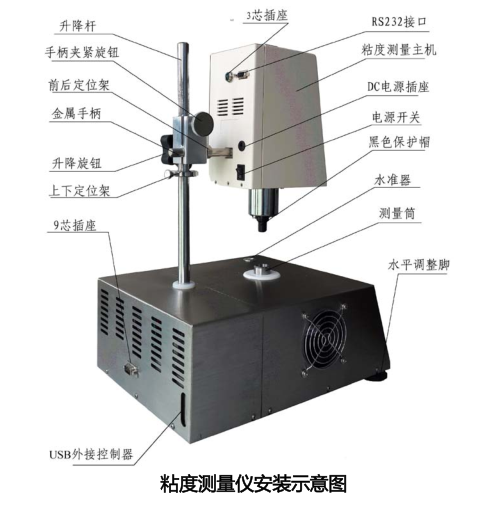
1. 把粘度温控一体机主机安放在平稳实验台上,并且调整水平位置。把粘度测量仪金属手柄插入升降架小圆孔中,同时调整粘度测量仪上水准器位置在中间,旋转手柄夹紧旋钮,使得粘度测量仪牢固装在升降架上。取下粘度测量仪下方黑色盖帽,放好备用(仪器维修运输时一定要装上)。黑色盖帽起到保护连接螺杆的作用,长期不用或运输时,一定要将黑色盖帽盖上。
2. 连接粘度测量仪 3 芯插座与温控一体机 9 芯插座连线。连接粘度测量仪、温控仪电源线。联结连接螺杆和连接杆,并将连接杆的另一头和所选转子连接,再将连接螺杆装在粘度测量仪的连接头处 ( 向左旋入装上 , 向右旋出卸下 ),观察并调整使得转子在小量样品筒中心位置。
3. 按照指示安装 DV-T2 数据采集和程控分析软件、USB-RS232 驱动软件在电脑。
4. 连接 USB-RS232 与电脑连线。
5. 点击图标 DV-T2 数据采集和程控分析软件,按照软件使用说明进行操作。
6. 把粘度测量仪移动到最高位置。取出小量样品筒、选用转子用酒精进行清洗,把清洗好的小量样品筒放回中心位置待用。慢慢旋转小量样品筒一直旋到落下卡住为止。
7. 小量样品筒内装入 2-16ml 左右的被测液(According to转子体积大小进行调整),使液面正好到转子的液面标记处;
8. 在软件界面处进行温度程序设定,详细请看 DV-T2 数据采集和程控分析软件说明书;
9. 下移粘度测量仪至规定位置,使液面正好到转子的液面标记处;盖上小量样品筒盖子;使得连接杆在盖子中心孔中心位置;
10. 在操作软件界面上按“运行”键,进行样品测量。观察测量进度,等待;
11. 样品测量完成后。按“停止”键。结束采样测量工作。同时在粘度测量仪按“复位”键,电机停止工作;
12. 保存数据曲线 ,分析样品,打印报告。
13. 把粘度测量仪上移大约 30mm 处,卸下连接螺杆和转子,( 向左旋入装上 , 向右旋 出卸下 ), 再上移粘度测量仪至最高位置。取出小量样品 筒、转子,进行清洗样品工作,最后用酒精清洗小量样品筒和转子。保持小量样品筒、转子清洁干燥;
14. 关机,切断电源;
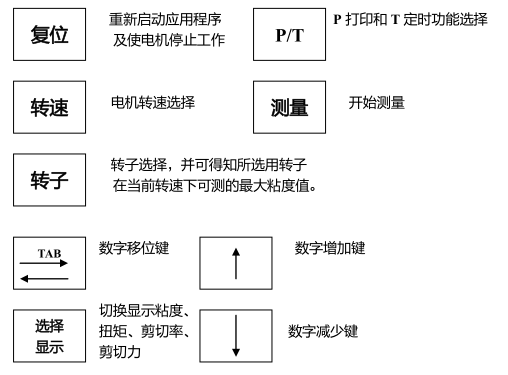
各键功能
操作步骤
(1) 按照“ 4. 安装”步骤将粘度测量仪安装到位。
(2) 把粘度测量仪移动到最高位置。取出小量样品筒、选用转子用酒精进行清洗,把清洗好的小量样品筒放回中心位置待用。慢慢旋转小量样品测量筒一直旋到落下卡住为止。
(3) 联结连接螺杆和连接杆,并将连接杆的另一头和所选转子连接,再将连接螺杆装在粘度测量仪的连接头处 ( 向左旋入装上 , 向右旋出卸下 ),观察并调整使得转子在小量样品筒中心位置。
(4)小量样品测量筒内装入 2-16ml 左右的被测液(According to转子体积大小进行调整),使液面正好到转子的液面标记处;
(5)在软件界面处进行温度程序设定,详细请看 DV-T2 数据采集和程控分析软件说明书;
(6)旋动升降架旋钮 , 使粘度测量仪缓慢地下降,转子逐渐浸入被测液体当中,直至转子上的标记与液面相平为止;盖上小量样品筒盖子,使得连接杆在盖子中心孔中心位置;
(7)接通电源开关;
(8)输入选用转子号:每按转子键一次,屏幕显示的转子号相应改变,并在 SP:14 → 15 →16→18→21→25→27→28→29→31→34→14 →之间循环,当屏幕显示为所选用的转子号时,即完成输入。
(9)选择转速:按转速键屏幕会出现 如 060.0RPM 当前转速,并在“ 6 ” 字符上不断闪烁 ,这时可以通过按数字增加键或减少键来设置转速的十位数;然后通过按移位键可逐位移向个位数及小数点后的十分位数,采用相同于上述十位数的设定方法可完成其他位的数值设定,转速设定完毕后 , 按转速键确认 。
(10)在操作软件界面上按“运行”键,同时按粘度测量仪上“测量”键,进行样品测量。即可同时测得当前转子、转速下的粘度值和百分计标度。观察测量进度,等待;
(11)样品测量完成后。按“停止”键。结束采样测量工作。同时在粘度测量仪按“复位”键,电机停止工作;
(12)保存数据曲线 ,分析样品,打印报告;
(13)把粘度测量仪上移大约 30mm 处,卸下连接螺杆和转子,( 向左旋入装上 , 向右旋 出卸下 ), 再上移粘度测量仪至最高位置。取出小量样品 筒、转子,进行清洗样品工作,最后用酒精清洗小量样品筒和转子。保持小量样品筒、转子清洁干燥;)
(14)关机,切断电源;
(15)P 打印和 T 定时功能选择 :
a. 先选择 P/T 时间: 每按 P/T 键,屏幕左下方出现 P :00 :00 和 T:00:00 切换。
P 表示是打印时间间隔,T 表示是测量样品定时时间。通过按钮“←”键和“→”键移位设置分和秒。“↑”键和“↓”键设置分和秒数字。P :00 :00 和 T :00 :00 表示无 打印和定时功能。
b. 测量样品定时时间设置:例如:要设置测量样品定时时间为 5 分钟。可以先按 P/T键,如果屏幕显示为 P :00 :00 ,再按一次 P/T 键,屏幕显示为 T :00 :00 就可以设置定时时间了 ,通过按钮“←”键和“→”键移位定位于“分”上,然后按“↑”键和“↓”键设置成 5,显示为 T :05 :00 即可,再按 P/T 键确认,即完成设置。在达到规定测量时间后,粘度计会自动停止测量,并锁住粘度值。
未知粘度范围样品测量
(1) 测量一般原则:高粘度的样品选用小体积( 28 、 29 号)转子和慢的转速,低粘度的样品选用大体积(21 、27 号)转子和快的转速。每次测量的百分计标度(扭矩)在 20 %— 90 %之间为正常值,在此范围内测得的粘度值为正确值。
(2) 先大约估计被测样品的粘度范围,然后According to高粘度的样品选用小体积的转子和慢的转速,低粘度样品选用大体积的转子和快的转速。一般先选择转子,然后再选择合适转速。例如转子 SP 为 21 号时,转速为 60RPM ,屏幕直接显示满量程为 83.3mPa.s ,当转速改为 6RPM 时,满量程为 833.3mPa.s 。
(3) 当估计不出被测样品大致粘度时,应先设定为较高的粘度。试用从小体积到大体积的转子和由慢到快的转速。然后每一次测量According to百分计标度(扭矩)来判断转子和转速选择的合理性,百分计标度一定要在 20 %— 90 %之间为正常值,若不在此范围内,粘度计会发出报警声,提示用户更改转速和转子。千万别忘了换了转子一定要According to选用转子改变转子号 SP 。
9 . 注意事项
(1) 装卸转子时应小心操作,装卸时应将连接螺杆微微抬起进行操作,不要用力过大,不要使转子横向受力,以免转子弯曲。
(2) 请不要把已装上转子的粘度计侧放或倒放。
(3) 连接螺杆与转子连接端面及螺纹处保持清洁,否则会影响转子晃动度。
(4) 粘度计升降时应用手托住,防止粘度计因自重而下落。
(5) 调换转子后,请及时输入新的转子号。每次使用后对换下来的转子应及时清洁(擦干净)并放回到转子架中。请不要把转子留在仪器上进行清洁。
(6) 当调换被测液体时,请及时清洁(擦干净)转子和转子保护框架,避免由于被测液体相混淆而引起的测量误差。
(7)仪器与转子为一对一匹配,请不要把数台仪器及转子相混淆。
(8)请不要随意拆卸和调整仪器零件。
(9)搬动及运输仪器时,应将黑色盖帽装在连接螺杆处,并把螺钉拧紧,放入包装箱中。
(10) After installing the rotor, please do not rotate it for a long time without liquid, so as not to damage the shaft tip.
(11) Many of the suspensions, emulsions, polymers and other high-viscosity liquids are "non-Newtonian liquids", and their viscosity values change with changes in conditions such as shear speed and time . The inconsistency of the measured results under the speed and time is normal and not an instrument error. For the determination of non-Newtonian liquids, the rotor, rotational speed and time should generally be specified.
(12) Doing the following points will help to measure more accurate values:
• Accurately control the temperature of the measured liquid.
• Immerse the rotor in the liquid to be measured for a long enough time to make the temperature of both the same.
• Maintain liquid homogeneity.
• Place the rotor in the center of the container during measurement, and be sure to install the rotor protection frame.
• Keep the rotor clean and free from vibration.
• When the measurement of high rotation speed changes to low rotation speed immediately, the machine should be turned off, or the measurement time at low rotation speed should be controlled a little longer, so as to overcome the error caused by the rotational inertia of the liquid.
• Use No. 21 spindle when measuring low viscosity and No. 29 spindle when measuring high viscosity.
• When measuring viscosity at low speed, the measurement time is relatively longer.
• During the measurement process, due to the need to change the rotor, the liquid to be measured, etc., after changing the position of the viscometer by rotating the lifting chuck, check and adjust the horizontal position of the viscometer in time.