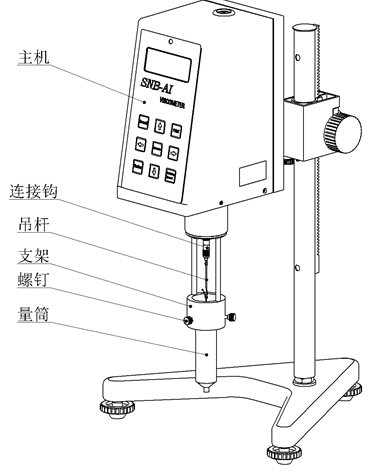
7.1 Make sure the installation steps have been completed accurately.
7.2 Turn on the power switch on the left rear side of the host (press the lower end), at this time the display is on, the host is in standby mode, and the motor does not work.
7.3 Select the rotor and input the rotor number: every time you press the <rotor> key, the displayed rotor number will change accordingly, and cycle among 21→27→28→29→0, when the screen displays the selected rotor number, the input is completed.
7.4 Speed selection method: If you set and confirmed 60 rpm before the last power failure, press the <Speed> key and the screen will display 060.0, and the character "6" will appear and disappear. At this time, press the <↑> key or The <↓> key can be used to set the tens digit of the rotational speed. By pressing the <→> key, the unit digit and the tenth digit after the decimal point can be shifted step by step. If the reverse shift is required, it can be completed by pressing the <←> key. , use the same method above to complete the value setting of other digits. After the speed is set, press the <Speed> key to confirm.
7.5 Adjust the level adjustment feet to move the level bubble to the middle position, so that the host can remain in a horizontal state.
7.6 Press the <Measurement> button to select the automatic "Auto" or manual "Manual" measurement method (manual measurement method is recommended for non-Newtonian liquids), and press the <Measurement> button again to start the motor and display the viscosity value.
7.7 If you need to replace the rotor during the measurement, you can directly press the <Reset> key, and the stepper motor will stop rotating at this time, and the host will be in standby mode. After the rotor is replaced, repeat the above steps from 7.3 to 7.6 to continue the measurement.
7.8 Press the <Print/Timing> key to realize printing and measurement timing functions
Selection of printing or measurement timing function: turn on the power of the host computer, press the <print/timing> key when the viscometer is not in the measurement state, when the screen displays P:××:××, enter the print setting function, press again <Print/Timing> key, when the screen displays T:××:××, it will enter the measurement timing setting function. The time to press the <Print/Timer> key should be appropriately longer when converting the above functions.
7.8.1 Set the printing time: Press the <Print/Timing> key and cooperate with the four operation keys <↑> <↓> <→><←> to set the printing time arbitrarily under the prompt of the editing cursor, for example: to set the printing time The interval is 15 seconds. You can press <Print/Timing> key to display P:00:00 on the screen, shift by pressing "←" and "→" keys, and press <→>, <←> direction keys and <↑>, <↓ >Number increase and decrease keys make the screen display P:00:15, press the <Print/Timer> key to confirm the current setting, and the screen displays the set printing interval time.
The printing function can be realized by connecting the optional special printer and RS232 interface. Printing is required during measurement. Press the <Print/Timer> key, and the printer will print out "on". Every time the specified printing interval is reached, the printer will print out the viscosity value measured by the viscometer in real time. To end the printing, press <Print/Timer> key, the printer will stop printing after printing "off".
7.8.2 Setting of measurement timing time: when measuring non-Newtonian liquids, the rotor, rotational speed and measurement time should generally be specified, and the user can set the measurement timing time according to sample characteristics or related standards.
Set the measurement timing time: Press the <Print/Timing> key, the screen will display T:00:00, and a flashing editing cursor will appear, press the <→>, <←> direction keys and <↑>, <↓> numbers to increase or decrease Press the key to input the measurement time. After inputting the measurement time, press the <Print/Timer> key to confirm and save the measurement time, and the screen will display the set measurement time. For example: To set the measurement timing of a certain sample as 12 minutes and 15 seconds, you should first press the <Print/Timing> key to display T:00:00 on the screen, and then press the <→>, <←> direction keys and
<↑>, <↓> number increase and decrease keys to increase or decrease the number, so that the screen displays T:12:15, then press the <print/timing> key to confirm the current setting.
After the measurement time is set, the viscometer will automatically stop measuring when the measurement reaches the specified time each time, and the screen will display and lock the viscosity value measured at that time. To cancel the measurement timing function, the measurement time should be set to T:00:00.