NDJ-5S/8S digital display viscometer is an upgraded product of our company's Rotational Viscometer. The instrument adopts professional mechanical design technology, manufacturing process and microcomputer control technology, and the data is collected correctly; the display adopts a blue backlight, high-brightness LCD display screen, and the data display is clear.
This instrument has the characteristics of high measurement sensitivity, reliable test results, convenient use and operation, and beautiful appearance. It is an instrument used to measure the absolute viscosity of Newtonian liquids and the apparent viscosity of non-Newtonian liquids. It can be widely used in oils, paints, etc. Measurement of the viscosity of various objects such as plastics, medicines, jewelry, paints, detergents, etc.
How the instrument works
This instrument is a digital display viscometer, and the motor drives the rotor to rotate at a constant speed through variable speed. When the rotor rotates in the liquid, the liquid will generate a viscous moment acting on the rotor, and the viscous moment will be larger; conversely, the smaller the viscosity of the liquid, the smaller the viscous moment. The viscous moment acting on the rotor is determined by The sensor detects it, and after computer processing, the viscosity of the measured liquid is obtained.
The instrument adopts microcomputer technology, which can conveniently set the measuring range (rotor number and rotational speed), digitally process the data detected by the sensor, and clearly display the rotor number, rotational speed and measured value on the display screen. The viscosity value of the liquid and its full scale percentage value, etc.
DV-1 is equipped with 4 rotors (No. 1, 2, 3, 4) and 8 speeds (0.3, 0.6, 1.5, 3, 6, 12, 30, 60 r/min), thus forming 32 combinations , can measure the viscosity of various liquids within the determination range.
Instrument structure and installation
(1) The structure of the instrument
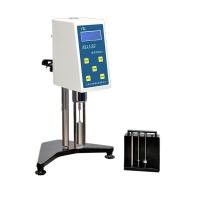
The structure of the instrument is shown in Figure 1.

(1) Level bubble (2) Liquid display screen (3) Outer cover (4) Rotor protection frame (5) Main unit base (6) Operation keyboard (7) Rotor connector (8) Rotor (9) Main unit base level adjustment knob
(2) Installation of the instrument
1. Check the power supply, which should meet the working requirements of the instrument: according to the relevant national regulations, the ground terminal should have a reliable ground wire.
2. The instrument should be installed on a workbench without corrosive gas, strong electromagnetic interference and vibration.
3. Insert the toothed column into the round hole of the main engine base, the toothed surface on the column faces the front of the base, and tighten the nut on the column with a wrench to prevent the column from rotating (see Figure 2).

(1) Lifting and tightening adjusting screw (with hexagon socket head) (2) Machine head fixing handwheel (3) Column fixing nut (4) Lifting handwheel (5) Column
4. Turn the lifting hand wheel to move up and down. If it is found that the lifting hand wheel is too tight or too loose when turning, you can adjust the tightening screw in front of the lifting seat. It is advisable to lift slightly tightly to prevent the viscometer head from falling under its own weight. Then insert the handle of the viscometer head into the fixing hole of the head, keep the head basically level, and clamp it with the fixed handwheel.
5. Unscrew and remove the yellow protective cap under the head of the viscometer (see Figure 3).
6. Adjust the three level adjustment screws on the base of the main unit so that the vial on the head of the viscometer is at the center.
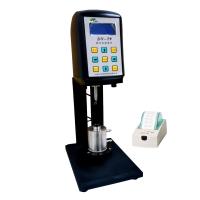
The rear layout of the instrument is shown in Figure 3.

(1) Printer interface (2) Mounting hole for machine head handle (3) Power switch (4) Yellow protective cap (5) PC interface (6) Power cord (7) Temperature sensor probe interface (8) Fuse holder (9) Protection rack mounting holes
Operation and use of the instrument
1. Prepare the liquid to be tested, and place the liquid to be tested in a beaker or a straight container with a diameter of not less than 70mm and a height of not less than 125mm.
2. Accurately control the temperature of the measured liquid.
3. Carefully adjust the level of the instrument, check whether the level bubble of the instrument is in the center, and ensure that the instrument is in a horizontal working state. (install the protective frame)
4. Referring to the range table, select the suitable rotor and screw it into the rotor connector (rotate to the right to install, and rotate to the left to remove).
5. Slowly adjust the lifting knob to adjust the height of the rotor in the measured liquid until the liquid mark of the rotor (the middle of the groove) is level with the liquid level.
6. Keyboard operation and display interface instructions:
(1) The keyboard of the instrument is shown in Figure 4.

(2) Turn on the power switch on the back of the instrument and enter the waiting state. The instrument uses
Chinese and English display, the display screen is shown in Figure 5.
Press the "▲" or "▼" key to select the desired language mode, press the "OK" key to enter, and the display is shown in Figure 6. Stop the cursor at "1#", press " ▶ " or " ◀ " to select the desired rotor number, there are 5 types of rotor numbers, namely "1#, 2#, 3#, 4# and 0#" rotors.

(3) Press the "▶" or "◀" key to switch to the speed position, and the cursor stops at 0.3 rpm as shown in Figure 6.
Press the " ▶ " or " ◀ " key to rotate the desired speed. DV-1 speed is divided into 9 gears, respectively 0.3 rpm, 0.6 rpm, 1.5 rpm
Min, 3 rpm, 6 rpm, 12 rpm, 30 rpm, 60 rpm and automatic gear.
当选择好转子和转速档位后,按“OK/确定”键,转子开始旋
转,仪器开始进行测量,屏幕显示如图7所示。
(4)如不知合适的转子和转速可选择自动挡,在确定转子后,按“OK/确定”键,仪器就会自动开始测量,逐步搜索到合适的转速。最后显示出测量的结果或自动显示所需调换的转子号。

图7中,转速的单位是RPM,粘度的单位是mpa.s;最右边的竖条显示为采样的进程;百分比指的是所测粘度为该档位满量程的百分数。
(5)在图6中当光标移到输出的位置时,按“▶”或“◀”键可选择通讯或打印两种状态。(注:打印、通讯两功能暂未开通)
(6)在图6中,当光标移到时钟的位置时,按“▶”或“◀”键可选择显示或修正两种状态,在显示位置按“OK/确定”键,可显示当前的时:分:秒和-年-月-日;在修正位置按“OK/确认”键,可对时间和日期进行修正。
(7)测量时按“RESET/返回”键,仪器将会停止测量;如再按“OK/确定”键,仪器将按上次设定的转子号和转速进行测量。
(8)在测量前,首先估计被测液体的粘度范围,然后在量程表中,选择合适的转子和转速。
(9)当估计不出被测液体的大致粘度时,应视为较高粘度。选用由小到大的转子(转子号由高到低)和由慢到快的转速。原则上高粘度的液体选民小转子(转子号高),慢转速;低粘度的液体选用大转子(转子号低),快转速。转子号刻在转子柄上。
(10)仪器具有超称报警功能,若测量值大于100%,测量值显示为over。为保证测量精度,测量时量程百分比读数应控制在10%—90%之间为佳。
(11)在任何状态下,按“RESET/返回”键,程序将从起状态开始运行,操作界面回到用户选择工作状态。
(12)量程表

例:操作方法一
如选择2#转子,12转,开机后,屏幕显示:选择中文时,光标停在中文处。
按“OK/确定”键,屏幕显示:让光标停在1#处时按“▶ ”键,即显示2#转子,再按“ ▼”键,让光标移到转速6转/分,再按“ ▶ ”键,显示12转,再按“OK/确定”键,仪器开始进行测量。当右边竖条方块显示光标由下向上升至满刻度时,屏幕显示的粘度值即为测量值。
例:操作方法二
如不知道合适的转子和转速时,可选择自动档。如:假设选用4#转子后,按“OK/确定”键,转速选择自动档(操作方法同上例),然后按“OK/确定”键,仪器会自动搜索到合适的转速。最后显示出测量结果或显示所需调换的转子号。如显示3#转子,那么要换
上3#转子,再按“OK/确定”键仪器开始测量,最后显示出被测液体的粘度。
注意事项
1、本仪器在出厂前严格调校检验,开机后即可正常工作,请操作者在操作前认真仔细地阅读本仪器说明书,严格按要求操作。
2、仪器电源需要在指定的电压和频率误差范围内测定,否则会影响测量精度。
3、装卸转子时应小心操作,要将仪器下部的连接头轻轻地向上托起后进行拆装,不要用力过大,不要使转子横向受力,以免转子弯曲。连接头和转子连接端面及螺纹处应保持清洁,否则将影响转子的正确连接及转动时的稳定性。
4、装上转子后不得在无液体的状况下“旋转”,以免损坏轴尖和轴承。
5、每次使用完毕应及时清洗转子,清洗时要拆卸下转子进行清洗,严禁在仪器上进行转子的清洗,转子清洁后要妥善安防在存放箱中。
6、仪器搬动和运输时应托起转子连接头旋上黄色保护帽。注:仪器通电工作前需要把黄色保护帽旋下,以防止损坏仪器。
7、不得随意拆卸和调整仪器的零部件,不要自行加注润滑油。
8、悬浊液、乳浊液、高聚物及其他粘度液体中很多是“非牛顿液体”,其表观粘度随切变速度的时间变化而变化,故在不同的转子、转速和时间下测定,其结果不一致是属正常情况,并非仪器不准(一般非牛顿液体的测定应规定转子、转速和时间)。
9. Do the following points to measure the viscosity more accurately:
A. Accurately control the temperature of the measured liquid.
B. Immerse the rotor in the measured liquid for a long enough time and keep the temperature constant so that it can be consistent with the temperature of the measured liquid.
C. Ensure the uniformity of the liquid.
D. When measuring, place the rotor in the center of the container as much as possible.
E. Prevent air bubbles from adhering to the bottom of the rotor when the rotor is immersed in the liquid.
F. Use the protective frame to measure.
G. Make sure the rotor is clean.
H. Operate in strict accordance with the operating instructions.
For liquids lower than 15mpa.s, the No. 0 rotor is selected.