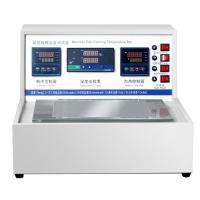
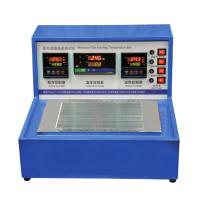
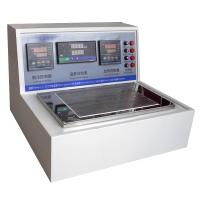
QMB-II minimum film forming temperature Tester ( referred to as low film ) is designed and manufactured according to the national standard GB9267-2008 . It is a new generation of paint film Tester. , energy saving, ultra-wide workbench, accurate temperature measurement and other advantages in one, it has become the leader of similar instruments.
working principle
A cold source and a heat source that can set the temperature arbitrarily are installed at both ends of a metal plate with a suitable thermal conductivity. After a certain period of cooling and heating, the metal plate is in a stable state, and a gradient temperature is formed on its surface. Apply the emulsion to be tested in the groove on the surface of the board. Under the action of different temperatures, the water in the emulsion evaporates, forming a clear dividing line on a certain temperature line. The high temperature side of the boundary line forms a transparent film, and the low temperature side of the boundary line has cracks or chalk phenomenon, and this boundary line is the lowest temperature of film formation.
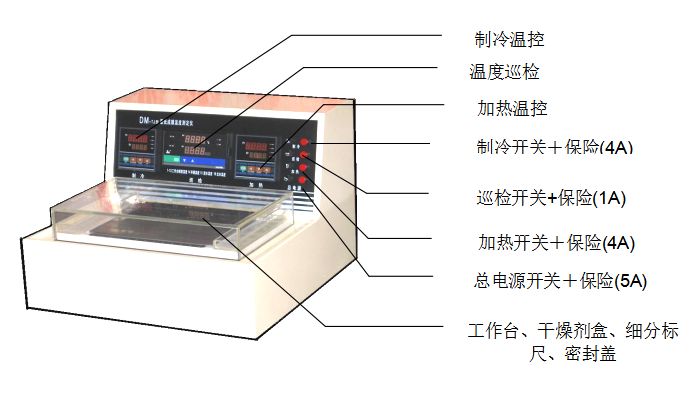
Instrument structure
The temperature gradient plate made of stainless steel is the heart of the machine, and the main components around it are the temperature control system (intelligent temperature regulator, high-precision temperature sensor, switching power supply, semiconductor refrigeration device), inspection system, drying device and corresponding electrical control circuit.
Instructions
1. Preparations before use: Open the packing box, (please keep the packing box for future maintenance and transportation) and check whether there is any damage or shortage. After verification, place the instrument near the upper and lower water in the laboratory, and do some cleaning work first. Then check the power input, and the water inlet and outlet are connected firmly.
2. Operation method
2.1 Connect the power cord to the power socket (220V, 50Hz three-hole socket, which needs to be well grounded), turn on the cooling water, turn on the main power switch, heating, inspection, and cooling switches in turn, and the instrument panel will immediately display the corresponding action ( The indicator light is on, and the digital display shows numbers).
2.2 According to the different conditions of the paint film to be tested, different test conditions need to be set. It is mainly cooling and heating presets (see the instruction manual of LU-906M intelligent regulator for the setting method), and the inspection table has been adjusted before leaving the factory, and generally does not need to be adjusted.
2.3 The instrument is preheated for about 150 minutes (if the inspection table is found to be stable or changes very little at points 1 to 13 within a certain period of time, the preheating is complete) before adding the sample.
2.4 Remove the plexiglass cover and inject the emulsion to be tested and the known emulsion into the gradient plate groove with a spoon or dropper, then spread it flat with an applicator, and cover the plexiglass cover (choose and apply according to the water content of the emulsion. Dry Put the agent into the box and use the sealing cover at the same time)
2.5 After about 60 to 90 minutes, the coating on the gradient plate undergoes a series of changes. After the water in the latex paint is evaporated, the polymer molecules interact to form a continuous film at an appropriate temperature. Part of the composition higher than the MFT of the emulsion The film is transparent, but the part below the MFT is cracked or chalky. This clear dividing line is the minimum film forming temperature of the emulsion
2.6 After determining the film-forming line, according to its position, use the subdivision scale of the two scales to calculate the accurate temperature.
2.7 After the test, turn off the power and water, and clean all parts to prepare for the next test.
Precautions and operating tips
1. The instrument is placed in a well-ventilated and bright laboratory, free from moisture. When the instrument is not in use, it must be covered with a plastic cover to keep it clean.
2. Power requirements: 220V, 50Hz, >400W, three-hole socket, good grounding.
3. Environmental requirements: temperature 23±2°C, relative humidity <85%, no direct sunlight, no vibration environment.
4. Water source requirements: no impurities, pure tap water must be kept smooth.
5. The test conditions are mainly cooling and heating settings. Refrigeration mainly affects the work at the low temperature end, subject to the first requirement. Heating mainly affects the work at the high temperature end, subject to the requirements of point 13. Minimize the difference between cold and heat as much as possible, which saves energy and improves resolution.
6. Clean the applicator before and after use, and apply some grease or vaseline when it is left for a long time to prevent corrosion.
7. When coating the emulsion to be tested, there must be at least one piece of known material for comparison.
8. When coating the emulsion, it is not necessary to fill the test tank, as long as it is around the estimated MFT, which saves labor and is easy to clean.
9. Place strips of toilet paper on the left and right edges of the gradient plate to prevent the workbench from being soiled during coating and cleaning.
10. For the convenience of cleaning, the surface of the board can be covered with a thin layer of aluminum foil (such as 0.02mm thick), brush it flat with a brush, and drop a few drops of glycerin to make the aluminum foil and the board tightly combined.
11. Calcium chloride (CaCl2) is more effective as desiccant.
Test example

*The lower the cooling temperature is set, the lower the cooling water temperature (16 points) should be, generally not exceeding 20°C