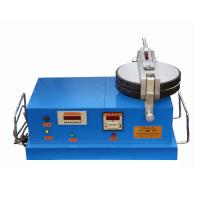
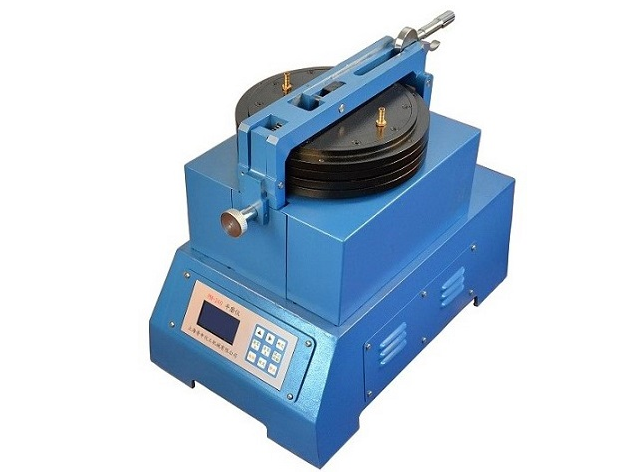
This flat Grinder can be used as a professional physical performance testing instrument in the pigment, paint and ink industries. The whole machine is compact in structure, simple in appearance, easy to change the number of revolutions and loads, and easy to assemble and disassemble the glass plate. Microcomputer control, LCD display, easy parameter setting. When the input parameters are wrong, the controller will automatically display prompt information, and when over-current and phase failure occur, the controller will also display prompt information. The purpose of reliable control and simple operation is achieved.
The connection between the flat Grinder and the controller
4.1 Pay attention to the direction of the socket when connecting, and use it after checking the connection and confirming that it is correct.
Check before use
5.1 Every time you use the flat Grinder, check whether the positioning rings of the upper and lower grinding discs are tightened. If not, tighten them before using them.
5.2 When running without load, the upper grinding disc needs to be opened, and the turning of the lower grinding disc should be clockwise.
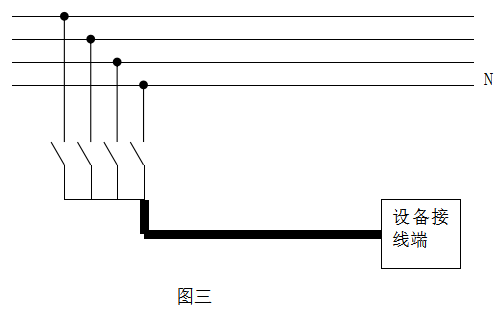
5.3 The instrument is powered by three-phase four-wire 380 volts and should be connected to the neutral wire, otherwise the electric control box will not work as shown in Figure 3.
button function
6.1 " ▲ ": "Set the number of circles" each cycle plus 1.
6.2 " ▶ ": "Setting number of circles" circular shift.
6.3 "Confirm": Confirm the set number of laps.
6.4 "Setting": set the number of laps.
6.5 "Run": The machine starts to run.
6.6 "Stop": The machine stops running.
6.7 "Stop counting": "Number of revolutions A" and "Accumulated times B" stop counting.
6.8 "Reset A": The counter of "number of revolutions A" is cleared.
6.9 "Clear A": clear the counter of "accumulated times B".
Steps
7.1 Put a certain amount of sample and blending agent on the lower grinding disc, use a knife to mix it into a slurry, then move the blended slurry to the center of the lower grinding disc, and put down the upper grinding disc, so that the positioning shaft core and the positioning block are buckled, Then the eccentric handle is lowered to the plate, and the required weight is hung.
7.2 When the power switch of the controller is turned on, the buzzer will make a beep.
7.3 The LCD screen displays the startup screen:
Then enter the operation interface
"Set laps: 0"
"Number of revolutions: 0"
"Cumulative count: 00"
7.4 Press the "Setting" key on the keyboard to enter the tens of thousands digit of the set lap number. At this time, the tens of thousands digit is flashing. Press the "▲" key to add 1 to the tens of thousands digit, and press the "▶" key to move one digit circularly. Press the "OK" button to confirm the set number of laps and enter the function operation. But the set number of laps is not 0, otherwise it will display "input set laps" and reset. Do not press the function key during the setting of the number of laps, otherwise the set number of laps will be displayed and reset. If you press the "OK" button and find that the set number of laps is wrong, you can press the "Set" button to reset. If it is confirmed that the set number of circles is correct, press the "Run" button, and the motor starts to run at this time. per turn. "Number of running circles" is automatically accumulated by 1. When the number of running circles is the same as the set number of circles, the motor will stop running automatically. At this time, the buzzer will emit a "beep beep" alarm sound, and the "cumulative times" will automatically increase by 1. At this time, pull the eccentric handle to separate the upper and lower grinding discs, pull the positioning handle outward, and push it up at the same time, open the upper grinding disc, and observe the sample.
7.5 If you want to run again according to the number of laps set last time, just press the "Run" button directly; if you want to stop midway, you can press the "Stop" button. If "Reset A", the counter of "Number of Operations A" will be automatically cleared; if "Reset B", the counter of "Accumulated Times B" will be automatically cleared, and at the same time, there will be a "beep". To continue working, just press the "Run" button, and the machine will continue to run until it reaches the set number of laps.
7.6 If the machine is going to run for a long time, the counter should stop counting. At this time, the "number of running circles" will display "STOP"; if you don't want to run for a long time, just press the "stop counting" button again, and the machine will return to the original counting state.
7.7 If the "Setting" button is pressed during the operation of the machine, the whole machine will stop running. At the same time, the tens of thousands of "set circles" flashes, and the values of "reset A" and "reset B".
7.8 If water cooling is required, connect the water nozzle of the upper grinding disc.
Precautions
8.1 After each work, the upper and lower glass should be wiped clean, with appropriate paper placed in the middle, and the upper grinding disc should be put down to avoid damage to the glass plate.
8.2 The set number of laps cannot be 00000.
9 Maintenance:
9.1 The controller can be placed close to the flat Grinder, but strong vibration should be avoided. After each work, the power should be turned off and covered with a cloth.
9.2 After the instrument has been used for one year, it is necessary to open the cover and fill the gearbox with oil.