safety warning
The TQC Paint Film Impact Tester has been designed to be as safe as possible. However, as with all devices, users need to follow required safety instructions. Always make sure to yourself that local health and safety regulations do not include any additional norms.
To ensure safe operation, follow these guidelines:
● Never put your hands under the test tube while the weight is increasing.
● When testing, please be sure to cover the stamp.
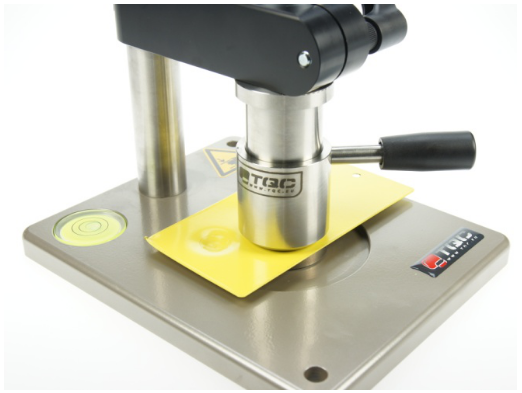
● Make sure that the TQC paint film impact Tester is in a completely horizontal position.
application standard
The criteria mentioned below are a list of possible criteria. If the required standard is not listed below, please contact TQC to check whether it can be adopted*:
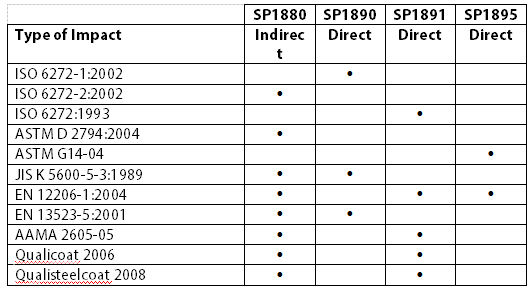
*Eligibility criteria depend on the type of impact Tester. The combination of items can be changed to match another standard.
Preparation before the test
1) Unpack the impact test
Extra care must be taken when packaging and shipping your paint impact meter; however, there is always the possibility that the packaging may be damaged in transit. Please check that your packaging is complete and not physically damaged. If there are any signs of damage, please take photos and document and report to the delivery company. Make sure they sign the damage acknowledgment.
2) disposal
Packaging includes cardboard and Styrofoam, please dispose of in an environmentally friendly manner. Your local environmental department can help you.
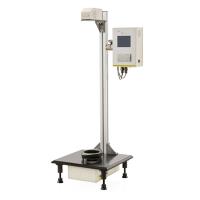
3) Assemble and place the paint film impact meter
In order to get great benefits from the TQC paint film impact Tester, remember: not only assemble it in the right way, but also put it in the right place. Height is the limit on the location of the catheter string, but the forces generated at impact also limit the number of suitable surfaces. Please read the instructions below and confirm the checklist.
The ease of use of a shock Tester depends largely on where the instrument is placed. Placing it on a table limits the accessible height, and placing it on the floor causes the operator to flex to place the sample.
4) Placement Checklist
The surface needs to be flat
The free height above the work surface needs to be 2.2 meters
The test surface may not bend under the test conditions
The temperature and humidity should meet the selected standard
Check local health and safety regulations to ensure placement and intended use comply with local requirements
Mount the impact Tester to the surface
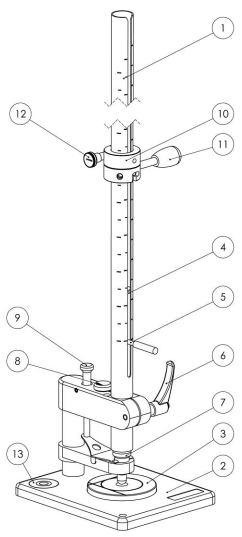
Specific installation method
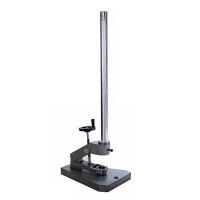
1. Select the desired hole punch [7] for testing.
2. Place the punch [7] in the holder above the ground plate.
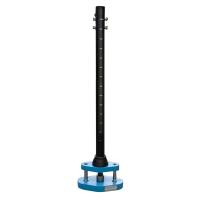
3. Install the weight [4] in the conduit [1].
4. Wrap the release collar [10] around the catheter [1].
5. Pull the release ring [10] and weight [4] all the way down and stop the weight by turning the release ring lever [11].
6. Tighten the retaining knob [12] to secure the release collar [10].
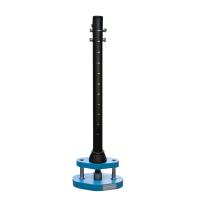
7. Place the guide tube [1] with the lock release ring [10] and counterweight [4] into the base plate assembly.
8. While holding the weight [4], unlock the release ring [10] by turning the lever [11] backwards, then lift the release ring [10] to the height required to start the drop test.
9. Press the red button [9] to lift the punch and push the panel under it in. Zero the instrument to the sample of the test subject (coated down test sample).
10. Turn the handle [6] to release the catheter while holding it. Move the catheter until the lifter aligns with 0 on the catheter's scale.
11. The impact Tester is now ready to perform tests (see 5.).
Specific test steps
1. Verification
Validation before use is required, if required. The verification process may vary depending on the standard used. Please note the results of the initial verification and store these results with this manual.
2. Carry out circuit test
The testing procedure used depends on the required standard. Not only is there a difference between ISO and ASTM to consider, but also whether it is an impact determination or a pass/fail test. Check the applicable conditions before using the impact Tester. The following procedures are only guidelines to ensure safe use during testing. Always follow the full protocol given in the standard used.
3. Indirect impact
1) When using the indirect impact method, be aware that the impact Tester generates a lot of force. To ensure safe operation, follow the instructions below.
2) Check that the impact Tester is level, that all parts are assembled correctly and that the correct punch is selected.
3) Press the red button to raise the punch and place the test sample.
4) Gently lower the drop weight onto the punch and adjust the guide tube. The zero mark on the catheter should be level with the weight lifter on which you are dropping the weight.
5) Press the red button to make sure the punch can still be lifted and the falling weight can move freely through the conduit.
6) Set the release collar to the desired height by positioning the slit of the weight pin exactly over the height mark on the conduit ruler.
7) Raise the falling weight and lock it in the release clip.
8) When safe, release the falling weight from the release clip.
9) Press the red button to unlock the test panel
10) Evaluate the test panel.
11) Repeat the test if necessary
12)检查冲击测试仪是否处于水平位置,并且所有零件都正确组装,并且冲头选择正确
13)评估测试面板。
14)如果需要,请重复测试。
6.4直接冲击
使用直接冲击法时,请注意冲击测试仪会产生很大的力。 为确保安全操作,请遵循以下说明。
1)检查冲击测试仪是否处于水平位置,所有零件是否正确组装,并且选择了正确的冲头。
2)用正确的侧手拧紧测试面板。
3)将下落的重量轻轻地放到面板上,并调节导管。导管上的零标记应与下降重量的举重器齐平。
4)按下红色按钮,确保仍然可以抬起冲头,并且下落的重物可以通过导管自由移动。
5)通过将举重销的狭缝恰好位于导管标尺的高度标记上,将释放轴环设置到所需的高度。
6)升高下落的重量并将其锁定在释放夹中。
7)安全时,从释放夹释放掉落的重量。
8)释放下落的重量,并在下落后将其恢复到初始位置。
9)评价测试面板。
10)如果需要,请重复测试。
11)检查冲击测试仪是否处于水平位置,并且所有零件都正确组装,并且冲头选择正确。
12)评价测试面板。
13)如果需要,请重复测试。
结果评估
可以使用多种方法对测试表面进行检查。
请注意所使用的标准并检查可用方法。
以下给出的方法通常用于评估:
1)10倍放大镜:
放大镜是评估的基本方法。
目视检查涂层的伸长,剥离和开裂。
请注意,视觉评估在不同的操作员之间会产生不同的结果。
2)化学测试:
Several testing standards allow chemical testing for cracks. These tests use chemicals that react with the test panel's ferrous substrate. The results of these tests will not be affected by different operator tests.
3) Voltage test:
Voltage tests can only be performed on completely enclosed coated surfaces. To ensure accurate interpretation, the reference panel needs to be tested before impact testing is performed. Check whether this method is allowed against the standard.
Maintenance
Despite its robust design, this instrument is precision machined. Never drop or fall
Always clean the instrument after use.
Clean the instrument with a soft dry cloth. Never use any mechanical means such as wire brushes or sandpaper to clean the instrument. Like using aggressive cleaners, this can cause permanent damage.