Installation and Assembly
1. Installation and operation
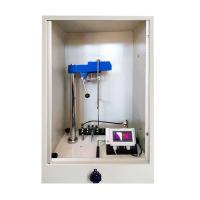
The Dutch TQC SP0500 pendulum Hardness Tester needs to be installed in a suitable place, preferably on a sturdy, vibration-free table or work area with normal ambient temperature and humidity. No special fixing is required.
Carefully unpack the device and accessories and check for completeness.
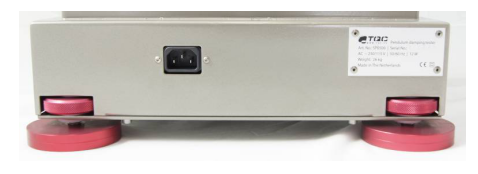
Place a level on the work surface and adjust the height of the feet if necessary.
2. Preparation of the main power supply
The 230V model is equipped with a safety tested power cord and should only be connected to a plug socket with a safety compliant ground wire.
Before connecting the instrument, check that the mains voltage specified in the indication window corresponds to the local mains voltage.
If not, the instrument must not be connected under any circumstances.
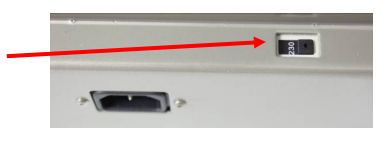
3. Power connection
The power connection is located on the back of the instrument. Insert the female plug into the socket on the back of the housing. The ON/OFF switch (14) is located on the right side near the end of the instrument.
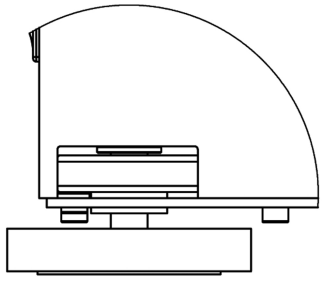
Instrument Controls and Functions
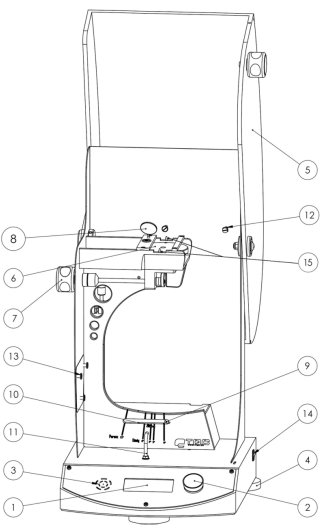
1. Display process information
2. Jog dial
3. Sound alarm/buzzer
4. Horizontal support feet (2 at the rear)
5. Draft box cover
6. Sample stage with spirit level
7. Sample stage adjustment knob
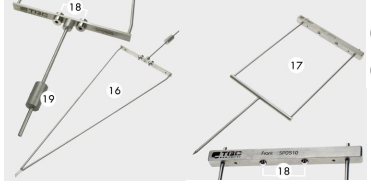
8. Mirror
9. Automatic release mechanism
10. Optical Detector
11. Light source
12. Spare pendulum (storage)
13. Glass calibration panel (storage)
14. Power switch
15. Support rod
16. Koenig Pendulum
17. Persoz pendulum
18. Spin Ball
19. Adjustable weight (for advanced calibration only)
Instrument settings
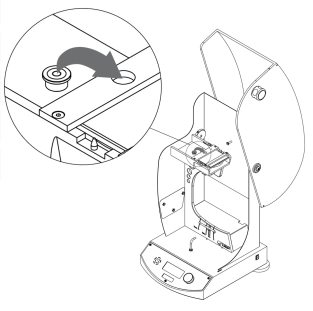
1) Place the instrument on a level and vibration-free surface. Keep the rear and top of the instrument clear to be able to open the draft shield (5).
2 ) Put the spirit level in the designated hole and put the glass calibration panel (13) on the sample stage (6), then lean the sample stage (6) on the upper bracket. Adjust the mirror (8) so that when looking at the mirror (8) horizontally, there is a good view on the spirit level (6).
3)调整后水平支撑脚(4),使水平仪处于中间位置。
4)使用调节旋钮(7)降低样品台(6)。
5)确保玻璃校准板(13)和摆锤均无油脂和污垢。
6)将钟摆放在支撑杆(15)上使其稳定。

7)使用调节旋钮(7)轻轻地升高,降低并再次升高摆锤。 这样可从而确保其稳定,对齐并正确放置在枢轴球(18)上。
8)检查摆锤的最终对准。 摆针应为零。 柯尼格摆锤(16)的反应比Persoz(17)慢。

9)在防风罩(5)关闭的情况下:轻轻转动调平支撑脚(4)来调整摆的对齐方式。使用调节旋钮(7)定期放下并抬起玻璃校准板(13),以确保摆锤仍处于所需位置。
10)将下部样品台(6)调平后,关闭防风罩(5)。升起样品台(6),然后再次检查摆的对准情况。摆锤(16/17)正确对齐后,继续进行下一步。如果没有,请检查校准板(13)和枢轴球(18)。
11)确保正确执行了第5章所述的所有准备工作。用电源开/关开关(14)打开仪器。使用慢速拨盘(2)浏览菜单(1)。转动慢速拨盘(2)进行导航,然后按进行确认。选择使用的摆类型后,进入测量菜单以开始测量。如果测量值在规格范围内(请参阅4.3),则摆锤(16/17)正确对齐。卸下玻璃校准面板(13)。仪器现在可以使用了。如果测量值有偏差,请参见下文。
偏差调节
1、微小偏差
使用调节旋钮(7)降低摆锤(16/17),查看摆锤(16/17)是否在不移动的情况下移至支撑杆(15)上。
如果摆锤(16/17)移动,则意味着玻璃校准面板(13)或枢轴球(18)都很油腻。
用适当的清洁剂清洁它们,然后再次校准。
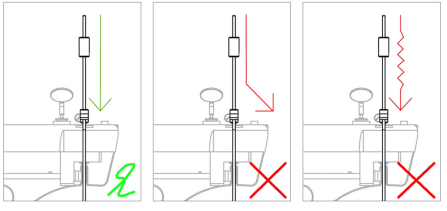
如果摆锤(16/17)仍然很好对齐,请进行以下调整。
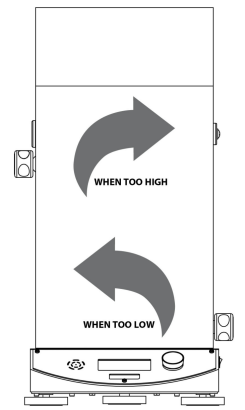
如果摆锤(16/17)的数量过多,请轻轻地转动调平支撑脚(4),以稍微升高摆锤(16/17)的左侧或降低其右侧。
如果摆锤(16/17)的数量太少,请轻轻转动调平支撑脚(4),降低摆锤(16/17)的左侧,或者将其稍微抬高。
2、重大偏差
当发生重大偏差时,应执行以下步骤:
清洁玻璃校准板(13)和枢轴球(18)。
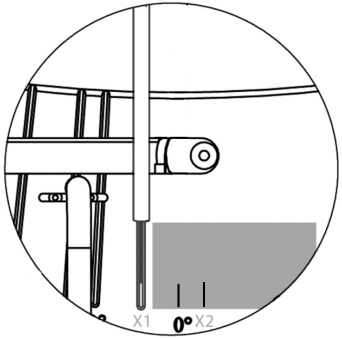
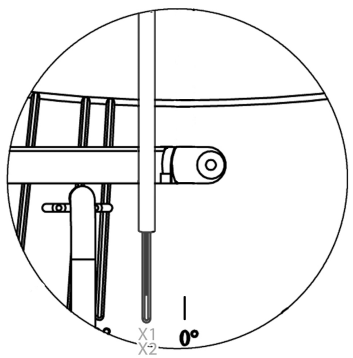
检查摆锤(16/17)在刻度尺上的位置,并标记或写下其位置(X1)。
降低样品台(6)并取出摆锤(16/17)。
将摆锤(16/17)旋转180º,再次放置,然后升高,降低和升高样品台(6)。
在刻度尺(X2)上检查摆锤(16/17)的位置。
如果X1与X2不同,则摆锤(16/17)弯曲。
如果X1和X2都为0°,但仍然存在偏差,请检查摆锤的振动(16/17)。
如果X1和X2位于同一位置,但不为零,则仪器未对准。
弯曲摆(16/17)
如果X1和X2如图所示放置,则摆锤(16/17)弯曲,需要由专业人士拉直并平衡。 请按照上述步骤检查操作是否正确。 如果不成功,则需要更换摆锤(16/17)。
仪器未对准
如果X1和X2如图所示放置,则仪器未对准。 重复该过程,从步骤3开始
摆振动
如果摆锤(16/17)笔直且清洁,但仍然出现偏差,请检查摆锤(16/17)的振动。 这是通过将秒数除以计数来完成的。 振荡应如第4.3节所述。 如果摆锤(16/17)仍不符合规格,请与当地的TQC代表联系。
2、柯尼格钟摆(16)
The pendulum rests on two tungsten carbide balls (18) and is balanced (to adjust the natural frequency of oscillation) by a weight sliding on a vertical rod connected to the crossbar. On a polished float glass panel such as a glass calibration panel (13) the period of oscillation should be (1,40 +/-0,02) s and the damping time from 6° to 3° displacement should be (250+/-10)s. König pendulums can slip on surfaces with a very low coefficient of friction.
3. Persoz pendulum (17)
The Persoz pendulum also rests on two hardness scaled tungsten carbide balls (18). No balance is provided. On a polished flat glass panel such as a glass calibration panel (13), the period of vibration should be (1 +/- 0.01) s and the time for damping from 12° displacement to 4° displacement for the same substrate should be ( 430 +/- 15) s.
4. Test panel
We offer a range of test panels (TQC, Q panels or equivalent) such as:
Steel, aluminium, glass, degreased, not degreased, polished and pre-treated.