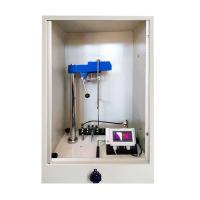
The specific operation method of the Dutch TQC SP0500 pendulum Hardness Tester is as follows:

Menu display information and operations
1) The startup screen after TQC is turned on.
Switch on the instrument via the power switch (14)
This is the first screen displayed after turning on the instrument (1).
2) Main menu
Depending on the last screen used, the instrument will start in the same screen. To go to the home screen, select Back.
3) Instrument setting menu
The instrument setup menu allows the user to select several options. By turning and pressing the jog dial (2), the user can select the available options. Language, Pendulum, Auto Release Delay and Sound Signal are available options.
4) Language
Available languages may vary by firmware version.
5) Automatic release
The auto release time can be changed, the standard setting is 5 seconds. Depending on the stability of the placement position, the time can be set.


6) Calibration of SP0500 pendulum Hardness Tester
When testing uncoated float glass samples such as glass calibration panels (13), ISO1522 requires both pendulums (16/17) to have a specified number of oscillations/second.
König 250 + / 10 sec. or 179 counts +/- 7 counts
Persoz 430 +/- 15 seconds/count
6.1 Calibration procedure:
Place the correct pendulum (16/17) on the instrument.
Place the glass calibration panel (13) on the sample stage (6)
Closing the windshield (5)
Lift the sample stage (6) slightly using the adjustment knob (7)

If the result is within the above limits, a "Pass" flag will appear. If you get a "failed" sign, you may need to make some adjustments:
Check the fluid level of the instrument using the fluid level indicator on the sample gauge (6). (Levels have a certain tolerance, and sometimes "playing" the level within the tolerance is enough to keep the instrument within limits).
Check the condition of the pendulum (16/17) (there should be no deformation), clean the pivot ball (18) and polish the glass calibration plate (13).
Check that the pendulum (16/17) is exactly on the "0" indicator when it is in the rest position.
The top weight (19) can be repositioned using the Coney pendulum (16) to achieve the exact 1.4 second oscillation time. The oscillation time can be easily checked by dividing the result (in seconds) by the number of counts.
Release the fastening bolts for the weight.
When the oscillation time of the pendulum (16) between 6° and 3° is less than 1.4 seconds, move the weight up.
When the pendulum (16) oscillates between 6° and 3° for more than 1.4 seconds, move the weight down.
6.2 Adjusting the Optical Detector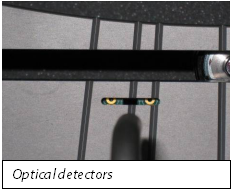
仅在接触TQC之后,还可以重新调整秤顶部的光学检测器(10),以使仪器处于公差范围内。 这是一项需要一些技术技能的工作。
请注意,有两个光学探测器(10)。 一种用于Persoz,一种用于König摆。 探测器可以单独调整。 请确保重新调整正确的检测器。
在这张照片上:
1)左探测器是Persoz
2)右探测器是König
要重新调整光学探测器(10),需要遵循以下步骤:
拔下电源插头。
打开防风罩(5)
摆好后摆(16/17)
According to需要调整的探测器,仅拧开半圈即可。
现在,将检测器小心地向所需方向移动一毫米:
要增加振荡时间,请将检测器向右移动
为了减少振荡时间,将检测器向左移动
7、进行测试
1)打开防风罩(5)
2)如果König和Persoz都可用,请选择正确的摆锤(16/17)。
3)通过旋转调节旋钮(7)降低样品台(6)
4)将摆锤(16/17)放置在TQC徽标朝右的位置,并在样品台上的两个定位销上的下面放两个孔(6)
5)将样品板放在样品台(6)上,涂层朝上。
6)关闭防风罩(5)
7)转动调节旋钮(7)轻轻提起样品台(6),从而提起支撑杆(15)的摆锤(16/17),使摆锤(16/17)的枢轴球(18)靠在上面 样本面板。


操作
1准备工作
将仪器连接至外壳背面的电源。
放置水平仪(6)和摆锤(16/17)。
确保仪器水平
2基质材料
选择ISO 1514中指定的材料。建议使用金属或玻璃面板。大约尺寸为100毫米×100毫米×5毫米。确保面板坚固,平坦且无任何扭曲
3预处理和涂层
除非另有说明,否则请按照ISO 1514准备每个测试面板,然后在其上涂上被测产品或系统。所施加的涂层需要光滑且无不规则。
4固化和干燥
Dry (or bake) and age (if applicable) each coated test panel for the specified time and under the conditions specified in the contract signed by the parties concerned. Unless otherwise stated, the test panels were subjected to a temperature of (23 +/- 2) °C and a relative humidity of (50 +/- 5) % for at least 16 h before conducting the test.
Notice
Dirt, grease, fingerprints, dust or any other contamination of the coated surface can negatively affect accuracy. Therefore, sample plates should be stored and handled properly.
5 coating thickness
Measure the thickness of the cured/dried coating by one of the procedures specified in ISO 2808. A good minimum dry film thickness of the coating should be 30 µm for a correct pendulum damping test.
6 start
Follow the steps outlined in Chapter 8 to start up the instrument.
maintenance
1 Inspection and maintenance
Despite its robust design, this instrument is precision machined. Never drop or drop it.
Always clean the instrument after use.
Clean the instrument with a soft dry cloth.
Never use any mechanical means such as wire brushes or sandpaper to clean the instrument. Like using aggressive cleaners, this can cause permanent damage.
Do not use compressed air to clean the instrument.
Normally, TQC Pendulum Hardness Testers do not require any maintenance.
After completing the pendulum hardness test, remove the test panel and check that the sample stage (6) is free of paint residue.
warn
Make sure that no broken glass, paint or other liquids are spilled on the electronic equipment or left in the Test Chamber.
The pendulum is subject to some natural wear and needs to be checked from time to time to ensure it is in trouble-free condition.
2 Material Disposal
Materials used for instrumentation or auxiliary functions, as well as exchanged items, should be disposed of in a safe and environmentally friendly manner. Please follow local regulations.