Main structure and working principle
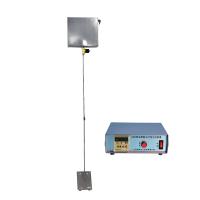
The device is mainly composed of Water Tank parts, time control parts, flushing pipe parts, sample rack parts etc. (see attached drawing 1). The working principle of the device is to inject tap water into the Water Tank , depressurize it, and divert it to the overflow process, so that the water level in the tank reaches the liquid , and is controlled by the time set by the time controller and the power switch. The "open closed" state of the solenoid valve and complete the flushing operation.


Installation Notes
Open the packing box, take out the Water Tank parts, flushing pipe parts, time control parts, sample holder parts, etc., and assemble them according to the following method.
1. Install the Water Tank parts
a. Connect the two flushing pipes together, and then screw them into the outlet of the solenoid valve at the lower part of the Water Tank. The Water Tank should be installed above a square pool with upper and lower water
b. Place the sample holder in a square pool, as shown in the attached drawing (2): first determine the water drop point (the Φ2 hole on the sample holder can be used as the water drop point), and measure upwards to 1955mm (note: this height includes the thickness of the test plate), which is the bottom of the Water Tank, then determine the position of the expansion bolt when the Water Tank is hung on the wall, and fix the expansion bolt on the wall
C. Hang the Water Tank on the expansion bolt first, and then tighten it with a nut
D. Insert the plastic hose at the water inlet and overflow respectively
2. Install time control components
Insert the round plug of the solenoid valve power cord into the round socket on the back of the controller unit. Will
The plug of the power cord is plugged into the power socket on the back of the controller.
Instructions
1. Open the water inlet valve, pour tap water into the Water Tank, close the water inlet close the water inlet valve. When the overflow stops, it is the standard control water level.
2. Place the sample to be tested on the sample holder, aligning with the outlet of the flushing tube
3. Insert the power plug of the time control part into the 220V AC power supply, set the test time to 60 seconds, turn on the power switch of the time controller, the solenoid valve will open the water outlet synchronously, and start to rinse the sample. When the flushing is full for 60 seconds, the solenoid valve will automatically close and stop flushing. If you want to perform the next flushing operation, press the reset button to proceed to the next operation.
Precautions
1. It is strictly forbidden to press the power switch with wet hands
2. The time interval between washing the sample plate twice shall not be less than 10 seconds
3 After each test, all the water in the Water Tank should be released.
4. The specification of the fuse is 2A, and other specifications cannot be substituted.
5 If the tap water used for flushing is dirty (with rust), the incoming water should be filtered and poured into the Water Tank to prevent the solenoid valve from being blocked.
6. After each flushing operation is completed, tap water must be injected into the Water Tank again to make it reach the standard level before flushing again.
7. The chassis needs to be grounded.
8. Pay attention to add leakage protector.