Injection and drop point of liquid material
1. Note to
1) Low-viscosity liquid materials can be poured directly into the syringe. Specific steps:
a) Put the needle nozzle cover on the needle nozzle;
b) Place the syringe on the syringe rack;
c) Pour the liquid material into the syringe, not exceeding 3/4 of the volume of the syringe, with the help of a funnel tool.
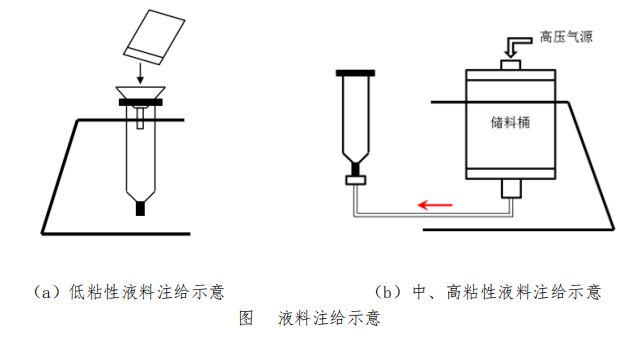
2) Medium and high viscosity liquid materials
Simplify work with the additional double feeder. Specific steps:
a) Fix the storage tank filled with liquid material on the shelf;
b) connecting the syringe and the magazine fixed adapter;
c) Connect the high-pressure air source of the storage tank;
d) Adjust the air pressure of the high-pressure air source to add the liquid material from the storage tank to the syringe, not exceeding 3/4 of the volume of the syringe.
2. Drop point
Drop point volume adjustment steps:
1) Set the device to any spit mode except "F1";
2) Adjust the spit out time dial and interval time dial to the appropriate position;
3) Press "SHOT" to test the dropping point.
Dispensing operation process
Dispensing can be carried out according to the following steps:
1) Syringe installation: select a suitable needle nozzle and install it on the syringe;
2) Liquid material injection: refer to Figure 8 and the corresponding liquid material injection instructions;
3) Debugging
a) Spit out mode: set the spit out mode encoder to F1;
b ) Power connection: turn on the power switch to turn on the host;
c ) Air pressure adjustment: adjust the air pressure regulator so that the air pressure is 25psi as the initial calibration test;
d ) Press "SHOT" until the liquid material is evenly spit out and the machine works normally;
e ) Drop volume adjustment: adjust the spit-out time dial key, air pressure regulator and needle nozzle thickness to obtain a suitable liquid material spout volume, except for the F1 spout mode;
f ) Vacuum retraction force: adjust the vacuum controller so that no liquid drops will seep out when the liquid material is spit out;
g ) Automatic timing: If automatic timing control is required, it can be realized , except for the F1 spit out mode;
4) Epoxy
Precautions and Maintenance
1. Routine maintenance
●Clean the needle cylinder in time after the work is over, so as to prevent the material from solidifying and difficult to clean. The cleaning steps are as follows:
a) Soak in organic water for 5-10 minutes;
b) Remove residual material from parts.
●When using, the material at the needle nozzle should be removed in time to prevent the material from solidifying and blocking the needle nozzle.
2. Precautions for use
● The working air pressure of the equipment shall not exceed 5.5 bar, so as to ensure the normal use of all parts;
The liquid material needs to be stirred evenly before work, so as to ensure that the drop point is consistent in size;
● Placing the syringe reasonably, do not let the liquid material flow into the air pipe and cause damage to the parts;
● The vacuum controller cannot be adjusted too large, so as to avoid damage to parts caused by liquid material being sucked into the air pipe;
● Properly dispose of discarded syringes and needle nozzles to prevent environmental pollution.