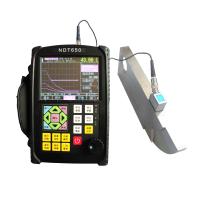
MITECH MUT600C digital Ultrasonic Flaw Detector
Using a 200MHz high-speed processor, it can accurately identify minor internal defects in 0-6000mm metals, support multi-language, set industry standards, automatically generate reports, support video playback (≥ 2 hours), and visually display welds.
 mitech
-

LEEB leeb610A Portable Yoke Flaw Detector Magnetization Pole Distance 0~220mm
$ 571.00 -

WENTAI HY-350 digital Ultrasonic Flaw Detector
$ 3940.00 -

LEEB leeb520 Ultrasonic Flaw Detector, industrial Ultrasonic Flaw Detector
$ 2566.00 -

LEEB leeb522 Ultrasonic Flaw Detector, digital Flaw Detector
$ 3198.00 -

KAIRDA NDT650 Ultrasonic Flaw Detector high gain 130dB intelligent calibrating
$ 1553.00
Accurate measurementsHigh sensitivity
The core processor CPU is clocked at 200MHz and is able toQuickly complete complex calculations and realize intelligent analysisIt has a strong ability to find very small defects and make it subtleThere is nowhere to hide.
HD display You can freely adjust the interface style
Full digital TFT320*240 true color LCD display, you can choose different operations according to the environmentInterface style, LCD brightness adjustable, waveThe shape display is delicate, and it can be clearly viewed in the full screenInjury result, full Chinese master-slave menu, noteFocus on user experience.
Wide detection range and low detection cost
It can measure the inside of metals from 0 to 6000 mmThe detection range is wide, the detection cost is low, and there is no human bodyRadiation, health and environmental protection.
User-friendly design for easy operation
Set shortcut buttons, digital shuttle wheel, cross dishA variety of operation methods in one, one hand can be skillfulFamiliar operation, different usage habits can be easily masteredThe operation can be used to complete the curve automatically through shortcut keysRoutine operations such as fabrication, probe calibration, etc.
Low power consumption, ultra-long standby performance, and reliable performance
Waterproof, oil-proof and dustproof appearance design, sturdy and durableIP65 protection level. High-performance security battery moduleIt is easy to disassemble and assemble, and the large-capacity lithium-ion battery supports continuous operationMore than 10 hours.
Support multi-language version free switching
Meet the needs of foreign companies and other parties
IP65 protection class 360 swivel bracket
The support frame is designed with 360 degree rotation and automatic locking, which is easy to use, firm and reliableThe outer surface is coated with rubber anti-corrosion material, which can effectively protect against oil stains in the field environmentdust and other corrosion.
Built-in industry standards
The performance of the instrument can be self-tested,Automatically generate reports,Curves can be generated by directly calling up the criteria built into the appBuilt-in mass memory, automatically save the current text when the computer is turned offpieces and data, will not be lost due to power failure, with 1000Group flaw detection channels, which can store multiple preset flaw detection standardsand parameters, the operation is more convenient.
Video recording function for easy traceability of the flaw detection processAnalyze the results of the flaw detection
The waveform can be played back, solidThe whole process of flaw detection can be recorded.Now data storage and management. The supported recording duration is notLess than 2 hours, for the number of beginners to learn flaw detection enterprisesFont management provides convenience.
Weld inspection is more intuitive
You can set the weld morphology parametersFlaw detection is possibleLocation of the defectVisualize the weld schematic diagram,and echo paths.
For the calculation of the Ф value, there is no need to make an AVG curve, and the dB value can be measured by using the bottom wave gain methodMold dual-purpose;
The surface correction function is convenient for surface flaw detection and can display the circumferential position of the defect
The grid line can be removed to avoid overlapping with the injury wave, which is convenient for the evaluation of the injury wave;
The echo coding function displays 1-6 echo display areas in different colors, which can better distinguish the primary wave
secondary wave, which is convenient for judging the location of defects;
The probe bias and probe angle (K value) can be automatically calibrated, and the sound velocity can be automatically measured
In-door broadening and freeze waveform functions can amplify or freeze echo details for easy defect analysis
Door position, door width and door height can be adjusted arbitrarily; The B gate can be optionally set with incoming wave alarm or lost wave alarm
The instrument can automatically measure and calculate the crack depth by using the endpoint line emission method;
The curve is automatically generated, the sampling point is not limited, and the compensation correction can be made, and the curve automatically floats with the gain
Automatically expands with the sound path and moves with the delay.
Real-time flaw detection time tracking record, automatic storage, worry-free flaw detection.
mitech MUT600C Digital Ultrasonic Flaw DetectorSpecifications
| LIST | VALUE |
|---|---|
| detection range | (0~6000)mm |
| Frequency | (0.5~10)MHz |
| Speed of sound | (1000~15000)m/s |
| Dynamic range | ≥36dB |
| Vertical Linearity | ≤3.0% |
| Horizontal Linearity | ≤0.2% |
| Display resolution | 320 * 240 true color LCD screen |
| resolution | >40dB(5P14) |
| Blind spot | 5MM |
| Sensitivity margin | > 60dB (200mm deep with 2 flat bottom holes) |
| digital suppression | (0~80) %, does not affect linearity and gain |
| video duration | More than 2 hours |
| electrical noise level | ≤10% |
| Probe type | Straight probe, oblique probe, dual crystal probe, penetration probe |
| gate | Inlet gate, loss gate; single gate reading, double gate reading |
| alarm | Beep alarm, LED light alarm |
| Flaw detection standard | Built-in common flaw detection standards in various industries, direct call, convenient and fast |
| Weld diagram | The weld shape parameters can be set, and the weld pattern and the position of the defect in the weld can be visually displayed during the flaw detection |
| Automatic calibration | Probe zero and probe angle (K value) Automatic calibration function; Speed of sound automatic measurement function |
| Memory | Real-time retrieval of the highest defect wave and recording of the defect value echo |
| positioning | Real-time display of defect level, depth (vertical), sound path position |
| defect quantification | Real-time display of defect equivalent dB values |
| defect characterization | Through the echo envelope waveform, it is convenient for manual experience to judge |
| surface correction | For flaw detection of curved workpieces, the circumferential position of defects can be displayed in real time |
| DAC/AVG | Linear dispersion is automatically generated with unlimited sampling points, and can be compensated and corrected. Linear dispersion automatically floats with gain, automatically expands with sound path, and automatically moves with delay. AVG Linear dispersion can display any aperture |
| AWS D1.1 | American Welding Society standard provides a dynamic reflection "defect rating" for various AWS weld inspection applications. Avoids manual calculations and improves inspection efficiency |
| Crazing bathymetry | Automatic measurement and calculation of crazing depth using diffraction waves |
| Door widening | Amplify echo details for easy echo analysis |
| continuous recording | Record waveforms in real time, store and playback waveforms |
| waveform freezing | Freeze the waveform displayed on the screen for easy defect analysis |
| echo coding | Display 1 to 6 echo display areas in different Colors for easy determination of defect location |
| B-scan | (Ordinary B-scan) Real-time scanning and cross-sectional display make detection results more intuitive |
| Environmental temperature | (-10~50)℃ |
| Relative Humidity | (20~95)%RH |
| Power Supply | Direct current (DC) 9V; lithium battery works continuously for more than 10 hours |
| Power saving method | Low power design |
| Working time | More than 10 hours |
| Protection level | IP64 |
| Communication interface | USB2.0 high-speed communication transmission interface |
| PC software | Yes. |
| working language | Chinese |
| exterior size | 280×220×70(mm) |
| Machine Weight | 5.5KG |
mitech MUT600C Digital Ultrasonic Flaw Detector Packing list
[Note] Because the manufacturer's packaging may be updated or upgraded, the detailed packaging list shall be subject to the latest standard configuration of the manufacturer.


 MUT600C


